Air Flow Pathways in a Leaky Bathroom Wall
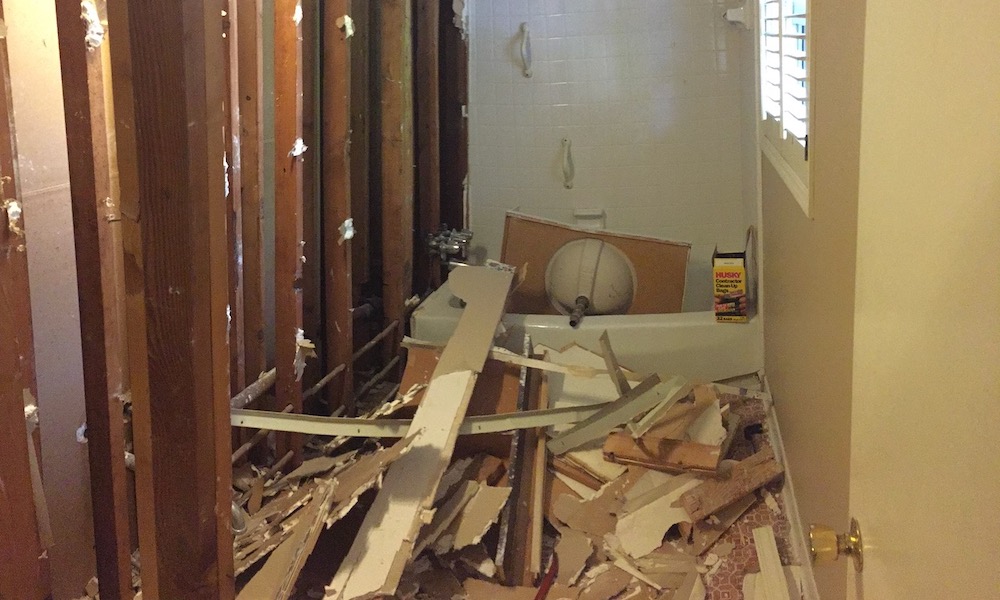
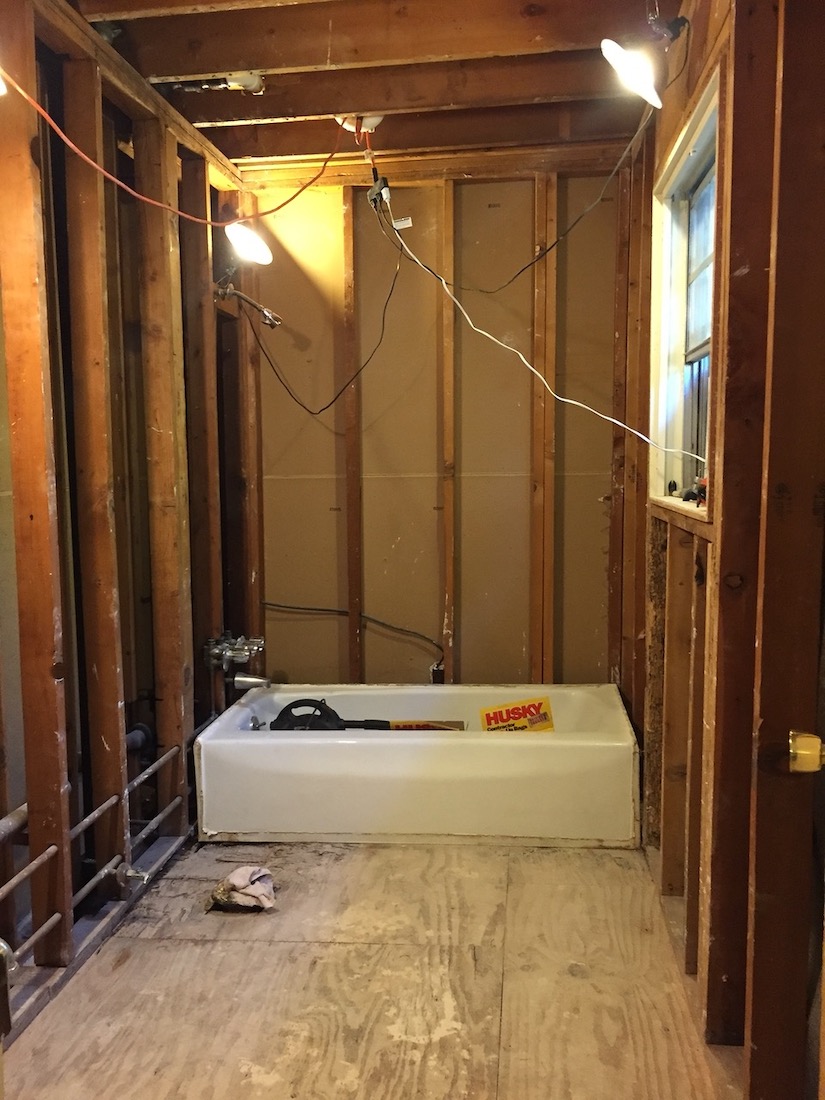
Last week I spent a lot of hours in my bathroom. I was sick. Really. I was sick and tired of having an outdated bathroom that was beginning to fall apart. So when my wife hit the road last Monday to drive across the country, I got out my wrecking bar. The photo above shows what it looked like last Tuesday afternoon. As I tore into the bathroom, one of the things that really stood out was the air flow pathways I discovered in the exterior wall.
I opened up the plumbing wall first. Lots of fun stuff, there. But the real fun came when I opened up the exterior wall. The four termite-damaged studs were part of that fun, but something else was even better.
Yogi Berra once said, “You can observe a lot by just watching.” So when I got into the exterior wall, I watched. I live in the Atlanta area in a condo built in 1970. Air leakage hadn’t been discovered yet back then (yeah, right), but that doesn’t mean it wasn’t happening. Check out this fiberglass batt from the exterior wall.
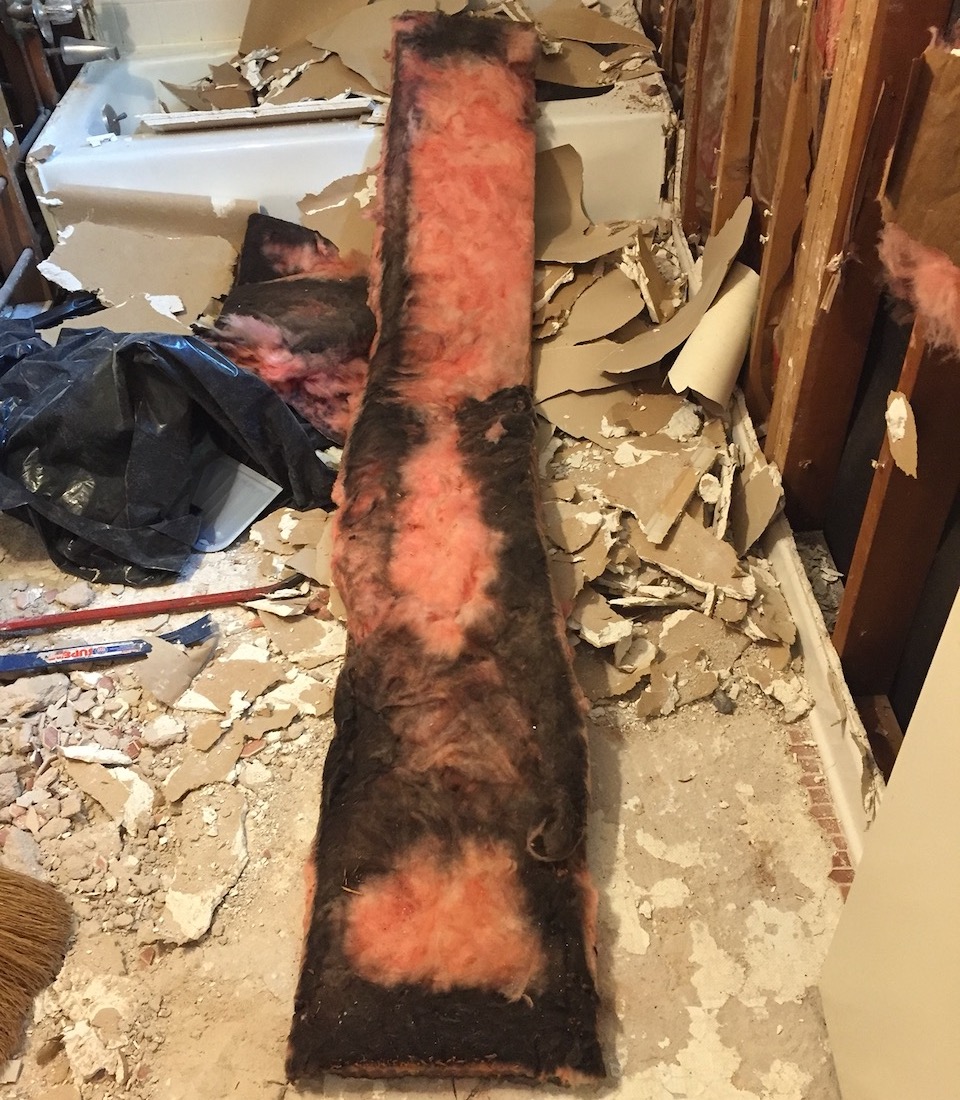
Do you see what I see? The black parts are where the fiberglass captured dirt. The dirt was traveling in air that was moving in the wall. Fiberglass is a great indicator of air leakage, and most of the fiberglass manufacturers make it easy for us to see the dirt. They make their product in light colors: pink, yellow, white. (There’s one that now makes brown fiberglass, which isn’t helpful for spotting air leakage but it’s still a great product.)
Now, let’s focus in on where the dirt appeared in this batt. Let’s observe. See that part in the red box?
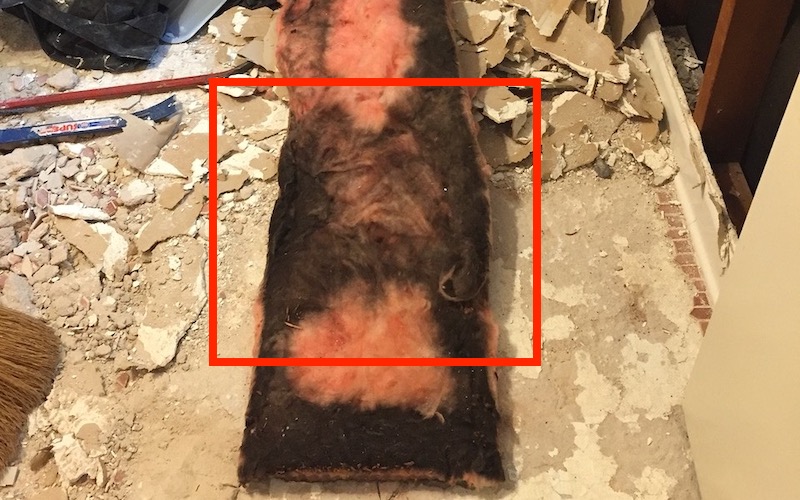
That indicates air was moving laterally across the stud cavity in the wall.
What?!
Yes, it’s true. When I first looked at the batt, that pattern didn’t stand out. I saw it only later when I looked at the exterior wall sheathing and saw the pattern repeated there. See the band of dust near the bottom of the cavity. That’s where the fiberglass batt picked up that band of dirt in the red box above.
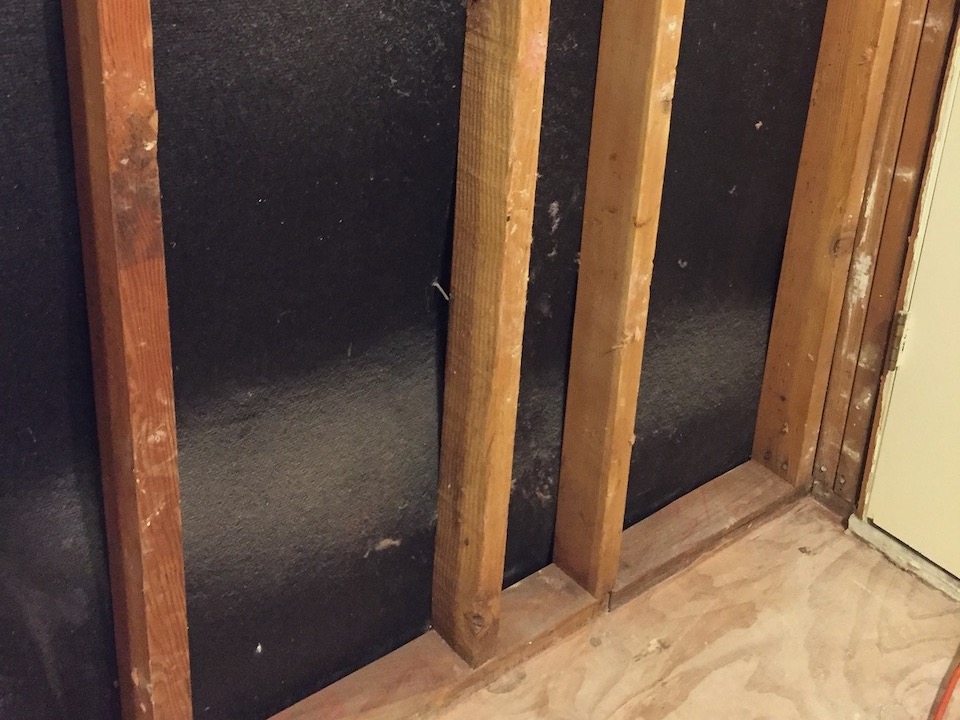
But how is air moving laterally across the stud cavities? Well, we know that air needs two things to move: a pressure difference and a pathway. It also likes to take pathways with lower resistance. So that band of dust on the sheathing is a pathway of lower resistance. You can see the pathway better in the photo below.

The sheathing that I discovered in the wall is asphalt-impregnated fiberboard, commonly referred to as Celotex, one of its primary manufacturers. It’s not as stiff as plywood or OSB, and you can see above that it’s not lying flat against the studs. Those gaps create pathways.
OK, that explains air moving inside the cavity, but is it connected with air outside the building enclosure? Some people think just the presence of fiberglass is the problem. They’re wrong. Here’s your answer:

I’m not sure if that was a nail that missed or if it pulled out sometime over the past 46 years. Doesn’t matter really. It’s a hole in our building enclosure. And there are more holes everywhere two pieces of the fiberboard meet and at the top and bottom of the wall. That adds up to a lot of leakage area.
Also, the fact that I can see the brick veneer on the outside of the building means there’s no drainage plane. No felt. No house wrap. No nothing between the fiberboard and brick. Fortunately, I haven’t found widespread moisture damage resulting from this.
How do you fix this? You’ve got several options. You could ignore the obvious air flow pathways and put it back together the way you found it. You could spray-foam the whole thing. You could seal the gaps and install fiberglass batts again. I’ll show you my solution in a week or so, once it’s done. (Followup article here.) Feel free to share your ideas in the comments below.
By the way, demolishing a bathroom by yourself is a heck of a lot of work. I hauled out 47 bags of debris and a few larger items. The good news is that by the time my wife returned home yesterday morning and discovered what I’d done, it looked like this:
What have you observed when you open up walls?
Allison A. Bailes III, PhD is a speaker, writer, building science consultant, and the founder of Energy Vanguard in Decatur, Georgia. He has a doctorate in physics and is the author of a bestselling book on building science. He also writes the Energy Vanguard Blog. For more updates, you can subscribe to the Energy Vanguard newsletter and follow him on LinkedIn.
Other articles in this series
7 Reasons to Gut Your Bathroom When You Remodel
How to Fix a Leaky, Underinsulated Exterior Wall
Installing an Exhaust Fan During a Bathroom Remodel
Related Articles
Are You Confusing Insulation with Air Barriers?
Air Barriers, Vapor Barriers, and Drainage Planes Do Different Jobs
Remodeling? Here Are 7 Reasons Not to Skip the Air-Sealing!
NOTE: Comments are moderated. Your comment will not appear below until approved.
This Post Has 30 Comments
Comments are closed.

I’m just as fascinated about
I’m just as fascinated about the building science as I am about the “wife science”!!! I assume she knew you would be doing this?
I also look forward to the conversation. Whenever you leave open air inside a stud cavity you can have issues, and this helps to reinforce how you just don’t have to get the installation of insulation CORRECT, you have to get the framing and the sheathing and housewrap application correct as well – something that framers often take for granted but we see issues all the time. IT’S COMPLICATED to build a stick framed wall and insulate and seal it up well!
No, she had no idea I’d be
No, she had no idea I’d be ripping the bathroom to shreds while she was gone. She was really excited to see it yesterday morning, though. She’s been after me for a while to do something about it, despite my telling her, “If a man says he’s going to do something, you don’t have to keep bringing it up month after month after month.” ;~)
I believe the quote is,
I believe the quote is, “Ladies, if a man says he is going to fix it, he will. There is no need to remind him every six months about it.”
I have it hanging on my kitchen wall! LOL!
Thanks, Rachel! I knew it was
Thanks, Rachel! I knew it was something like that.
We see this all the time in
We see this all the time in kitchen and bath remodels. We put back Roxul insulation but not sure we did anything to solve the problem. We do insist upon new exhaust fans with all the bells and whistles with built in timers, humidity sensors and we make sure the exhaust is properly vented.
Why not if you already havn’t done so is to present this problem to the insulation manufactures and see if the can improve upon the seal at the top of the foundation for the wrap.
What you have found tends to
What you have found tends to support a position I have held for quite some time. It relates to Energy Star requiring that exterior wall electrical switch and outlet boxes be sealed at the inside wall face. You know the foam around the wires and the foam squares that go behind faceplates. To that always meant we had given up on keeping air movement out of the walls.
One common problem area that I have not found a solution to is how to seal the joint between the stick framed wall and the top of the foundation. There are foam strips that can be used between the mud sill and the masonry but they only help with lateral air flow into the crawl space. I am referring to the vertical airflow between the housewrap and the OSB or plywood sheathing. The housewrap is there to shed moisture but has nothing sealing it along the bottom. I once had my hair blown by air leakage through a pocket door wall that “T’d” into the exterior wall during high winds. That wall was clearly pressurized and the only way I found to stop it was to apply urethane caulk along the horizontal masonry to siding joint. Extremely crude but it worked.
I can only envision some form of flashing that is installed between the mud sill and the foundation that extends outward several inches. This could be turned upward after the walls are stood and sheathed. The housewrap could then be taped to it, sealing that bottom edge. Not sure how practical this would be in a real life building scenario. Thoughts?
ps This is why I only build with precast insulated concrete panels. I have no joints so absolutely no air leakage issues.
“One common problem area that
“One common problem area that I have not found a solution to is how to seal the joint between the stick framed wall and the top of the foundation”
Possible Solution: Exterior rigid foam or some from of SIS (ie. ZIP-R).
Thomas, there are a lot of
Thomas, there are a lot of good air sealing tapes for that joint between foundation and framing. You can get them from Siga, Pro Clima, Cosella-Dorkin, and others.
Forgot to reply to your
Forgot to reply to your mention of electrical junction box gaskets. They do almost nothing because, as you say, they don’t address the problem at the source. Here’s what we found when looking at air leakage through a gasketed switch during a blower door test:
I Blew a Gasket — Air Leakage at Electrical Switches and Outlets
http://www.energyvanguard.com/blog-building-science-HERS-BPI/bid/57593/I-Blew-a-Gasket-Air-Leakage-at-Electrical-Switches-and-Outlets
I run a heavy bead of
I run a heavy bead of construction adhesive at the plate to rim joist line and before nailing on the bottom course of sheathing (or standing up wall). Takes care of lateral and vertical infiltration quickly and cheaply.
No joints or leakage with precast panels? You sure?
Filter-Glass Strikes Again
Filter-Glass Strikes Again (just realized I should do a educational comic series with that title) but seriously there are decades of scientific data buried in walls everywhere. I dislike fiberglass batts as much as the next home performance guy but I owe a great deal of my understanding of the way air moves in structures to these things.
Actually, Andy, the
Actually, Andy, the fiberglass isn’t responsible for the air leakage. It was never meant to be an air barrier, but it works fine when installed properly in an airtight assembly. See my article on this topic:
Are You Confusing Insulation with Air Barriers?
http://energyvanguard.com/blog-building-science-hers-bpi/are-you-confusing-insulation-with-air-barriers
But you’re absolutely right
But you’re absolutely right about its usefulness in understanding air flow patterns in leaky assemblies.
Thanks for flushing us with
Thanks for flushing us with exposure and knowledge, “filter”glass also teaches us a lot about air movement. We don’t get what we expect, we get what we inspect. Thanks for sharing and caring!
Happy to oblige, Dennis. Yes,
Happy to oblige, Dennis. Yes, fiberglass teaches us about air movement, but it’s the air movement isn’t the fault of that insulation. It’s air permeable and must be installed in airtight assemblies.
Are You Confusing Insulation with Air Barriers?
http://energyvanguard.com/blog-building-science-hers-bpi/are-you-confusing-insulation-with-air-barriers
I understand how to keep
I understand how to keep energy efficiency in style, I have doing this for awhile. I know the difference between a sweater and a wind breaker, they go better together.
Indeed!
Indeed!
Homasote is a similar product
Homasote is a similar product to Celotex and was marketed as insulation, sound-proofing, drop ceiling panels, etc. It appears yours has absorbed moisture and expanded causing it to bow out from the framing. The question is, is the Celotex only bowed out in the bathroom area, or is it like that in other parts of your home? If just in the bathroom area, it suggests the excess moisture that caused it to bow came from the bathroom by migrating through the wall.
I’m surprised that we don’t see more moisture damage. Apparently all that air intrusion into the wall cavities meant no moisture could be trapped.
You don’t mention whether the exterior wall is weight-bearing or not. If not, I’d take out the framing as well and build a complete exterior wall assembly to insert in it’s place. Not practical, but it would allow you to rebuild using the latest materials and techniques. Otherwise, a flash and batt method would work well, until the Celotex moved.
Will the interior walls receive sound insulation in the cavities? Will you put poly on the interior walls under the drywall? I look forward to seeing how you fix the exterior sheathing under the brick exterior.
Yes, I suspect that it’s
Yes, I suspect that it’s moved over the 46 years that it’s been in the walls of our condo. Moisture absorption is a likely cause. I imagine the fiberboard looks much the same in the rest of the walls. Now I just gotta wait till my wife goes out of town again so I can find out. ;~)
I’m planning to seal and insulate the exterior wall with foam board, spray foam, and fiberglass. I have no intention of rebuilding the whole thing because, yes, it IS a load-bearing wall. Plus, that’s maybe a tenth of our total exterior wall area.
Yes, I’m going to be soundproofing the interior walls and ceiling (neighbors above). We don’t use poly in walls here. In fact, it’s not really a good solution anywhere, especially if the building will be air conditioned in the summer.
When I retrofitted some of
When I retrofitted some of the rooms in my house, I used rigid foam board with 2-part foam around the perimeter to air-seal it in place, then batts on top. A bit laborious, but my wife gets me cheap. The winter IR pics look great.
I was thinking of poly only on the interior walls to keep moisture from the bathroom from migrating into the walls. Not typically done, more a thought exercise.
That’s exactly the method I’m
That’s exactly the method I’m planning to use, Dale. Foamboard sealed into the back of the cavities and fiberglass batts (Grade 1, of course, except for the 1/2″ of compression from the foamboard) in front.
Another good thing about gutting the bathroom is that I’m going to install an exhaust fan. That should take care of the internally-generated moisture.
Hmmm. Maybe use Molly’s to
Hmmm. Maybe use Molly’s to push the homasote back against the studs and keep the airgap between sheathing and veneer open, then 2″ closed cell foam?
That would probably work, Ted
That would probably work, Ted, but the first part sounds like it’d be pretty difficult.
Re: two queries raised in
Re: two queries raised in your post:
1) How to remedy air leakage in exterior wall: I’m thinking 3/4″ foam board cut to fit entire width and height of stud cavity and pressed tight against the Celotex. Instead of sealing edges of the foam board and stud interface with spray foam, use foil tape (the good thick mil type) and then paint a coat of duct mastic over the tape. I’ve done this for sealing thermal bypasses in my attic and works well. A little labor intensive but my thought process is once you put up drywall you want both foam board and air sealing method to stay put. If spray foam shrinks over time it might open up air pathways again.
2) What have I found when opening up walls? When I was doing apartment unit turnover/make-ready work I once had to pretty much gut a bathroom like in your photos above due to rotting between the commode and tub. When I removed commode and tub from bathroom and peeled away flooring and etc. I had to wonder how the commode didn’t end up in the crawl space below with a user sitting on it. The rot I found was that bad. Was a nice feeling to fix all that and leave the bathroom far better than I found it.
Cameron, that’s pretty much
Cameron, that’s pretty much my plan, except that I’m going to use spray foam to seal the foam board in place. I’ll spray the edges of the cavity before setting the foam board in there and then set the board into the spray foam before it cures. Then I’ll spray more around the edges on the front side of the foam board. Also, I’m planning to use 1/2″ board instead of 3/4″.
Yeah, our subfloor is rotted out between the tub and toilet, too. Once I get the tub out, I’ve got to replace the two layers of rotten plywood. The toilet and tub were still adequately supported, but if I put all my weight on the rotten plywood, I’d probably go through.
Spray foam by itself is a
Spray foam by itself is a very limited fix. It will stop the air but not the water on the outside. Worse, as the foam expands it could further extend the Celotex into the brick cavity. (The backs of the bricks appear in the photograph of the gap where the nail missed.) While a much better detail would have included an air water barrier outside the sheathing, a taped asphaltic board will work behind a well constructed brick veneer.
If the sheathing is touching the back of the brick and the brick gets any direct exposure to wind driven rain or heavy roof runoff, then it is only a matter of time before the sheathing, the stud and in the inside of the wall will be wet too.
Short of replacing the brick wall, or removing a few bricks sufficient to reattach the sheathing properly, you might consider stuffing the cavity with Mortar Net or similar to assure that the sheathing doesn’t touch the brick, and try to seal the ends of the board to the stud with foil tape and then sealant compatible with the insulation materials.
You might also consider two temporary holes through the Celotex board to allow for some temporary pressure from the inside to pull the board back onto the stud with a heavy wire or hook. After the stud sealant is cured, the wires can be removed or cut and the small holes filled with a bead of sealant.
This is a fussy detail to have to build from the inside, but I can’t wait to see the final resolution. Good Luck.
How much time, money and
How much time, money and patience do you have? How long are you going to live there? Do you care about it very long-term? We know the Celotex has degraded and pulled away, likely due to moisture. We don’t know if the moisture comes from inside, outside or both (evidence of moisture back there? any patterns?). So far it sounds mostly able to dry, likely mostly to the inside. Once you add foam board (what kind? Poly-iso? Polystyrene?) it will reduce the assembly’s ability to dry to the inside, no? We could be making a moisture situation back there worse that it’s been (I would want to think that all the way through, I would open up a non-bathroom wall to test hypothesis, but that’s why I have about 10 un-finished projects around my 1960’s house and drywall patches galore, bits and pieces of well-sealed/insulated space next to leaky crap, like building Johnny Cash’s car one piece at a time – though a couple of rooms are …complete and really good…).
How much space between the studs and brick? I want a good drainage plane there, not impeded or interfacing with nasty old permeable Celotex. My first line of thought in brainstorming with my partner would be: 1. remove the Celotex (just that simple, right?) 2. Fish some kind of drainage mat material back there against the brick (Vaproshield Wrapshield RS? I’d love an integrated WRB…Trouble is, no way to mechanically fasten it, still, better than the Celotex). I want a thermal break outside the studs too! (Since we’re in there anyway). My next thought was 3. Maybe in 1’ or 18” horizontal strips, you could fish ½” foam board back there. But there are the Celotex nails – pull them? Flat bar and knuckle buster, boring and takes forever, may not be possible in some places so never mind that thought. So there will now be a gap between the drainage mat and the studs, let’s fill that with some closed cell gun foam. If it expands a little beyond the left and right face of the studs that’s OK. The trick will be to get the gun foam installed without compressing or getting into the drainage mat, but that just takes some finesse, a few light passes. 4. Now install rigid foam board (thickness depending on the remaining gap and desired final R-Value) to align with the plane of the foam-in-back of the studs, careful not to compress the drainage mat. Cut it short on all sides, maybe ½” or so to leave a 1 part foam gap, then 5. foam those joints. 6. Trim foam as required to install grade 1 fiberglass. Or use thicker, (R-13 min) foam board and call it a day. 7. Blower door test it before fiberglass to make sure you’ve got the assembly all airtight. What to do around the top, bottom and sides? Need to give that all some more thought and aside from the obvious (really picky and time consuming) I may be missing some scientific detail, what could go wrong over time?
This is all just a starting point. And there’s the window detail…
At this point, my partner would say (well, first he would say, “crazy person! you want to do WHAT?” is it really worth all that?) then “that won’t work because…” and we would go back and forth until we agreed on something scientifically/structurally sound and humanly possible. Then I would estimate the time and material it will take to install such a beast, add appropriate markups and present to my client who would fall on the floor, get back up and say…but I thought air-sealing and insulating was a cheap and easy way to save energy? What’s the ROI for that? And I would say “LOL” then “well…moisture…” then I would offer option B which is like you said, rigid foam board and spray foam to seal the cavities, pressure test it then grade 1 fiberglass. And try to never think about that Celotex again…or the backside of the brick…or the backside of the studs…all slimy…but at least I would have that analyzed and priced detail in my library for the next one similar, and my client would have made an educated decision.
Makes me want to gut my bathroom – I’ll bet mine is worse than yours! Thanks for sharing and explaining it all!
Excellent article about air
Excellent article about air movement.
However, it also illustrates the dangers of having “do it yourselfers” remodel their own homes. I assume you pulled a permit for this job. You could have covered the tub during demo to protect it from damage since it looks like you might still use it. Forty-something years old? That means it was built before 1978. Did you follow the EPA lead paint protocol during demo?
The real question is….. Why didn’t you recruit some help and have the entire job done by the time the wife returned? C’mon, they do it all the time on cable TV. They always do the demo, pick selections, rebuild, and complete the job all in 30 or 60 minutes.
When I renovated the main
When I renovated the main floor of my 1926 bungalow last year I found a dessicated possum! The wall sheathing stopped at 7 feet but my walls are nine feet so there was access into that cavity through the soffits. I used a combination of 1-part foam and foam board to seal up my wall cavities before installing unfaced fiberglass batts. Made a HUGE difference.
I’m doing something similar
I’m doing something similar with foam board and spray foam in the exterior wall and band joist, Howard.