Going Beyond 2×4 Walls in a Warm Climate
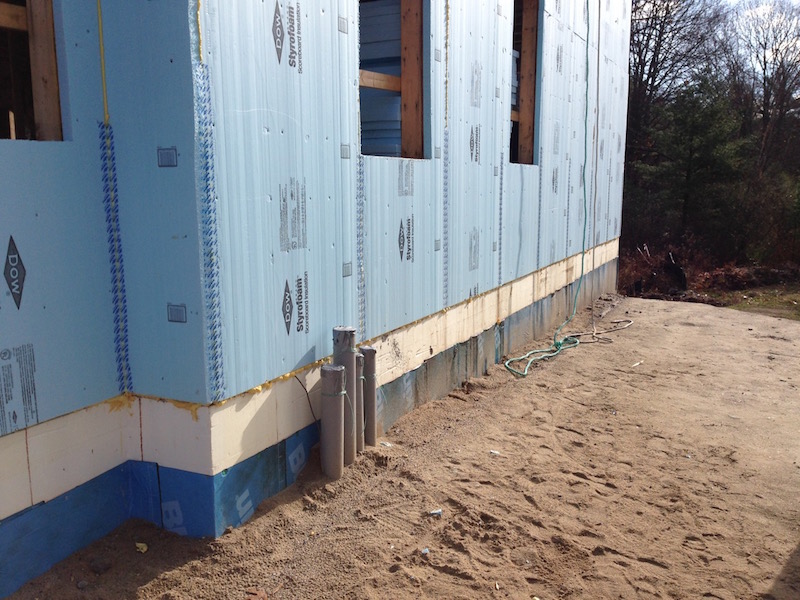
If you live in the world of 2×4 walls, as I do, you may have wondered about the savings you’d get by going to a more robust wall assembly. The typical house in southern climes has 2×4 walls with R-13 insulation in the cavities. Two ways to beef that up would be to add continuous exterior insulation or to go to a thicker wall. But which saves more energy? And how do they compare to the plain old 2×4 wall?
This question comes up fairly often in our HVAC design work. Clients want to know not only about how much energy they’ll save but also if they’ll be able to downsize the HVAC system. The former saves on operating cost, the latter on first cost. Let’s take a look.
Total R-value
A wall assembly is a combination of materials that allows heat to flow in both series and parallel. For this article, I’m going to show you the results I got for four different wall assemblies. First, I’ve set up a spreadsheet that calculates the total R-value of an assembly and then used that tool to calculate the R-values for these four walls. Here’s a summary of them (assuming grade 1 installation):
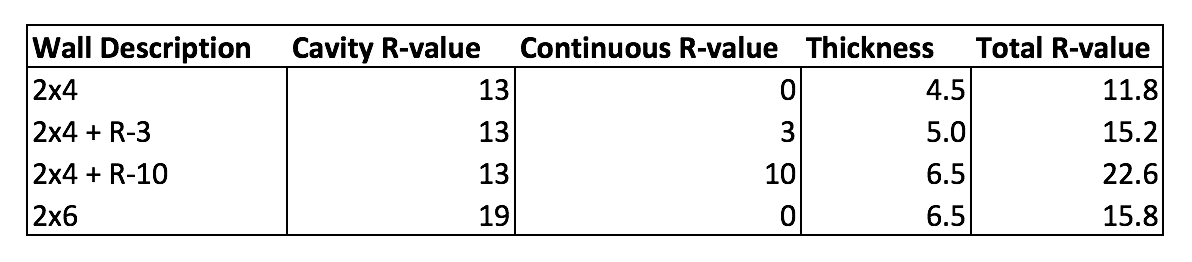
The first one is your standard 2×4 wall with plywood or OSB sheathing. It’s also based on wood studs, not steel. The second one is the base wall plus half-inch, R-3 continuous exterior insulation. The third one is the base wall plus two-inch, R-10 continuous exterior insulation. The last one is a 2×6 wall with R-19 cavity insulation and no continuous exterior insulation.
The best R-value is the one with two inches of exterior insulation. The 2×6 wall is roughly equivalent to a 2×4 wall with a half-inch of exterior insulation.
HVAC design loads
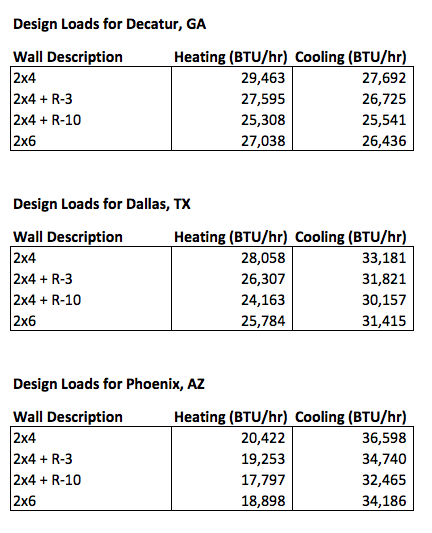
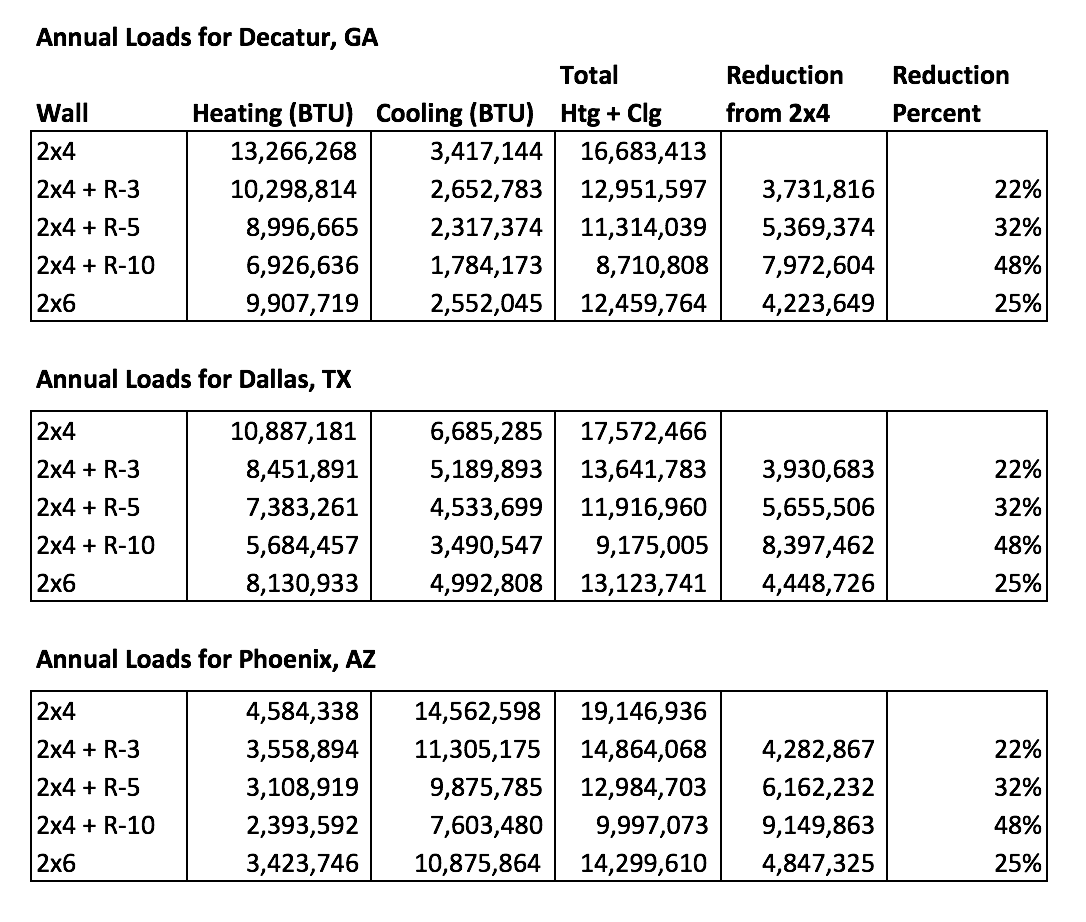
To see what effect these different R-values have on the size of the heating and cooling systems in a home, we have to put in actual numbers for a house. I chose one that we worked on recently. It’s a typical house: two stories, 2,800 square feet of conditioned floor area, and about 2,400 square feet of wall area. I’ve got the file set up in RightSuite so I looked at the heating and cooling loads for the different walls shown in the table above.
But I also looked at the results for three different locations in 2×4 world: Decatur, Georgia (in the Atlanta area and where the house really is located), Dallas, Texas (a hotter climate), and Phoenix, Arizona (a climate so hot I don’t know why people live there but hey, that’s their choice). Here’s what I got:
The design temperatures for the three locations were:
Decatur: 25° F & 91° F
Dallas: 28° F & 99° F
Phoenix: 42° F & 108° F
The results here show that the most reduction we can get in the design loads is about 4,000 BTU/hr. That’s about a third of a ton of cooling capacity. In other words, you’re not going to find much reduction in your equipment costs by adding exterior insulation or going from 2×4 to 2×6 walls. Dropping three to four thousand BTU/hr may allow you to move down one size in your equipment. Maybe.
Energy savings
Well, if you’re not going to save much on the first cost of your heating and air conditioning equipment, what about the energy you’ll save each year by reducing the heat transfer across your walls? It’s not hard to calculate how much heat flows across a wall over the course of a year. The formula for annual heating load is:
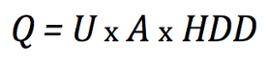
The HDD is heating degree days. It’s the same form for annual cooling load but you use CDD. (Check out my primer on degree days for more info.) But that equation as written results in mixed units because U has the unit of hour within and HDD is, of course, in days. So to get the answer in BTUs, we have to multiply by a factor of 24 to convert between hours and days. (The first version of the table below was incorrect because I had forgotten that little factor of 24, which made all my numbers too low.)
For the three locations I’m looking at, the number of degree days are:
Decatur: 2,671 HDD & 688 CDD
Dallas: 2,192 HDD & 1,346 CDD
Phoenix: 923 HDD & 2,932 CDD
Using those numbers with the U-values calculated from the R-values in the first table above (U = 1/R) and 2,442 square feet of wall area, here’s what I found:
Note that I added another assembly here. In addition to the four above, I included the 2×4 wall with one inch of continuous exterior insulation with an R-value of 5. I figured someone was going to ask about it in the comments.
The good news in these results is that adding more insulation to the walls saves millions of BTUs. The bad news is that the BTU is a pretty small unit of heat. If I had shown how many kilowatt-hours those BTU savings add up to, the highest number would be only about 2,700. That means you’re not going to save a lot of money on your energy bills by going beyond the standard R-13 wall in warmer climates.
But if we look at the percent reduction in heat transfer through the walls, it’s significant. The 2×4 wall with R-3 exterior insulation and the 2×6 wall both reduce the heat flow through walls by about a quarter (22% and 25% respectively). Going to the 2×4 wall with R-5 exterior insulation reduces your wall heat transfer by about a third. Going to two inches of exterior insulation on a 2×4 wall cuts your annual heat transfer through the walls in half.
Is it worth it?
The 2×4 wall with two inches of exterior insulation gets you the best results among the five assemblies I included here. You could, of course, add even more exterior insulation and reduce the heat transfer even more. Or you could go to a fatter wall without exterior insulation, such as a Joe Lstiburek’s ideal double-stud wall. Keep in mind, though, that each inch of thickness you add to the standard 2×4 wall increases your cost, and each successive inch buys you less and less reduction in your wall heat transfer.
With energy costs what they are now, none of the improved walls shown above in the three locations I chose will save you much money and may not even be cost-effective. But energy costs now in much the US are really low. Will they stay this low as long as you’re in the house? Who knows!
If you’re in a warm climate and want to go beyond a standard 2×4 wall, you can do this analysis for your area and with your local energy costs to see if it’s cost-effective for you. Of the four improved walls above, the one that’s going to be the lowest cost is probably the 2×6 wall. It’s also the safest to build if you’ve got a framing crew that hasn’t done exterior insulation before. I don’t mean that your house could fall down if you build it with exterior insulation. I’m saying crews that have never done window bucks or attached siding over exterior insulation may have trouble with the details. But they can frame 2×6 walls.
There’s a learning curve with exterior insulation. If you have a crew that can deal with 2″ continuous exterior insulation, though, you can cut the heat transfer through your walls in half and still end up with walls the same thickness as 2×6 walls.
Other reasons to go beyond the 2×4 wall
For some people, the cost-effectiveness based on current energy costs determines whether an improved wall makes the cut. Or maybe it’s just how many dollars it adds to the bottom line. But let me suggest some other reasons to consider an improved wall over a standard 2×4 wall.
First, there’s comfort. Whether you go with a 2×6 wall or a 2×4 wall with exterior insulation, that extra insulation means that the inside surfaces of your exterior walls won’t be as cold in winter or as warm in summer. Now, you may think that doesn’t matter a whole lot as long as your heating system or air conditioner is up to the task, but you’d be wrong.
As it turns out, air temperature is only one factor that affects our comfort. Another really important one is called mean radiant temperature. Anyone who’s ever walked around naked in poorly insulated house on a cold day has a visceral understanding of mean radiant temperature. Even if the air temperature is warm, cold walls (or windows) can suck the heat right out of you and leave you chilled. (My friend Robert Bean is the most persistent advocate for comfort I know. If you want to do a deep-dive into this topic, check out the pages on mean radiant temperature on his website, Healthy Heating.)
Second, there’s carbon. Every BTU of carbon-intensive energy we save helps keep our atmospheric carbon dioxide from increasing further. Most places are using at least some dirty electricity because of the way electricity is shipped around the country among utilities. Reducing the amount of heating and cooling we need in buildings is one of the best ways to help reduce carbon emissions.
This article is targeted toward warm climates, so moisture accumulation in cold sheathing isn’t that big a deal. The colder your winters are, though, the more important it is to keep your exterior sheathing dry. Exterior insulation over the sheathing is great for that. One of the weaknesses of double-stud walls is that the sheathing stays colder and thus wetter, possibly even wet enough in cold climates to cause damage. (See my article on Building Science Corporation’s research on a house with double-stud walls.)
Where you may find more savings
If I were building a house for myself here in the mild climate of Georgia and were choosing from the wall assemblies above, I’d go with the 2×4 wall with 2″ of continuous exterior insulation. I like the idea of cutting my wall heat transfer in half. But I’d also make sure I wasn’t do stupid things to negate the savings from the walls.
Here are the top three areas where the most stupid things happen:
- Windows – A good window is still a poor wall. A window that meets code here in Georgia has an R-value of about 3. That’s a heck of a lot less than the R-23 wall I just said I’d build, so I’d do two things. I’d install windows a good bit better than R-3. And more important, I’d make sure I didn’t have silly solar gain problems. Windows can kill you on your cooling loads, so you’ve got to pay attention to placement, overhangs, and sizes.
- Ducts – First of all, I’d have no ducts in the attic. Then I’d have no ducts in any other unconditioned spaces. Then I might even have no ducts at all, at least for heating and cooling. And whatever ducts I do have would be designed properly, installed well, and commissioned completely.
- Foundation – A lot of comfort and moisture problems originate with the foundation, whether it’s slab-on-grade, crawl space, or basement. The details matter. Even in a hot climate like central Texas, slab-edge insulation can save you a lot on heating. We’ve got a client there building a Mediterranean style house with a lot of exposed slab perimeter. Slab-edge insulation would reduce their heating load by 25%. (And believe it or not, their heating load is higher than their cooling load.)
Whether or not you go for an improved wall assembly in a warm climate depends on your particular priorities. It’s not the slam dunk it is in a cold climate, but there are benefits.
Allison A. Bailes III, PhD is a speaker, writer, building science consultant, and the founder of Energy Vanguard in Decatur, Georgia. He has a doctorate in physics and writes the Energy Vanguard Blog. He also has a book on building science coming out in the summer of 2022. You can follow him on Twitter at @EnergyVanguard.
Related Articles
The Diminishing Returns of Adding More Insulation
The Layers and Pathways of Heat Flow in Buildings
The Fundamentals of Heating and Cooling Degree Days, Part 1
NOTE: Comments are closed.
This Post Has 58 Comments
Comments are closed.
Your Total (whole wall)
Your Total (whole wall) assemblies don’t make sense to me. If the 2×4 total R-value is 11.8, and you add R-3 of continuous insulation, the total R-value should be 11.8 + 3 = 14.8. You show 15.2, a difference of 3.4. Then for the 2″ continuous insulation of R-10 you show 22.6. A difference of 10.8.
1. Why is the 1/2″ R-value = R-3, or R-6 per inch and the 2″ R-value = R-10, or R-5 per inch. Why is different insulation used?
2. Why is the continuous R-value not added directly? 11.8 + 3 = 14.8 Total R-value
3. If you are adding a “skin effect”, why is it not identical in each wall?
Great question, Bill. I wrote
Great question, Bill. I wrote about how to do this calculation in an article titled The Layers and Pathways of Heat Flow in Buildings back in 2015. The way this calculation is always done is to look first for the different parallel pathways, adding up the layers in each. Then you do a weighted average of the parallel pathways. Click the link for the article to see the details.
Any comment about how
Any comment about how termites like to live in slab insulation? I know DOE had awarded a grant on doing some research into termite resistant slab insulation but I confess I lost track of what the results of it. This was one of the first things I learned when I first started working in building science at energy extension – termites didn’t eat insulation but sure loved to live in it.
Well, I did mention slab-edge
Well, I did mention slab-edge insulation at the end of the article, Arlene, but I didn’t want to go too far down that termite hole. Definitely a topic I need to cover in a future article.
It is an important rabbit
It is an important rabbit hole. Energy doesn’t exist in a vacuum. One always has to be mindful of unintended consequences. Now, not every warm climate is a bastion for termites, but there is a large area where you can’t get away from them.
So maybe not a rabbit hole, but a termite tunnel?
Yes, it is definitely
Yes, it is definitely important. And we need to find a way to do it right, not just because of the energy consumption but uninsulated slab edges also can be a huge comfort problem.
And yeah, that’s why I called it a termite hole.
I am building in Blairsville
I am building in Blairsville GA at 2300 ft on mountain ridge facing ENE over Lake Notterly. Would love your advice. Using 2X6 framing with 2″ closed cell, 1″ exterior Zip-R and Rockwoll. Builder says way overbuilt. Also, I insulated slab which he never does!
@Richard: I concur with the
@Richard: I concur with the builder. The Zip-R minimizes thermal bridging, which is a big deal. But the main benefit of cavity foam is air sealing (plus a small bump in R-value in the case of ccSPF). You can seal the cavities MUCH cheaper (and equally effective) by ‘picture framing’ all the sheathing-stud intersections with caulk or closed cell foam (via Hilti type applicator). You’d get a lot more benefit by upgrading your sheathing to 1.5″ Zip (R-6.6).
As for cavity insulation… unless you have another reason to use Rockwool, I think you’d get more bang for the buck with blown-in insulation (Spider, BIBS or cellulose).
BTW, if attic is vented, be sure to seal all the top plates, especially along the seam between top plates and ceiling drywall, as well as seal the ceiling fixture back-boxes. Ceiling light cans (even those rated AT) need to be sealed. This is typically with site-constructed boxes made of EPS or with specialty covers (https://tinyurl.com/yxcqogvs).
Many of my peers will disagree, but in my opinion, full sub-slab insulation is a waste of money in your climate (exception: radiant floors), since most of the action is at the perimeter. In all but the coldest climates, for at-grade floating slabs I typically specify 2 to 4 feet horizontal along the perimeter edge and 2 inches vertical on the inside edge (between notched stem wall and slab). Exposed insulation tops may or may not be an issue depending on your floor coverings. If so, the top of the edge insulation can be beveled to make this work. If the slab is monolithic (turn-down), only the outside face needs to be insulated. If part or all of the slab is below grade (i.e., basement), then omit the horizontal insulation.
In your climate, slabs with good ground contact provide a passive cooling benefit. Any heat lost to the soil during heating seasons creates a thermal zone that, over time, gradually reduces the already small floor loads. With an effective perimeter insulation wrap, the only loss is the residual heat that remains at the end of the heating season.
Hi Arlene, as I’m sure you
Hi Arlene, as I’m sure you know, when it comes to slab-on-grade construction, edge insulation has far more impact than fully insulating beneath the slab. (As an aside, in cooling dominated climates, full ground contact beneath the slab provides passive cooling benefits.)
Many of the projects I work on are in areas at high termite risk, but I always specify edge insulation for slab-on-grade homes. There are several ways to accomplish this without risking termite damage. The easiest is go with a stem wall and floating slab, substituting XPS for the bond breaker.
I’m not generally a fan of ICF construction, but I’m curious how this system mitigates termite risk. I recall some years ago an ICF builder told me they use chemically treated EPS for basement walls and foundations, stem walls, etc. So I’m also curious about research on how this has worked out.
There’s a ICF manufacturer
There’s a ICF manufacturer which contains termite treated foam. Allegedly it’s the only “code approved” ICF product for use in termite zones. *shrug*
Slab insulation now has boric
Slab insulation now has boric acid in it and proper stainless steel mesh at edges and penatrations physically blocks termites.
Good analysis, Thanks… How
Good analysis, Thanks… How about a 2×6+3 and a 2×6+5 walls? These are more typical upgraded walls.
1. Per ACCA MJ8, aren’t Dallas design conditions 24/98? Why did you use 28/99?
2. A good reason not to use slab-edge insulation in north central TX is termites and soil movement. There are solutions for it, but too expensive.
Armando, yeah, it’s easy to
Armando, yeah, it’s easy to do the analysis for 2×6 +3 and 2×6 +5, but in warm climates, that takes you well into the diminishing returns regime.
1. I used the ASHRAE 2013 1%/99% design temperatures in RightSuite Universal.
2. Yes, termites are definitely an issue with slab insulation in warm climates. That doesn’t mean it’s impossible to do.
1. Can you please expand on
1. Can you please expand on diminishing returns? Thermal bridging doesn’t save that much energy in hot summers? Another benefit for using outsulation is that it makes an additional moisture barrier when taped with an approved tape.
2. Is ASHRAE more accurate than ACCA for design temps? Should I start writing in my Specs for HVAC subs to use ASHRAE and not ACCA?
https://www.energyvanguard
https://energyvanguard.com/blog/76941/The-Diminishing-Returns-of-Adding-More-Insulation
It would have been nice if
It would have been nice if you had included data from Minot North Dakota.
Cause North Dakota is a well
Cause North Dakota is a well known location in a warm climate…
Gary, there’s lots of stuff
Gary, there’s lots of stuff out there about beefed up walls in cold climates. Martin Holladay at Green Building Advisor has written a lot about it, especially with exterior insulation. See this one, for example:
Calculating the Minimum Thickness of Rigid Foam Sheathing
How would this apply to a
How would this apply to a northern location?
Thanks.
Matthew, see my comment to
Matthew, see my comment to Gary Reecher just above yours.
And there is always other
And there is always other types of insulation as well as the OVE stick built structure.
Yes indeed! There’s SIPs,
Yes indeed! There’s SIPs, ICFs, double-stud walls, and more. I’ll get to some of those in the future.
Allison, I was surprised to
Allison, I was surprised to see you using only cavity R values in your charts – this can be quite misleading, as you know DOE studies have shown framing factors of 2×4 stud walls are 25-27% – and this is BEFORE building codes strengthened the shear wall standards in 2012. So your numbers are off by quite a bit. I would recommend a 4.5″ thick wall with R26 continuous (except at framed openings and top & bottom plates) closed cell foam. Joe Lstiburk refers to this as the “Clever Wall” – it involves MUCH less labor & materials – and opportunities for error (OFEs – remember these are manufacturing sites prone to error!) – than the double stud wall (or single stud wall for that matter). I know of homes in South Texas – and Columbia SC – built this way on a protected concrete slab that is being passively cooled by the earth.
Charles, those aren’t just
Charles, those aren’t just the cavity R-values. They’re the total R-values that include air films, drywall, sheathing, framing, cavity insulation, and continuous insulation based on a framing factor of 23%. I’m not sure why you read it that way.
And yes, I know there are other types of walls. This article was already plenty long with just the narrow focus I chose.
I had a similar thought when
I had a similar thought when I was reading it, but came to the conclusion that you’re listing nominal cavity R-values for simplicity and allowing your manual J calculator to factor in the entire assembly. Is that correct?
Yes, Bob, that’s correct.
Yes, Bob, that’s correct. Sorry for the confusion.
Interesting read. was
Interesting read. was surprised on the (large) % heat transfer reduction.
Those heat transfer equations are idealized to assume zero heat transfer via air infiltration/exfiltration? If yes, I’d guess this would significantly reduce those percentages. Are there studies that try to quantify the actual real-world air transfer typical of homes (varying significantly with build style and build date, no doubt)? Leaky windows, doors, drywall, floors, etc.. Opening the door 10 (or maybe it’s closer to 100? 1000?!) times a day, seems like a crapshoot to estimate this!
Would be interesting to see a multi-year study of a specific home’s actual heating/cooling usage, compared to the theoretical calculations for that specific home, in that specific climate. this might at least allow us to lump together and quantify all the real world Chinks in the proverbial Armor
Allison, I always love you
Allison, I always love you blogs because they are always thorough and well thought out. What I tell my customers is that of the three ways heat transfers (conduction, convection, radiation), convection rules. I can have all of the insulation possible and if air is still moving its effectiveness plummets. I support the move to exterior insulation as long as it is properly sealed. Attempting to seal up a stick framed house by caulking the inside of the stud cavities is like caulking the inside of a boat for leaks. Just plain silly to me. Building codes on air infiltration are woefully behind and only mildly effective. NC only calls for a blower door test of below 5 ACH. You might as well leave a window open. My last Hurricane/disaster resistant home blew a 0.54 ACH (almost 1/10 of the code mandate. We always address convection first and then add insulation and radiant barriers as appropriate. As you may remember, we don’t build with stick framing either.
Great overview – thank you
Great overview – thank you for sharing. I’ve seen similar studies on different framed assemblies and they all come to a similar conclusion on the limited advantage of more insulation in warmer climates. However, the engineer that did one study pointed out that this is only true for similar framed walls and holding all other variables the same. Thermal mass and air infiltration are significantly important to overall energy efficiency in these climates. Much higher results can be achieved, jut not with framed walls. We also have to be thinking of thermal comfort which is largely driven by radiant conditions (MRT).
Is there any reason to adjust
Is there any reason to adjust for walls being beaten with sun? Seems to me that while the air temperature might be 100°, the surface temp of a wall hit with sun is much higher. You mention “solar gain problems” with windows, but don’t they also apply to walls (albeit less so).
I’m guessing that the models do adjust for solar gain on the roof (do they? surely they must), but should we consider these modeling results as assuming fully shaded walls (a great idea), or do the models somehow adjust for average solar gain through the south and western walls?
@James, as a compromise, due
@James, as a compromise, due to complexity of modeling shading from adjacent walls, nearby structures and vegetation, Manual J does not account for differences between different wall exposures. I believe this is the case with all modeling tools commonly used for residential. Solar gains are incorporated into roof/ceiling load modeling, but again, these loads are not adjusted based on orientation.
MJ cooling loads are known to be somewhat conservative so the only practical impact of this compromise is on air balancing, which is based on relative room-by-room loads. And given how poorly most homes are balanced relative to design loads, I would argue that any differences derived from an accounting of solar gains by exposure, assuming that’s even possible, would be lost in the noise.
I was lucky enough to move to
I was lucky enough to move to Richmond VA and we seem to have the best / worst of both worlds. From what I can see, we’re almost 50/50 on HDD/CDD and I’m trying to extrapolate your figures for heat, cold and humidity. It would seem that external insulation wrap would still be optimal as it ‘works’ well for the heat, cold and humid elements. Would you be inclined to agree?
Is thermal mass inside insulation a topic for modern American building methods? I’ve some sustainable building experience and rammed earth, stone etc inside insulation has some research pointing to benefits.
Good article. Most articles
Good article. Most articles on beefing up wall insulation are pretty expensive measures and this is looking at often-built cost effective walls. Here are several things you might address in a future article”:
Whether 2×4 or 2×6, 16″oc vs 24″oc and aligned studs with single plates, all makes a big difference in how much cavity insulation there is and heat transfer through the wood.
2″ exterior insulated sheathing presents difficult (and more expensive) installation issues. Fasteners for the siding have to penetrate the studs (how much depends on the type of fasteners and the wind load zone you are in) but at a minimum you are over 3″ if you leave a proper drainage plane. There are ways to do it but I think a better alternative to the 2×4 with 2″ of foam is a 2×6 with 1″ of foam. Though it is a slightly lower performing wall it doesn’t present as much of an installation problem.
Lastly, when you address foundations, mention sealed insulated crawl spaces. They have much less air leakage around the perimeter than through the insulated floor of conventional vented crawl spaces; it gives you a conditioned space to run your ducts and pipes; no duct insulation is required and you get heated floors in the winter without the expense of radiant tubes.
Have you seen the “production
Have you seen the “production builder friendly” insulated wall? 2×6 top/bottom plates then vertical 2x4s are nailed flush with the interior edge of the 2×6’s, then sheathing on the exterior side of the 2×4 and a layer of rigid foam on the exterior side of the sheathing. The idea is that offsetting the 2×4 enables the rigid foam layer to remain co-planer to the slab edge all the way up to the roof.
I’m most likely the central
I’m most likely the central Texas client that you referred to at the end of your article. Termites ARE the reason that I didn’t insulate the slab perimeter. They are rampant here, building dirt tunnels 4-5 inches high in the grass. I wish that I could have insulated the slab, but it’s just not worth the risk (to me). BTW our electric bill for July was only $140 for our 2800 sqft house. That was the same amount we paid in our 600 sqft rental while we were building. I’m a very satisfied and happy client.
Nice to hear from you, Gary.
Nice to hear from you, Gary. Although I guess I could have been referring to your home, the one I was talking about in the article was actually a job we’re working on now in the Hill Country near New Braunfels. Termites are definitely an issue, but that’s not why they didn’t do slab-edge insulation. The recommendation came to late for them as they already had their walls up. Glad to hear about your low cooling bills!
I look at this differently…
I look at this differently… a 2×6 wall 24-oc is not much more expensive than 2×4 16-oc including insulation. When you do optimal-value engineering, it’s clear that 2×6 24-oc should be the baseline for all other assemblies.
Then the question becomes how much exterior insulation? In cooling dominated climates, anything beyond 1″ is usually not justified (depends on several factors). Moreover, with stucco cladding, 1″ EPS is built into the price, and with other cladding types, a 1″ layer of EPS or XPS can readily be accommodated.
The challenge is getting builders on board with 24-oc and advanced framing techniques in general. The vast majority of homes built in my area over the past 12 to 15 years have 2×6 frame walls spaced 16-oc. That makes no sense!
I’m with you David. 24″
I’m with you David. 24″ centers and other advanced framing are the way to go. I hope we can get this done on the replacement homes from the fires in northern and southern CA.
I encourage you to quantify
I encourage you to quantify the MRT effect. The wall surface temperature change is quite small and is easily compensated for with a much smaller change in air temperature. This converts it from a vague comfort issue to a minor (perhaps 1% of whole house energy use) economic issue.
Great topic and analysis,
Great topic and analysis, Allison. I love reading your blogs for the sly humor and detailed analysis.
I like that you started with the standard 2 x 4 stick frame wall and show it can perform just fine in a warm climate without a lot of fancy engineering. I think too often we seek answers in exotic materials or new technology and not in well planned and executed installation procedures.
If it makes any difference to wall performance… what air infiltration value was used? <1 ACH or something larger? If this is not important, please explain. Thanks.
Thanks, Brad!
Thanks, Brad!
I didn’t include the effects of infiltration in these results. That would be a bit beyond the simplistic calculations I did here. That’s a job for a more robust hygrothermal modeling tool, like WUFI.
Thanks for the link to the
Thanks for the link to the WUFI post. My edu-macation continues… 🙂
Regarding framing, the
Regarding framing, the comment states you used a framing factor of 23% in all walls in the comparison. Does that translate into the 2×4 wall @ 16″ oc and the 2×6 wall @ 16″ oc? Since 2×6 walls are usually framed at 24″ oc, what framing factor does that translate into?
Is the framing factor just the percentage of wood in the assembly, or does the placement of the wood affect it? What would the framing factor be on a 2×4 wall @ 12″ oc but offset every other stud with 2×6 sill and top plate?
RE: Insulation: Isn’t it possible to get more than R-19 in a 2×6 cavity?
@Cal, 23% implies more
@Cal, 23% implies more precision than is due. Real-world framing factors vary several percentage points depending on number of corners, wall and window heights, and framing details (notably advanced framing). IIRC, the framing factor for a 2×6 wall 24-oc ranges from about 10 to 15 percent. A 2×6 wall 16-oc has the same FF as 2×4, although the u-value would obviously be different.
The framing factor for a “2×4 wall @ 12″ oc offset every other stud with 2×6 sill and top plate” would be similar to
2×6 24-oc (10% to 15%) since the 2×4 studs are not thermal bridges. The 2×4 studs would increase the assembly u-value. Not sure what purpose they serve…?
High-density batts for 2×6 framing are rated at R-21. I believe 2×6 BIBs and Spider(tm) is rated at R-23. Flash-and-batt or flash-and-blow with a layer of closed cell foam would be a bit higher than that.
Cal, David is correct that
Cal, David is correct that the 23% number implies greater precision than really exists. The reason I used that number is that it’s the one RESNET uses in the energy modeling for home energy ratings. Here’s the part of the table from their standard showing wall framing factors:
[[{“fid”:”2310″,”view_mode”:”default”,”fields”:{“format”:”default”,”field_file_image_alt_text[und][0][value]”:”RESNET 301 framing factor table”,”field_file_image_title_text[und][0][value]”:”RESNET 301 framing factor table”},”link_text”:null,”type”:”media”,”field_deltas”:{“1”:{“format”:”default”,”field_file_image_alt_text[und][0][value]”:”RESNET 301 framing factor table”,”field_file_image_title_text[und][0][value]”:”RESNET 301 framing factor table”}},”attributes”:{“alt”:”RESNET 301 framing factor table”,”title”:”RESNET 301 framing factor table”,”height”:”244″,”width”:”578″,”class”:”media-element file-default”,”data-delta”:”1″}}]]
By this table, the answers to your question about walls framed at 24″ on center would be 20% for standard framing and 16% for advanced framing. I’m not sure where David’s numbers of 10-15% come from so maybe he’ll let us know. It doesn’t seem likely to get a 10% framing factor with 24″ on center.
For example, in a 10′ section of wall, 8′ high, there would be 6 studs and 3 plates. That would give you a 12% framing even without openings and no corners. To get down to a framing factor of 10%, you’d have to do something like structural insulated panels connected with wood splines 48″ on center.
Those are ‘default’ values
Those are ‘default’ values based on conservative assumptions within each category. I’ve seen research that shows ranges found in practice, which is presumably how RESNET arrived at that table. As you would expect, the ranges fall above and below the RESNET defaults.
Following your example… what if walls are 10′ with single top plate and only 4 corners? Also, keep in mind that with advanced framing, windows framed without jack studs reduce the overall framing ratio, especially when aligned on a 24 inch module with studs, and headers sandwiched with rigid insulation. I can’t find my reference at present. The lowest framing factor for 24 oc may be a bit higher than 10% but you can definitely do better than 15%.
Yes, actual framing factors
Yes, actual framing factors can be all over the place. In homes designed without any thought given to the enclosure, they can be significantly higher than the defaults in the table above. Some of the designs I’ve seen have corners all over the place, too many windows, and headers where they aren’t needed. Then the framers show up without a detailed framing plan to work from, and the result is a thermal disaster.
Now about this:
Also, keep in mind that with advanced framing, windows framed without jack studs reduce the overall framing ratio, especially when aligned on a 24 inch module with studs, and headers sandwiched with rigid insulation.
I’d agree with that statement if you put the word “can” right before “reduce.” Smaller windows and uninsulated headers will result in higher framing factors. But if someone is doing advanced framing and eliminating jack studs, yes, in general windows should reduce the framing factor.
Great article! I’ve been
Great article! I’ve been really impressed with the quality of articles on your blog. Keep up the great work.
I would love to see the
I would love to see the comparison in cost and performance between the 2×4 wall at 16” o.c. 25% framing factor with R13 in the cavity vs. a 2×6 wall at 24” o.c. 15% framing factor with R19-R21 in the cavity. Adding your choice and quantity of exterior foam on top of either would cost the same from there. How about coming up with the cost of that 10’ section of wall talked about, one 2×4, one 2×6 OVE? Great discussion, I always learn from these great articles!
Stay tuned, Dave. That’s the
Stay tuned, Dave. That’s the direction I’m going in this little series.
Good Stuff!
Good Stuff!
Good stuff
Good stuff
What would be the best for a
What would be the best for a home in GA? 2×4 or 2×6 walls? Which would be for interior and which for the exterior?
I recommend 2×6 exterior
I recommend 2×6 exterior walls in most climates, including yours, but only if spaced at 24 inches on-center. In that case, there’s not much, if any, additional cost for 2×6. Interior walls are virtually always 2×4 unless there’s a structural reason to go larger. Sometimes walls behind certain plumbing fixtures are 2×6.
We are looking a building a
We are looking a building a 2500 sqft single story in south Texas and have been struggling with the decision to go 2×4 vs 2×6 both with ZIP R3 sheeting. Our build will be rural and the experience of the local crews is limited at best with anything other than 2×4 standard stick framing. We considered 24″ OC 2×6, but then we have concern about the drywall bowing. We will be doing plenum truss to bring the ducts into conditioned space. Given all that, would you advocate 2×4 or 2×6 framing from an energy perspective?
So, in the couple of years
So, in the couple of years since this blog was first put up, I’ve been doing a LOT around the impacts of building the ‘igloo’ in the south. What I would say is which every you do, you want to look for an HVAC company that understand how to run a Manual J and knows what a SHR is and is willing to pull OEM data on the unit. None of this AHRI crap. In the south, it won’t get you what you need. And just gird your proverbial loins, you’re going to be in a multi-stage unit and/or a dehumidifier.
Because if you are going to build that good of a building envelope in the south, and you are harboring any kind of delusions of grandeur of getting a SEER above 16, you can kiss the idea of a humidity removal in HVAC equipment goodbye. You will have shifted the sensible to latent ratio so equal that there is no unit on the market that exists that can handle it. Best you can get is a 3 to 1 sensible to latent ratio, at least last I looked. And I look a lot. And last I looked, DOE High Risk R&D for these products still didn’t have them close to hitting the streets.
Stephen Definitely 2X6 on 24
Stephen Definitely 2X6 on 24″ centers. Thousands of houses have been built this way with no drywall problems. With respect to the plenum truss, is it not possible to use two or three ducted multi-splits in closet or hallway drop ceilings? Also pay attention to the comment about equipment above.
@Stephen, since you plan to
@Stephen, since you plan to install R3 continuous, the main benefit for 2×6 24oc would be the energy savings from the additional cavity R-value. Whether or not it’s worth the additional cost depends on the particulars for your project (local lumber, insulation, energy costs). Keep in mind that in hot climates like yours, walls are relatively less important than roof, windows, orientation, overhangs and ducts in conditioned space. I think it’s safe to say that if you have to pay a premium for a framer willing to do 24oc then you’d be better off going with competitive 2×4 framing. But don’t forego the exterior (continuous) insulation.
BTW, if you happen to be going with stucco cladding, that system typically already includes 1 inch EPS, and at a lower cost than the R3 ZIP panels (compared to non-insulated ZIP).
In my experience, bowing isn’t an issue for walls. We previously had to use 5/8 drywall for 24oc ceiling joists to avoid bowing, but most of today’s drywall, which is a lot stiffer, can span 24oc joists @ 1/2 thickness without any issues. So even if there ever was any issues with wall bowing @ 24oc, that’s certainly not the case today.
@ Arlene wrote: “you will have shifted the sensible to latent ratio so equal that there is no unit on the market that exists that can handle it.”
I’ve designed a LOT of mechanical systems for beyond-code homes in the Southeast and I don’t have that problem. We can achieve close to 50% SHR if required (through airflow control and/or reheat techniques) but operating at a such a low SHR imposes a severe penalty on sensible efficiency. It’s always better to reduce the moisture load to begin with rather than wasting energy to remove it!