17 Steps to Better Duct Systems
If a 12 step program is good for helping people deal with addictive behaviors, then a 17 step program ought to be better, right? Or maybe it’s just a random number that fits the number of tips that popped into my head as I planned this article. In either case, I’ve written a lot about ducts in this space over the past ten years so here’s a little compendium of tips for duct design and installation, which was inspired by a similar list that Neil Comparetto wrote for Bryan Orr’s HVAC School Tech Tips last year.
1. Don’t blow air on people.
Pretty straightforward here. The heating and cooling system’s purpose is to condition the space so the occupants are comfortable. Air blowing across your skin may feel good in the summer, but in winter it’s not. Put the supply registers in places where they won’t be blowing air directly on people and you can avoid of comfort problems.
2. Slow down the air with bigger ducts.
There’s no magic velocity you need to keep the air moving faster than in ducts. When you move it faster, it’s noisier and feels more resistance. Moving it slower keeps things quiet and efficient. But — and this is a really important caveat — you don’t want the air to move too slowly when the ducts are in unconditioned spaces, especially attics. See my article on the best velocity for moving air through ducts for more details.
3. Use return filter grilles.
I like putting the filters in the return grilles for a few reasons. It keeps the return ducts cleaner. It’s often a more accessible place for changing the filters. And it allows you to increase the surface area to keep the filter pressure drop low. (See step 5.)
4. Size all filters the same.
We do this in our HVAC designs to make it easier when it comes time to change the filter. The homeowner can order a box of filters, all the same size, and not have to worry about which ones go where. The way you do it is to use the filter sizing rules I gave in an earlier article and then use the largest filter grille size for all of them.
5. Increase filter size.
This one goes with the two previous tips. A lot of people think high-efficiency filters, like MERV 13, kill the air flow because of huge pressure drops. That’s true with bad filters and undersized filters. See my filter sizing tips article for more.
6. Provide return air pathways for all bedrooms.
Older homes got supply vents but not return vents. We know better now because a closed bedroom door can create big pressure differences inside the house, which can cause problems. You have several options for return air pathways: Put in dedicated returns, use jumper ducts, or install transfer grilles either through the wall or in the door itself. Heck. Even door undercuts can work in some situations.
7. Follow the two rules for flex duct.
It’s pretty simple:
- Pull the inner liner tight
- Use flex only for straight runs. When you need to turn the air, use a fitting.
See my Joy of Flex article for more details.
8. Choose better fittings.
ACCA’s Manual D for duct design has tables of equivalent lengths for all kinds of duct fittings. Study those tables and avoid the ones with high equivalent lengths whenever possible.
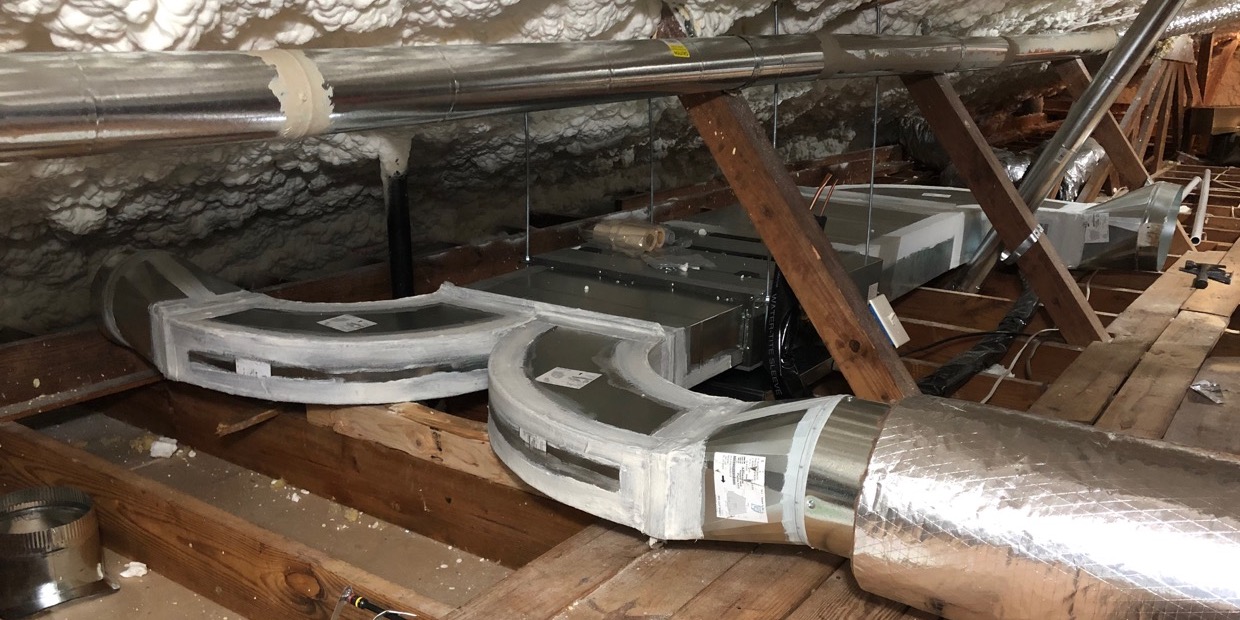
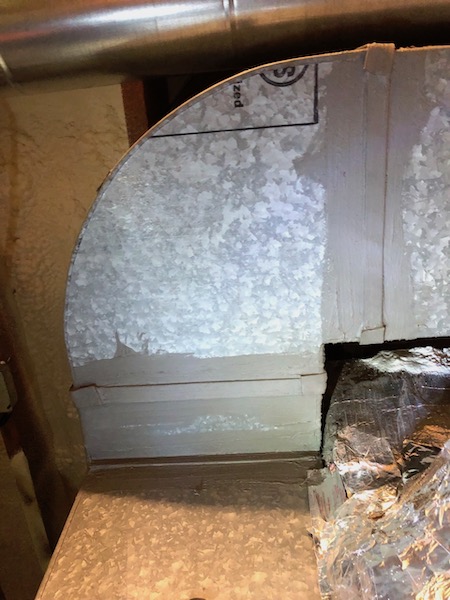
With elbows in particular, pay attention to the throat, which is the inner side of the turn. The photo below is from the duct system that was in my house when I bought it in 2019. That sharp 90 degree throat creates a lot of turbulence, one of the two primary causes of reduced air flow.
The photo at the top of this article is part of the new duct system in my house. Notice the smooth radius turns on both sides of the elbows coming off our ducted mini-split air handler. In case you’re wondering, it’s a Mitsubishi ducted mini-split heat pump and was installed by Canton Heating and Air. I recommend both and will be writing more about our new heat pumps soon. (Disclosure: Mitsubishi is a sponsor of the Energy Vanguard Blog. Canton Heating and Air gave us a discount on the installation.)
The general rule for fittings is that you want them to transition as smoothly as possible. Sharp turns or abrupt changes in size add more turbulence.
9. Put the air handler in the middle.
If the air handler is in the middle of the house (or zone), the air flow pathway is shorter. And yeah, the fittings are much more important than straight runs of duct in the overall resistance. But when the air handler is all the way on one side of the house, you’re probably going to have more fittings AND more straight length.
10. Use a lot of mastic to seal the ducts.
Duct leakage is a problem in many houses. In some, it’s a huge problem. Make sure all connections are secure and all joints and seams sealed with mastic, lots of mastic. It’s an inexpensive sealant. And it’s a lot easier to put on ducts when you’re first installing them than later on in the life of the house.
11. Keep the ducts in conditioned space.
I’ve been harping on this one for a long time. Ducts in unconditioned spaces cause problems. In attics, they’re exposed to higher than ambient temperatures in summer and nearly as low as ambient in winter. In unconditioned crawl spaces or basements, you get moisture problems in cooling season. In garages, you can suck in bad air and send it inside for the occupants to breathe. It’s well established that ducts in conditioned space perform better.
12. Bury attic ducts deeply in insulation when you can.
If you just can’t find a way to get the ducts inside the building enclosure and have to put them in the attic, you can bury them deeply in attic insulation in a dry climate. This is about as good as keeping them inside the conditioned space. And buried ducts are now allowed in the building code (2018 IRC).
13. Avoid condensation in humid climates.
In a humid climate, you may be able to bury them in the insulation but it’s riskier. Because of high humidity in a vented attic in a humid climate, it’s possible for ducts buried in insulation to get condensation on the outside of the outer jacket. The 2018 IRC does allow you to bury ducts in attic insulation in humid climates (zones 1A, 2A, & 3A), but you have to use more insulation — R-13 rather than R-8. That doesn’t eliminate all risk, though, because of places where the insulation might be compressed or if there’s duct leakage inside the jacket. If you decide to do this, though, just make sure you understand the risks and do your best to avoid any problems.
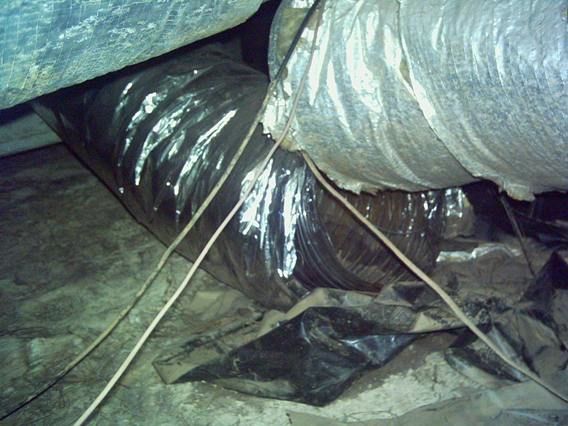
Ducts sweat in other situations in humid climates, too. Sometimes it’s because of poorly insulated ducts. Sometimes it’s duct leakage. Sometimes it’s two pieces of flex duct pressing against each other and getting condensation where they touch. Sometimes it’s the bottom of a duct sitting on top of attic insulation. Coastal climates are especially subject to this problem.
14. Shorten the ducts by not putting supplies at the perimeter.
This one goes with step 9. You don’t need to put the ducts at the perimeter in new homes because we have much better windows. You can shorten the overall duct length and total effective length by not running the supply ducts out to the perimeter.
But that’s not the only advantage! When you put the vents at the perimeter in an attic, it can be very difficult — if not impossible — to insulate the boots. That could mean excess heat gain or loss, higher bills, and potential condensation in humid climates. In vented crawl spaces, you can have the same problems.
15. Take advantage of the Coanda effect.
When planning out your supply vents — following step 1 first — use the ceiling. When you blow air from a high sidewall vent placed just under the ceiling, you’ll get some additional help in moving the air across the room compared to blowing the air into open space.
16. Never use bypass ducts.
Zoning a single HVAC system so you can control it with multiple thermostats can help sometimes. I prefer to zone with separate systems, but we do occasionally design zoned systems. One thing we never recommend, though, is a bypass duct. At best, it lowers the efficiency of your system. At worst, it can freeze the coil, damage the compressor, or crack the heat exchanger. Just don’t do it. See my article on zoning bypass ducts for more details.
17. Test the system for static pressure, air flow, duct leakage, and overall performance.
Start with good design. Then install using best practices and the tips above. Then test to make sure the system performs as you expect it to. This step is called commissioning and is critical not only to the system you’re testing but also future systems you design and install. You’re likely to find performance problems in your duct systems when you first start testing, and that will help you avoid making the same mistakes in the future.
That’s it. Do these things and your ducts will perform well.
Related Articles
The Best Velocity for Moving Air Through Ducts
Can Door Undercuts Work As Return Air Pathways?
Case Closed: Get Those Air Conditioning Ducts out of the Attic
Navigating the Twilight Zone: The Hidden Flaw in a Zoned Duct System
NOTE: Comments are moderated. Your comment will not appear below until approved.
This Post Has 25 Comments
Comments are closed.

I HATE flex duct.
I HATE flex duct.
Zone based on loads. Bypass ducts are a band aid.
Reduce pressure drops. Turning vanes are your friend.
If ducting looks a mess – it probably is.
Excellent tips here. The
Excellent tips here. The elbows in the 1st photo look amazing. Does one have to worrying about the mastic on the seams fatiguing with all the temp changes over the years? I have some seams with mastic that seem to have opened up slightly with time(10+ years).
@Charles, Thanks for
@Charles, Thanks for mentioning turning vanes. The first time I saw the chart of equivalent duct lengths for elbows and then how much better those same elbows performed with turning vanes I had to wonder why I never see them in real life installs? Is cost the only reason?
Hey Allison, you wrote “You
Hey Allison, you wrote “You don’t need to put the ducts at the perimeter in new homes because we have much better windows.”
A trusted old-timer (saying that makes me feel younger) once told me that the traditional practice of locating floor diffusers at the perimeter was driven more by rim joist losses than windows per se. In any case, you make an important point: perimeter topology is no longer considered ‘best practice’ for homes built to today’s energy codes.
In the old days up north, you
In the old days up north, you always put the supply register under the window so that it would defrost it in the winter. Otherwise, you can’t see outdoors. Automobiles later stole that concept 😉
Lots of good advice…just a
Lots of good advice…just a caution for the outliers…up here in the north at -40F….the inside surface temperature of triple pane argon filled glass can easily hit 55F and enough to cause aggressive downdrafts across large panes…a combination of thermal window treatments and perimeter up-flow can help…
Re: flex…ya all know my thoughts on it…I banned it on my projects…got tired of not getting paid by flex duct manufacturers for teaching their customers how to install their products properly…
re: ducted returns from bedrooms (all rooms)…Amen…its a requirement in Canada.
@Robert, I would argue that a
@Robert, I would argue that a single return layout when properly designed (with low-static passive return paths), has undeniable advantages over multiple ducted returns. This not only reduces installation cost & complexity, but saves a bit on blower energy. Whenever possible, I specify a ductless return, especially in basement homes in cooling climates. This ensures better air mixing and dehumidification in summer when the basement has little or no actionable sensible load.
Regarding perimeter supplies… Having never lived in a sub zero (F) climate, I can’t say how that experience might color my perspective, but at least we should acknowledge that when we direct supply air to a window surface, then by definition, we’re going to increase the heat losses (or gains) through the glass.
Drapes and other window treatments can go a long way to mitigate the impact of drafts as well as provide additional insulation, which is exactly the opposite of what happens when we direct supply air toward the glass.
One caveat: When we isolate a window from the room with curtains, the likelihood of condensation increases. Everything is a trade-off. But if we provide occupants with a basic understanding of these interactions, they can have their cake an eat it, too!
Cheers David,
Cheers David,
re: unducted returns…I’ll take your word for it though it won’t change how systems are done up here…
re: perimeter/glass/heat loss…yes the heat loss will increase but if it is not done the downdraft occurs which leads to cold floors and ankle draft…then there is the radiant asymmetry issue that designers ignore
re: condensation…yes…and a nice segue into recent advice by a certain well know health professional to increase humidity levels in homes…this picked up and distributed across Canada by the press without the caveat you noted…since we tend to pressurize our houses its not just condensation on windows its in the cavities…to add insult to injury people then setback theiur thermostats….so picture this….a pressurized house with an increase in moisture and decrease in ambient temperature…
Does anyone know where
Does anyone know where turning vanes can even be purchased? Asking for turning vanes from the supply houses is always a big mystery to them. LOLL, Very good info Allison, very hard sometimes to get customers to accept in making ($$$) the changes for better performance.
Turning vanes are usually
Turning vanes are usually fabricated by the sheet metal shop that is making the ductwork using a product called vane rail. See this: http://www.durodyne.com/ConnectorVaneRail.php
When designing a duct system,
When designing a duct system, is it best to keep all of the trunk duct size the same, for the entire length of the supply air trunk duct? Is reducing the duct size for the supply air trunk duct unnecessary, other than saving money?
@Emmerson, I believe you’re
@Emmerson, I believe you’re thinking of this backwards. A reduction trunk helps maintain velocity and static pressure throughout the trunk so that branches near the end of the run are not starved of air by branches closer to the blower.
Although a uniform trunk can be designed to work well, reduction trunks are considered by many to be best practice, not a way to save money. In fact, reduction trunks typically cost more since the reduction fittings may require custom fabrication.
David. Thank you for the
David. Thank you for the clarification. I have always reduced my trunk duct. I also think it is one of the best ways to design duct systems. I just wanted to get some clarification from you. I am always striving to be better. You have some helpful and knowledgeable articles. Keep up the good work. On another note, if you ever have time to give some information on HVAC systems at altitudes above 4000 feet, that would be awesome. There is not nearly enough information out there on this subject.
Great advice in easy to grasp
Great advice in easy to grasp language. Thanks professor.
Great list !
Great list !
I have two questions about the list.
Step 3: How do you keep the grills from shifting when the blower turns on? I have a relative who has this type of set up (returns are in ceilings) and every time the systems turns on the filter makes a noise as it gets sucked up against the duct work and then dropped against the return grate. It has about 1/4 inch or more of play.
Step 16: In lieu of using a bypass duct do you guys just position the dampers for the individual zones to remain partially open (ex, 30%) when not being used?
Just a comments with regards to Step 1. Having spent the better part of 15 yrs of air blowing on me I can attest to this being a big issue with regards to comfort.
@JC, filter grilles have tabs
@JC, filter grilles have tabs that can be bent out to grip the filter so it doesn’t shift. If the tabs don’t reach the filter than you’re using the wrong size. Filters can be ordered from a number of online resellers with several different factional dimensions so they will properly fit the cabinet slot or grille, as the case may be.
Regarding bypass, check out Allison’s article: “Navigating the Twilight Zone: The Hidden Flaw in a Zoned Duct System (https://bit.ly/3bDyC4P). Although the article doesn’t get into alternative approaches to maintaining proper airflow across the heat exchanger or refrigerant coil in a zoned system, it’s addressed in depth in the comments. In my first comment, I describe my approach to designing zoned duct systems.
Thanks for the link. Read it.
Thanks for the link. Read it.
Our jury-rigged solution was to keep the bypass attached but leave the damper of the smallest of 3 zones (finished attic) open. The bypass duct terminates into the return for this particular zone so the air moving through it at least experiences some mixing.
Where can I find a duct size
Where can I find a duct size chart to size a trunk duct supplying to multi size supply ducts to vents?
Sizes of heat pumps in regard to tons per unit? i.e. 3 ton unit or 11 ton unit! How big do they get?
How to figure return air requirements and size of air filters to fit? I know the cubic feet.
Thank you
Can you give more explanation
Can you give more explanation on #16. If that’s the case, weve been doing it wrong for years. We do use a bypass damper though
Greg, sorry about that. I
Greg, sorry about that. I meant to put a link to my article on that topic but forgot. It’s in there now as well as in the list of related articles at the bottom of this article. And here it is, too:
Navigating the Twilight Zone: The Hidden Flaw in a Zoned Duct System
I wasn’t a blogger during
I wasn’t a blogger during your “Twilight Zone” article, but it sure drew a lot of response. Although it is 9 years later, I would like to make a comment about zoning systems. That article drew a lot of comments about equipment manufacturers liking or not liking bypass ducts. Please note that only the zoning system equipment manufacturers who don’t make the heating/cooling equipment support bypass ducts. I don’t know of any heating/cooling equipment manufacturers that support the use of bypass ducts or at least not the 3 HVAC OEM’s that I have worked for. We prefer to only heat or cool the air once before it is supplied to the house for equipment efficiency and reliability reasons.
@Greg wrote: “weve been doing
@Greg wrote: “weve been doing it wrong for years”
So have most contractors. And it’s still being taught… Case in point: ACCA Manual Zr (residential zoning, published in 2012). At least one prominent member of the Zr committee sought to address this issue head on in the manual, but it was not to be. Old habits are hard to break. On the other hand, Carrier (as well as Bryant and other affiliated brands) prohibits bypass with its Infinity Zoning system. And at least one state has banned bypass (a limited exception is allowed).
“We do use a bypass damper though”
All zoning systems with bypass have a bypass damper, no? But it’s the damper that causes many of the problems we see with zoned systems. A motorized damper that “fails open” (or shut), or even a mal-adjusted barometric damper can cause a big performance hit or worse. At best, a well implemented bypass on an air conditioner reduces both sensible capacity and efficiency.
I understand the theory of
I understand the theory of point 14. However, with a small house with the AH in the center and the ducts in a conditioned crawl space, how does it create a problem? It would seem that supplies on the exterior walls would give better air mixture in the room. If the supplies are located on inner walls I would think the air flow is only mixing a small portion of the air within the room thoroughly and the outer portions of the room would have insufficient air mix/movement.
@Bob, running ducts out to
@Bob, running ducts out to the perimeter isn’t a problem, especially in the scenario you describe. I think Allison’s point is simply that it’s not necessary. I would argue that the air mixing benefit of perimeter diffusers is minimal at best for homes built to today’s energy code or better.
Step 13: Avoid condensation
Step 13: Avoid condensation in humid climates.
Is there something out there that keeps attic humidity low?
Thanks,
Jim