5 Steps for Keeping Water Out of the Holes in Your Walls
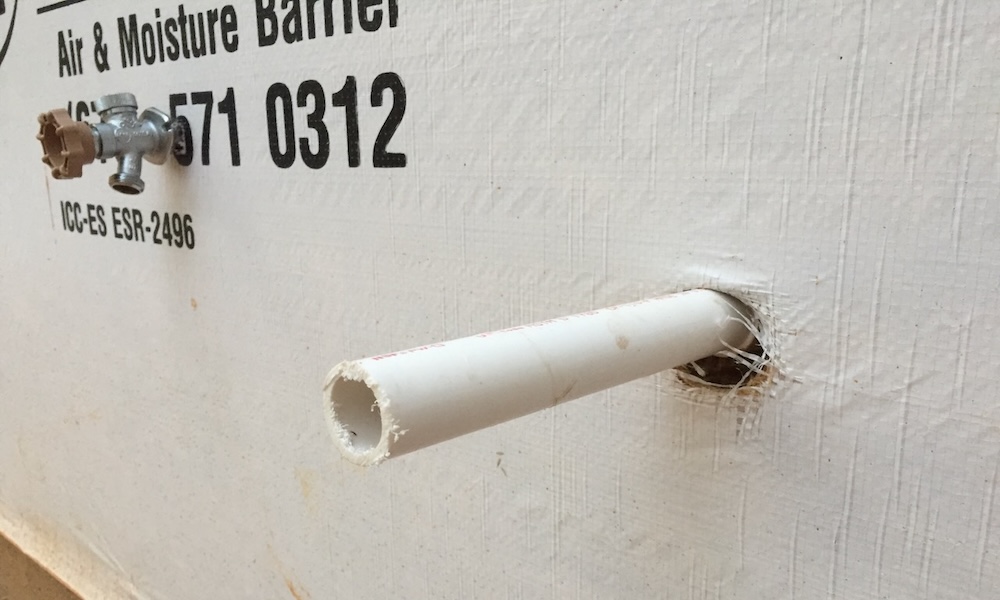
What you see in the photo above is common at construction sites. Once a house gets framed, the next step is drying it in. For the walls, that means installing a drainage plane. The one they used on this house is pretty obvious: It’s the white material with the words “Air & Moisture Barrier” printed on it. (Note: I’m not saying it’s a good drainage plane. Read on.) And then the trades come in and start punching holes in that drainage plane. Can you see the problem?
On a jobsite like this, the way they flash these penetrations—if they do anything at all—is to slap some tape around it and move on. I’m sure that’s what they did for the house above. Maybe the house gets lucky and little or no water leaks there. Maybe it does have significant leakage, but it doesn’t show up till any warranty on the house has expired. This is the kind of stuff homeowners have to pay for over and over.
Here are 5 things you can do to reduce any infiltration of air or water as much as possible when building or repairing a house.
1. Have a plan!
The first thing to do is research and planning. We’re lucky to have so many good flashing materials and products available now. And the knowledge is available for free all over the Web. In fact, the Pacific Northwest construction company Hammer & Hand made their Best Practices Manual available for free. You can find it on their website or download a pdf copy.
![A good flashing plan includes multiple layers of protection [Image courtesy of Hammer & Hand]](https://www.energyvanguard.com/wp-content/uploads/2025/05/6-penetration-flashing-details.png)
In contrast, the builder of the house in the lead photo above used a three step process: 1. Cut a hole. 2. Push the pipe/wire/duct through the hole. 3. Put tape around the hole.
It’s critical to have a plan. The plan has to be detailed. And the plan has to be executed.
2. Make sure everyone knows the plan
To execute the plan properly means that everyone working on the project needs to know what that plan is. And more than that, workers need to know who is allowed to cut holes in the air and water barrier and who isn’t. The sign below helps with that.
![Airtight Building jobsite sign [Courtesy of 475 & Pro Clima]](https://www.energyvanguard.com/wp-content/uploads/2014/10/air-barrier-jobsite-sign-475-pro-clima-800.jpg)
3. One thing per hole
I know this one might sound like a recommendation to make things worse. But hear me out. First, the reason for one thing per hole is because it’s really hard to get a good seal around two wires or pipes or ducts coming out of the same hole.
Look at those two wires below. If you try to seal that by simply wrapping tape around them, there will inevitably be gaps between the wires that don’t get sealed.
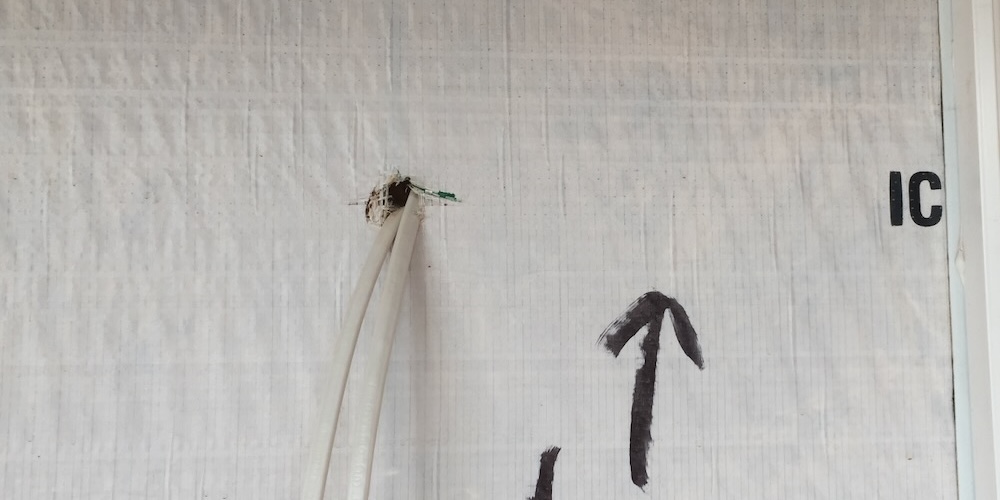
So instead of doing it that way, you make a bigger hole, run a pipe through it, and consolidate as many wires as you can there. (See the Hammer & Hand flashing page for a good image of it.) But inside that conduit, you separate the wires enough to get sealant between them all. The result is that you have one larger hole in the building enclosure but each wire gets separated and sealed properly.
4. Belt and suspenders
As you saw in step 1, a good plan involves multiple layers of protection. You want to make sure that if one layer fails, there are other layers to back it up. That’s a belt-and-suspenders approach.
![A nicely executed belt-and-suspenders approach to flashing wall penetrations [Photo from Building America Solution Center]](https://www.energyvanguard.com/wp-content/uploads/2025/05/flashing-wall-penetrations-belt-and-suspenders-BA-solution-center.jpg)
5. Inspect and test
Before things get covered up with cladding, someone needs to be assigned to check all of the flashing and make sure it’s done properly. It’s also a good idea to do some testing, especially if you’re trying something new. Get it all sealed up and spray it with water. If the house is able to tested with a blower door, use smoke to see if the penetrations leak air.
Wrap-up
Let me wrap this up with three points.
Firs,t I mentioned that the builder of the house in the lead photo probably just wrapped tape around the pipes before installing siding. One indication that this builder doesn’t understand water management is the woven house wrap. The tiny perforations in it are meant to make it vapor permeable. But those holes are big enough to let liquid water through as well.
A better choice of material would be one that has a microscopic pore structure that allows water vapor to pass but stops liquid water. The geeky scientific name for it is spun-bonded polyolefin. Dupont’s Tyvek HomeWrap is the most common one in that category.
Second, you can use the flashing techniques I’ve discussed here only when there’s no cladding on the house. That is, it’s a new house under construction or one being remodeled or repaired. If you’re a homeowner with a water problem because of poorly flashed penetrations, make sure the contractor you hire knows how to fix it properly.
Third, it could be way worse. Check out what happened with this Kentucky house built with NO drainage plane. Yes, the sheathing got wet and started rotting. To make it worse, the homeowners hired a contractor whose fix lasted only four months.
What tips and tricks have you picked up to ensure airtight and watertight building enclosures? What water damage from poorly flashed penetrations have you seen? Leave a comment below.
Allison A. Bailes III, PhD is a speaker, writer, building science consultant, and the founder of Energy Vanguard in Decatur, Georgia. He has a doctorate in physics and is the author of a bestselling book on building science. He also writes the Energy Vanguard Blog. For more updates, you can follow Allison on LinkedIn and subscribe to Energy Vanguard’s weekly newsletter and YouTube channel.
Related Articles
Down and Out Is the Rule for Draining the Rain
10 Questions to Ask Your Prospective Home Builder
Air Barriers, Vapor Barriers, and Drainage Planes Do Different Jobs
The Pen Test — A Control Layers Tool for Architects and Contractors
Comments are welcome and moderated. Your comment will appear below after approval. To control spam, we close comments after one year.
The inverse of the air sealing detail – is what holes not to cover up. Case-in-Point: Encapsulated attic space with an exhaust port for a desiccant dehumidifier. (This is a dehumidifier that blows humid air outside the building enclosure and is rated for 0F – 100F). This encapsulated attic in Zone 6A had 2″ ccSPF – the exhaust port is to keep humidity from steadily increasing. The ccSPF installer removed the plastic covering around the port and proceeded to fill it with spray foam. The dehumidifier installer (me) had to remove that foam. This also demonstrates that a “house needs to burp” to occasionally relieve a build-up of water vapor.
William: I’m having trouble picturing how that desiccant dehumidifier is set up. Is there a duct to that opening? Is there a damper? How does it “burp”?
The house wrap has instructions. I have yet to see a construction site where they were followed. The biggest mistake I find is how the windows and doors are connected to the house wrap at the top. The house wrap MUST lap over the top flange of the window/ door on the EXTERIOR. It MUST NOT return inside the house through the opening.
Richard C. MacCrea
Mountain House Plans
Richard: Yep, I’ve seen that a lot, too. It does seem to have improved over the past 15 years, though. Here’s an article about a case where I got the contractor to redo the flashing:
The Drainage Plane Flashing Battle Continues
https://www.energyvanguard.com/blog/The-Drainage-Plane-Flashing-Battle-Continues