A Hot Water System Retrofit for an Old House
David Wasserman and I worked together at the Southface Energy Institute back in 2007-08 and have been friends since then. Before Southface, he was an engineer at Oak Ridge National Lab. We also call on him for occasional help with some of our HVAC design work at Energy Vanguard. He knows his building science, especially the mechanical side. So when he recently posted a comment about the hot water system retrofit he’s done on his own house, I wanted to see it.
The article where he posted that comment is the one I wrote about why it takes so long to get hot water in your house. The basic problem is that a lot of hot water pipes are both too long and too big in diameter. In the article I wrote about my own house, where it currently takes two and a half minutes to get hot water at the kitchen sink. I can reduce the length of the pipe to the kitchen, but it’s the diameter that’s killing me. I’ll fix mine before long, but Wasserman has already done something about his slow hot water.
Wasserman’s hot water retrofit
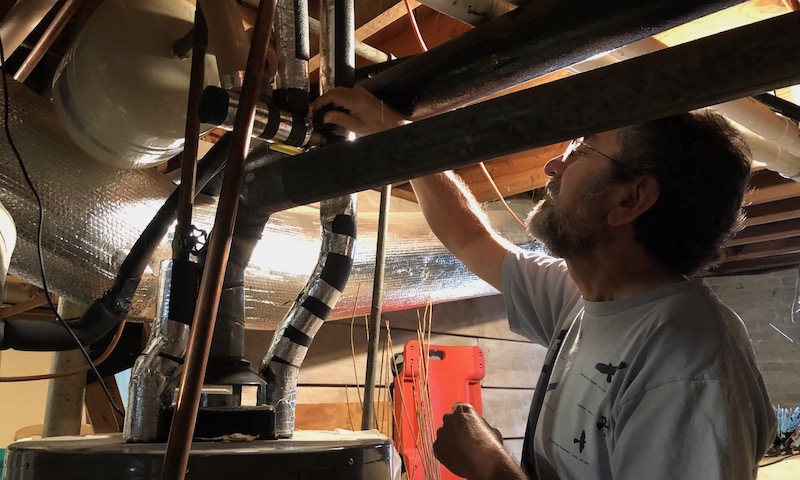
I went over to his place last weekend, and he showed me what he’s done. That’s him in the top photo pointing out the addition to his hot water pipes, with a closeup below. It’s really simple. His existing hot water lines are all 3/4″ and 1/2″ copper pipe. With the low-flow fixtures used in homes now, those pipes are too big. He didn’t remove them, though. He simply added a second, smaller pipe for three of his hot water runs
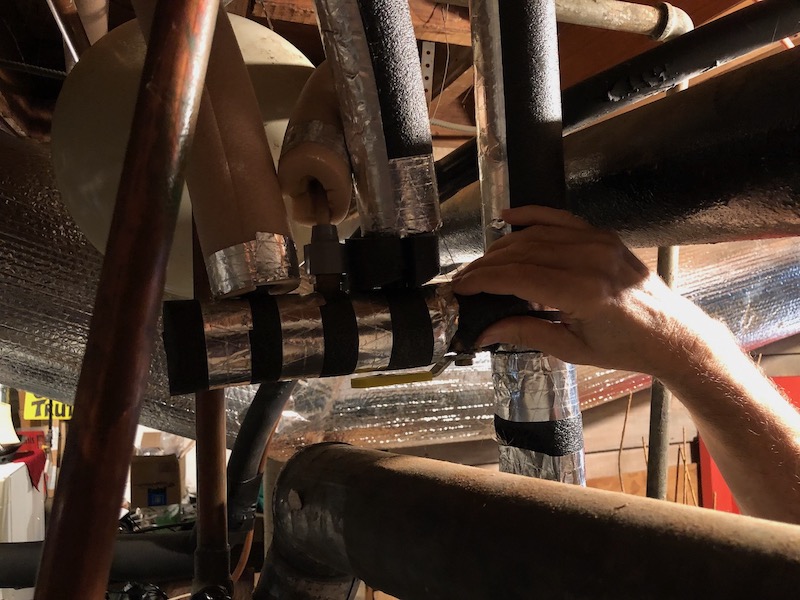
In the photo above, his hand is right in front of the original hot water line coming off the top of the water heater. To the left of his hand is a short manifold he made out of copper pipe and copper tees (details below). Near his thumb is a cutoff valve for the three new hot water runs. Since it’s parallel to the manifold, you can tell the valve is open and the hot water goes that way. The three new runs go up from that manifold. They’re made of 1/4″ PEX tubing, which you can’t see except for one little gap because they’re insulated.
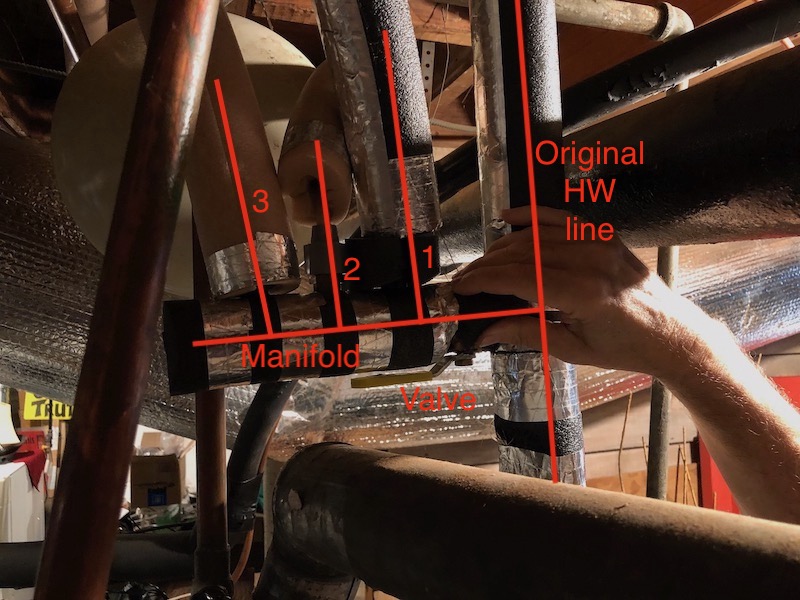
In case you can’t see all that in the photo above—and it IS hard to see with the pipes all covered in thick insulation—the annotated version of the photo below should help. The numbered lines are the new 1/4″ PEX lines he installed between the manifold and the three hot water taps. (You’ll have to look closely to see the word “valve.” I couldn’t find a color that stood out any better there.)
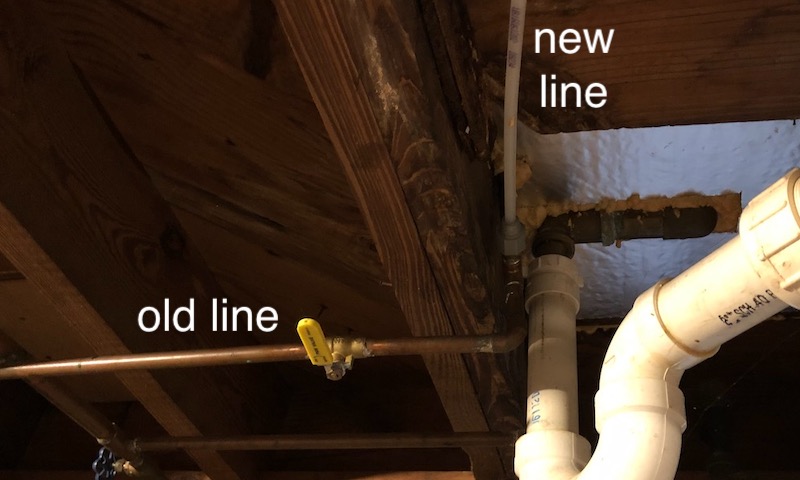
Those three PEX pipes go to three different parts of the house. The photo below shows one going into a bathroom. Since he doesn’t want hot water going through both pipes, he installed valves for the old runs near where the new run connects to it. Perpendicular to the pipe indicates that that one is off, and all hot water is coming through the 1/4″ PEX pipe. The other two runs are set up the same way. Simple, right?
And how well does it work? He said it used to take over a minute to get hot water to his kitchen faucet. With the hot water system retrofit, it takes about 8 seconds. I verified that when I visited. They hadn’t used hot water in the kitchen yet that morning, so I turned on the tap and counted out, one-one thousand, two-one thousand… When I got to 7 seconds, the hot water was there.
The details about his retrofit
If you’re interested in what parts he used and the other details, here’s what he wrote in his comment on the other article. The links are to the parts he used.
- Attach a 3/4″ to 3/4″” copper Tee as close as you can to the water heater outlet.
- Then create a manifold consisting of 3/4″ to 1/2″ copper Tees connected by 3/4″ stubs. Put as many Tees on it as you need. End the manifold with a cap, not a 90 degree bend.
- Then attach 1/2″ copper male adapters to each branch of the manifold.
- Then thread on a Sharkbite reducing adapters.
- The PEX tubing then slips into the adapter.
- At the other end find a 1/2″ pipe [or whatever size yours is] as close to the fixture as possible, install a ball valve then install a 1/2 to 1/2″ Tee down stream and repeat steps 3 and 4 above.
- This insulation works well with this tubing
Caution: Prescriptive plumbing codes don’t allow pipes as small as 1/4″ so you may need an engineer to help if you want to go that small. You need to know the flow rate required at the end of the line. To use 1/4″ PEX tubing, it should be about 1.8 gallons per minute or less. Also, if you need to run the PEX more than 25 feet, you’ll need to go to a larger size, too. To get a better handle on what you need, use this plastic pipe design calculator.
There you have it. David Wasserman’s method to retrofit the hot water distribution system works well in his old house. If you’re worried about this retrofit not meeting the code, which requires 3/8″ minimum pipe, Wasserman said: “Code requires you to put in over-sized piping but it does not require you to use them!”
Allison Bailes of Atlanta, Georgia, is a speaker, writer, building science consultant, and the founder of Energy Vanguard. He has a PhD in physics and writes the Energy Vanguard Blog. He is also writing a book on building science. You can follow him on Twitter at @EnergyVanguard.
Related Articles
Why Your Hot Water Takes So Long
Water Heating Is a System, Not Just a Water Heater
The 3 Types of Energy Efficiency Losses in Water Heating
NOTE: Comments are moderated. Your comment will not appear below until approved.
This Post Has 47 Comments
Comments are closed.

Good article on hot water supply on long runs, but what do we do on concrete slabs? Running new lines up thru the attic and down w/be rough. I’ve heard those recycle pumps at the fixture are about the only option?
George, yeah, with your water pipes embedded in a slab, any retrofit is difficult. If you’re in a place that doesn’t freeze, like a lot of Florida, putting them in the attic is an option. That comes with its own set of problems, though.
You likely remember my home, slab foundation, two story, limited attic access. The PEX style water distribution is further complicated with a central manifold at the garage where I can turn of any fixture from there. So….no loop nor loop potential.
We are heading in the direction of circulating with temperature controlled cross overs at the kitchen, master bath, guest bath. Willing to go to the remarkable expense around cost per cross over my research (reading online posts) indicates the cross overs have lost reliability, durability, performance. Often in a short time.
Any comment?
Arthur Beeken
Arthur, I do remember your house, and the nice dinner we had there. I don’t think you showed me the hot water system, but it sounds like it’s one of those “I wish I had known about this before” kind of issues. I’ve just started dipping my toes into hot water, so I don’t know temperature-controlled crossovers yet. Maybe someone else will jump in and help us out here. (Larry?)
Allison here is a pic of a crossover used under a sink along with a manifold type system (larger pic can be found via link):
https://thehtrc.com/2013/fix-a-leak-with-watersense-program
I feel your pain Arthur as the one draw back to Home Runs is you would need a pump on each line though I would recommend limiting to 1 or 2 fixtures that a take the longest & are used the most often. Installing a pump in a guest bath that is hardly used might just not be worth the time & might lead to the durability issues you may have heard of due to lack of use.
Allison – you could always look into sub manifolds – one main run to each bath or area & then a manifold that splits it off to each fixture. You could then install an on-demand crossover say at the sink & the only lag would be what is in the shower leg if you go to turn that on.
I would also point out via that link that running 3/8 pex might not give you a 7 second time but it would be right up there. It would be nice if the Plumbing code got in line with the faucet flow rates they require.
Thanks, Sean. So a crossover is just where a demand recirculation pump pulls hot water and dumps it into the cold line. I’m familiar with how it works but don’t think I had run across that term.
My current plan for the new plumbing system I’m going to put in next year (not the Wasserman style retrofit I’m about to do soon) is to run a trunk to the bathrooms and a separate line to the kitchen. The bathrooms are all clustered near the water heater, and the kitchen is farther away. I might separate out the primary bath so it can fill faster.
My retrofit will be to run a 3/8″ PEX line to the kitchen, which will give me a chance to see how well that works. I’m hoping it will reduce the wait time enough that I don’t feel the need to install a demand pump. Thirty seconds will feel almost instantaneous compared to my current 2:30, but I’m hoping for maybe 15 seconds.
Allison wrote:
> So a crossover is just where a demand recirculation pump pulls hot water and dumps it into the cold line.
To clarify the terminology as I understand it… a thermally controlled crossover valve, as used by the Watts system (referred to in another comment below), maintains a given temperature at the remote fixture. Since the valve (and indirectly, the pump) are thermally controlled, there’s no user interaction and thus is NOT a demand system. The pump can be locked out with a timer to reduce heat loss in the pipes.
An on-demand system also uses the cold water line for the return but I’ve never seen one referred to as a crossover system. In particular, there’s no crossover valve since the pump is started by the occupant (there’s simply a bypass connector). The pump automatically shuts off when warm water reaches the remote sink. The pump and sensor can be located at the water heater but this essentially doubles the run time and associated energy losses in the pipes, though still far less than other types of recirc systems since the pump only runs a few minutes a day. Also, on-demand pumps generally have much higher flow rates than other types of recirc systems to minimize wait times.
The Watts and similar bridge valves are low-volume-rate plastic devices that seem to limit the crossover flow to relatively low rates, based on the one I bought several years ago to use with our recirculation system (with under-slab uninsulated hot water lines). A newly patented (in 2021) all-metal temperature-controlled device that probably uses a bimetal closure to function like a thermostat, has a higher flow rate for on-demand system use (they call it an “advanced bridge valve”). A company called AquaMotion has developed this, with the high-rate one (apparently good for up to 5 gal/min) being for on-demand systems and a lower-rate version also available to function more like the older plastic ones. The nominal closing temperature is in the 95-105 F range, so that fully-hot water does not flow into the cold water line, but is still warm enough to be used by itself if you are washing hands or getting ready to shower. Combined with new on-demand system controls that detect the use of hot water (turn on the valve part way for 1 second, then off), they start the demand pump on a 30-second minimum timer (it stays on if hot water is indeed needed), and shut it down when the hot water use has stopped, The company says that this kind of need-detection on-demand system can be used with multiple such bridge valves, if desired, since each will automatically close once hot water arrives. This avoids the hassle of push-button starting or the annoyance of motion-sensor starting… it only starts up when hot water is actually being wanted and used, all by itself. As if this is the way it is supposed to be, not kluged!
Marty: Thanks for letting me know about that system. I like the idea of not having a separate button or occupancy sensor to start the recirculation. I’ll have to check it out.
What would be a minimum house water pressure when using 1/4 inch supply lines ?
Good question, Robert. Maybe Larry Weingarten will reply since he’s an expert on 1/4″ PEX hot water lines.
Hello, Is there any concern about “dead legs” with the piping that David Wasserman did? Also about running piping when there is a slab, there are tricks. I built a SIPS home on a slab, so have no attic or crawl space. I used large hollowed out baseboard for some of the 3/8″ PEX tubing that I have. Perhaps for retrofit, crown molding can be installed to create a raceway for tubing?
Yours, Larry
Larry, the dead legs you refer to would be the old sections that are bypassed, I assume. What would the concern be? Bad stuff growing in there? I admit that the water in there could be nasty if it sat for years and then you opened the valves again, but maybe flushing it out would clean it enough? And maybe turn the water heater temperature up while flushing it?
The dead legs I’m about to create won’t be there very long because I’m going to redo the whole distribution system next year. I don’t think David Wasserman has any plans to open his up, but I suppose a future homeowner might. I’m interested to hear what others have to say.
Hello, Here is a link to Uponor and their chart for 1/4″ PEX: https://www.uponor.com/getmedia/651addbe-6d75-4985-a07e-6c0e2229290f/pdam.pdf?sitename=USA . About dead legs, my concern is bugs like legionella growing in that nice warm stagnant water. I try to keep dead leg lengths down to inches if possible. I understand that you want at least one foot per second of flow periodically to make it harder for biofilm (aka, legionella habitat) to form. I do think that if we’re mindful and take precautions like flushing, then there isn’t any real problem.
Yours, Larry
Our 2 story house in SoCal is on a slab with 3/4″ copper tubing running up thru the attic for most of the runs. The kitchen is at the back of the house so the run goes up into the attic, across the attic and master bedroom and down the back wall into the kitchen (a long run). A straighter run could have been accomplished between the two floors and now with dry wall in place any changes would require a lot of demolition. We often just run water into a bucket at the sink to get hot water there, a huge pain but less of a waste. I’ve had an on demand gas water heater that past 6 years now and have considered all sorts of solutions to this, none of the them very cost effective. I did run a recirculating pump for a few years when I had a conventional gas water heater and it failed after a few years due to our extremely hard water here (440 ppm). Since I don’t mind waiting for the hot water but do mind wasting 4 gallons every time I need water I might get another recirculating pump made for my on demand system. I don’t see a PEX solution right now but at 34 years old maybe our copper system is living on borrow time anyway, lol.
Have the small undersink instant water heaters evolved from their original state? That may be a solution for me w/the pipes in the concrete floor?
This is so exciting! I’m working on a complete remodel of my 1965 built home. These ideas and concepts are so helpful in my quest to modernise my home! Thanks for your articles! I’m so glad I subscribe!
I installed several recirculating pump systems from Watts, with a crossover valve under the furthest away sink from hot to cold. it opens thermostat controlled. It works really well and the installation is simpler. If you have a second run, you just another crossover valve at the end of that one as well. The drawback is, that the pump runs all the time, but can be controlled by a timer.
On Oct 21, 2021, at 9:06 PM, arthur hybridhp.com wrote:
Thanks for this advice. My question is around durability and performance over time. I wonder if your initial experience plays out over time.
Other posts have indicated durability issues.
RC remote activation of this pump with a 15min? run time would solve your continuous run time issue. I had success with this strategy a return line in place and using the DMand brand. Door bell style push buttons at strategic locations worked well. A positive observation regarding that company, the initial pump had a bad internal solder joint. I repaired that and image captured the process. Sent that to them. They thanked me and sent me a new unit anyway. Nice result.
a
As I understand the Watts system, the pump activates when the thermal crossover valve opens. According to docs, the valve opens when the static water temperature at the valve drops to ~98F. This reduces energy loss compared to a typical recirc loop (because lines are maintained at much lower temperatures). However, there’s still a lot of wasted heat compared a high speed on-demand pump, which only needs to operate a few minutes a day.
A bigger problem with crossovers in my mind is that it puts warm water at cold water taps along the return path. That’s not much of a problem with a demand pump since it only needs to run a few minutes a day.
A new system that I’ve seen and plan to install uses a flow sensor to start up the demand pump. You turn on the hot water for 1 sec, then off. The pump is activated for 30 sec, or until hot water use is stopped. An “advanced bridge valve” can allow up to about 5 gal/min flow, and closes automatically in the 100 +/- 5 F temperature range. With such a system, hot water is not continuously fed into the lines, only to cool off. As such, it should be far more efficient than a recirculating timer or the system that you described (maintaining hot water in the lines all the time), and much more convenient than on-demand systems operated by push buttons or motion sensors. Just open for a second, wait a few more seconds for the hot water to arrive, and go!
Just a far-out question. Is it possible to fish a PEX line through an existing over-sized copper line, like a wire in a conduit? Sounds risky, but I thought I would ask.
John, I think I’ve heard of someone doing that, but you’d have to have a copper run with no elbows in it. Even if you could force it through the turn, PEX-B can kink.
Allison has it right based on my experience–we’ve pulled small pex through copper, but only sub-slab type S runs with bends instead of fittings. Works like a charm in that application though!
You forgot to mention the water demand calculator – this is like a Manual J only for Water demand. How many water heaters and lines are over-sized? Water demand should identify the size of the hot water line.
For us “wet-heads”, the copper line first needs to go through the buffer tank to get to 75F, then go into the in-direct for the final heat exchange up-to 120F. Some us even heat the house via a heat-exchanger connected to the in-direct. Low temperature water is a money saver.
Not knowing David, I would have expected nothing less, based on his lastname alone. How wonderfully fitting.
Allison, Regarding instant hot water, I installed a condensing boiler with indirect-fired hot water tank in 2006, and 2 years later got a utility audit in which they installed low-flow aerators in all the lav. faucets. That night I realize I would never again be getting hot water in my lav sinks, because the wait would just be too long. Patience has limits! So I researched hot water recirc systems and bought a Watts pump with themostatic-check valve. Since it was so easy to put in, I installed the cross-over valve under the furthest lav faucet between the hot and cold lines that day. I planned to cut in the pump at the water heater the next weekend, but I never did! In those few days I discovered we did not need the pump: with a water heater in the basement and the most distant bathroom on the second floor the buoyancy force between the less dense hot water and the cold was enough to cause a “natural” recirculation of cooled hot water back to the water heater through the cold water line. That was great… 3 seconds to warm water; what an incredible luxury!
But then I thought about the heat being lost in the interior of the house framing where it was not doing anything useful. I make hot water with an indirect fired tank served by a zone valve from my boiler. I already had a switch in the tank thermostat line at the top of the basement stairs for a quick shutoff when we are away from home. So I started to look for a time clock that could control that 24 volt AC thermostat circuit and disconnect it every night. I could never find one with dry contacts for 24 volts, but one night as I was trying to fall asleep and heard the boiler come on to make more hot water, it suddenly occurred to me that I could use that old programmable thermostat in my junk bin as a time clock for a 24 volt circuit. If I set the day temperature to 90 degrees F it will always call for heat (it never gets that hot in the house), and if I set the night setting to 45 degrees F. it will open the circuit all night. So at least we would not have recirc at night and we would not be heating hot water during the night when no one is using it. That worked quite well, and we always had hot water when we wanted it. I later extended the OFF times from 1030 am- 3pm and 8:30 pm – 6:45am. We can “coast” on stored hot water during mid-day and from 8:30pm until bedtime. We minimize hot water energy when we don’t need it and have instant hot water when we do want it.
Yes we no longer have instant COLD water, but who cares? We find we never really want it. It’s only needed to temper the hot water and the tepid water in the cold line will do that.
One other energy trick I employed: Our condensing boiler reduced our gas use by a significant amount, but it was not an ideal installation because it still served our high-temperature baseboard radiation. I thought about adding more lengths of baseboard so we could lower the supply water temperature reset schedule and get the return water low enough to condense the flue gas more hours of the year, but haven’t done that. As a stop-gap when I installed the boiler, I put a diverter valve in the return water line to the boiler. When closed it forces return heating water to go through the domestic hot water tank coil, giving up heat to the tank and lowering the return water temperature closer to the condensing temperature of about 135 degrees F. It doesn’t condense in the coldest weather when the supply water temperature is highest, but in mild weather it does get to condensing flue gas temperatures more often. It’s a good thing we have a 3rd heat loop zone for the basement, because that boiler doesn’t give up much waste heat to warm that area. I can hold on to the plastic flue pipe all day and just feel a pleasant warmth.
I moved into a house with a hot water recirculating pump on a timer. I like the water it saves, but it bothered me that any time the pump runs, the water in the pipes (in the attic) is leaking energy as the water cools. I discovered that even when the pump was unplugged, there was passive recirculation and our heat pump water heater ran on and off all day. Once I removed the thermal crossover valve at the distant sink, the kWH used by the water heater dropped by half!
My plan is to plug the recirculating pump into a smart plug and plug an electrically operated valve at the distant sink (in place of the crossover) into a smart plug. Then you program the app so that you simply touch one button on your phone and the system recirculates for 3 minutes and then shuts off. Convenient, plus saves water AND energy.
Now the problem is finding a smart plug that stays connected to the WiFi signal. I tried a Wyze plug which has not been reliable. Any recommendations or other ideas out there?
@Tim, I had the exact same situation in a previous home. At the time it was built (I wasn’t the original owner), timer-based HW recirc systems were required by code (thankfully, a group of us were able to get that changed). I didn’t find passive recirc to be a problem in my case, perhaps because it was single story.
I’ve had poor success with products general that rely on phone apps for connectivity. I hardwired my pump outlet to a new wall switch in a convenient location where I installed a short duration wind-up timer. Total cost was under $30. I had easy access in the attic where I re-routed the outlet’s electrical wiring to the new wall switch.
As for your passive circulation… an electrically controlled valve actuator and associated components would be rather pricey. I’m wondering if a simple check valve would do the job? Some types of check valves require a moderate amount of force to open. If I were looking for such a valve, I would post a query over at The Wall forum at heatinghelp.com.
Any spring check valve could not be opened by buoyancy forces only. The pump would have to be on to open it. Whereas a swing-check valve opens quite easily.
The thermal crossover valve is normally open and only closes when the water passing through it warms up. The problem was passive flow in the forward direction so a check valve would not solve that. Are you suggesting that the resistance to opening the check valve in the forward direction might be enough to stop the passive flow? In that case, I would put the check valve on the hot line before the thermal valve?
Yes indeed, Tim. A spring-check valve has a spring holding it closed and takes significant pressure to open it. More than available from the buoyancy difference between hot and cold water. On the other hand, a swing-check valve is much easier to open. Here is an example: https://www.supplyhouse.com/Matco-Norca-525C03LF-1-2-C-x-C-Bronze-In-Line-Check-Valve-Lead-Free-Spring-Loaded
I would be leery of sweat-type check valves. Too easy to damage the the seat gasket.
@Tim, here’s a spring-loaded check valve with 5 psi cracking pressure, more than enough to stop forward flow from thermal buoyancy: https://www.amazon.com/Ez-Flo-20452-Line-Check-Valve/dp/B00838IOLI
If you need 3/4″, search for Ez-flo 20453, or if you prefer brass: 20401LF & 20403LF (IPS).
Thanks to everyone! I think there is a better smart plug and a check valve in my future.
By the way, NILM seems to do for electricity what my Flume device does for water (unintentionally bringing this conversation back to water). It straps onto the outside of the main water meter and the app reports water flow into the house to tenths of a gallon. I have found it very useful here in thirsty California. I find it a stretch, though, that it is able to break down that flow into usage categories like indoor, outdoor, shower, toilet, appliances, etc.
Tim, I’ve had good luck with KASA smart plugs, by TP-Link. Some of them will record kWh used too.
Tim: I’ve got a bunch of the Emporia smart plugs and haven’t had a problem with them dropping the connection.
I have the Emporia Vue whole house electric monitor and am very pleased with it. So their plugs should also be as good. The Vue has a CPU with 17 inputs, one for a pair of current transformers (CTs) on the main entry wires, and either 8 or 16 for individual circuits. I discovered that my heat pump was using $3.00 /month in standby mode, so switched off its breaker. One other discovery: I monitor 8 of our largest loads (refrigerator-28%, stove-11%, heat pump – 0%, boiler-15%, kitchen plugs-1%, clothes washer-3%, dishwasher-0%, balance-48%). You can see the percents above for May, so far. The smart phone app that connects to the Vue also monitors their smart plugs, and shows kWh and percent of total for now, the past minute, hour, day, week, month & year. What I have found is that the balance of circuits with its many small plug loads consistently adds up to 45-50% of our energy use. These are loads we don’t notice like the receiver for anything with a remote or the porch light and are too small to individually monitor. Also a single plug circuit serves many rooms and has many small items plugged in. It would be great if these monitors could also recognize the electrical signature of these small items so you could decide if they are worth keeping connected. The Sense monitor can supposedly do this, at least for large loads (like the ones on my individual CTs). Does anyone have a monitor that can do this and how effective is it at recognizing small plug circuit loads?
@Gene, what you’re describing is referred to as non-intrusive load monitoring. NILM piqued my interest 35 years ago when I read about it in an EPRI research paper. At the time, the processing power required to pull this off was beyond reach. That finally began to change around 15 years ago.
We now have low-cost ASIC’s that can perform transient and harmonic spectrum analysis on the power line. But hardware alone can’t reliably disaggregate all the individual loads one finds in a home. The challenge, and thus the magic is in the algorithms and user interface design. A combination of machine learning (AI) and human intervention (i.e., device training) must be applied to make this work.
I haven’t been following NILM as closely as I once did, so I, too, am interested if anyone has experience with how well the Sense system works, or if other customer NILM products have been introduced. Apparently, most of the product development work is being done by companies that provide customer engagement systems and services to utilities, making it difficult to track progress.
Here are some links of interest:
Fraunhofer Institute – NILM overview
Venture Radar – search ‘Nonintrusive + load + monitoring’
NILM conferences
Wow, that’s a very extensive list. I had no idea that so many companies were making these non-intrusive monitors. I am very curious about their ability to recognize the small low-energy loads we tend to forget about. My Emporia Vue has revealed that minor loads are an important fraction of overall energy use if you are frugal with your major loads.
Dave, we had a Sense system installed with our new solar panels last summer. It actually works very well, and closely matches the data from the utility and the solar power Enphase Enlighten system that is also regulatory-grade monitoring. While it has not (correctly) identified all of our energy-use sources by their power “signatures,” it has gotten most of them. I can also look at the past, recent, and current real-time data from the Sense anytime that I want, and display the power-consumption (or solar-power-generation) details down to the sub-minute level (the smallest-timeframe display is 15 minutes on my desktop screen). It seems to be fast enough to get almost all of the heat pump surge current (and other surge currents) in the usual on-off cycles, and has shown me the power consumption of the 12.5 kW tankless unit that I had installed for the master bath (which is on the opposite end of the house from the water heater). Hair dryer, hair curler, clothes iron, computers, induction cooktop, microwave, Ninja Foodie mini-oven, big wall ovens, and motor-running devices like our heat pump water heater, refrigerators, a freezer, and mini wine fridges…it sees all of them on the demand side. On the solar supply side, I can see the effect of variable-density clouds passing overhead (the panels keep working even when unevenly shaded), or the shading effect from nearby trees, or the daily blue-sky differences in production as the sun’s course varies in the sky. They also have a feature which detects faults in the incoming power line or within the home (in the “Sense Lab”), which have fortunately been not activated in our case, and the display can be set up with your personal electric power rate structure (including “time of day” and “day of week” and “time of year” rate adjustments), as well as your particular billing cycle, to estimate the electricity-use portion of your bill. A comparison of your use with “similar home” and “within your state” users is also available, as well as a real-time graphical breakdown in a type of bubble plot that shows your current use and how it is attributed to certain devices/uses or to “other.” I used its daily and monthly summaries of information to compare with the Enlighten and utility data. Lots of information that you can use, if you want to.
Marty, I have the Emporia Vue2 with CT’s on 8 circuits and the main breaker, plus a few smart plugs that also measure power. I use it to check to see what our mini-split is doing after I turn it on, since these heat pumps have virtually NO user feedback devices to tell you how or if they are doing what you want. (My boiler has a Pressure-Temeperature gauge and control error codes that are very useful.) I added a smart plug on my garage door opener and have it scheduled to shut off every night at 11 pm and turn it on manually if I need to open the door. I still would like to know what is going on with plug loads and lights, since the “balance” of the un-measured items in the house amount to 40 to 50% of total use. For instance, in August it was 41% of the total. I can see that we have various things that are used for many hours, mainly lights, I think. But I wish it could figure it out what they are. I know our garage door opener was 1% of the total for August, about 2 kWh, but I’ll bet the kitchen ceiling light is one of the bigger items. But is it more than Our computers, modem and backup hard drive? Can your Sense identify lighting loads ? The balance is such a large fraction that it makes me very curious, even if there is little I can do to eliminate it.
When we bought the house, we converted all of the lights to CFLs or LEDs, and as the CFLs have gotten older, and some have burned out, I’ve used LEDs for all replacements. We had a 4 ft 4-light fluorescent fixture on the ceiling in the kitchen when we bought, and immediately replaced that ugly old piece of junk with a nice thin edge-lit LED 2 ft by 4 ft panel that puts out 7000+ lumens, and recently added six 4″ LED recessed lights for another 3500+ lumens around the perimeter (the panel is over a central island). These use so little energy (the panel is only 70W) that the Sense has not (yet?) recognized them in the low-level noise. It is picking up the start-up spikes of the small wine fridges, but their compressors are so small and efficient that their running power is just a little bit higher than the background from the computers, wireless home phone, cable modem/wifi, clocks, and other very low level users (including the few watts for the Sense module). As I write this, the lights are all off, and Sense is reporting that our “always on” load is 275W, 89W of “other” (i.e., unidentified), and 112W for a fridge, which I suspect is our 4 cu ft wet bar fridge, but our computers are still buried in the “always on” category; our solar output is at 4 kW (it is morning here; we’re currently peaking at about 5 kW in mid-day). The lowest-energy devices that I see in its artificial-intelligence-identified list are the garage door, a “motor,” two “lights” (I don’t know if that is correct or not), a “vacuum” (we have a central vac), and my laser printer, which is small and only used on random occasions. So, I think, depending on the energy load and “waveform” associated with any given light it may or may not be able to identify it. Based on my interpretation of the description of the tech in the instructions, a reproducible and differentiable waveform pattern in the energy use is a key component for their algorithm. In our low-energy-use-by-intention house it does not seem to find most of our lights. For that matter, it has not (yet) identified our heat pump water heater, which must have a built-in soft-starter since I don’t see any start-up spikes that I’d associate with it (but I have not done the intentional experiments to see it, either).
Thanks Marty for the additional insights into the Sense AI system. Our house dates to 1968 and we have made many updates. We also have a mix of CFL and LEDs lamps; those CFL’s just don’t want to die. Some are over 30 years old! I guess there is really no practical way to get at lighting and small plug loads, except perhaps dedicated smart plugs. Our total power use is low, under 4000 kWh / year and that may be why the unmonitored small loads make up about 50% of that. I recently put a smart plug on our garage door opener, so I can turn it on only when I need it. It draws only 7 watts, but that’s 50 cents a month in CT that can be turned off. But some circuits supply several rooms for light and plugs, with many things connected. When everything is off our load is just under 100 watts, and we use power strips to shut off our two TVs completely. The family room entertainment uses 19 watts when they are all off; almost $3 / month. So power strips are worth using. I guess we are NOT going to be able to separate these loads, whether by AI or circuit monitoring, and it is likely we cannot eliminate many of them. After all, we do need lights from time to time. It just surprises me that it is such a large fraction. I think I will put a smart plug on our entertainment center to monitor that use. I suspect it is a large fraction of our unmonitored loads. I probably won’t want to change that, but it will be an interesting data point in out on-going science experimant.
Now THAT’s super-low energy use! In our climate, year-round heat pump use keeps our total consumption a lot higher than yours, at about 12 MWh per year, even though we have a newer house than yours (1987) but it was fairly well built, with 2×6 R-19 insulated walls, R-30 ceiling, and Andersen Thermopane casement windows. But it has its flaws, like the attic-mounted air handler and old flex ducts, and under-the-uninsulated-slab hot water line, etc. That’s why we decided to put in a solar array that would generate about 90-95% of our energy use, even though we still end up paying the utility for the grid connection, etc., plus the extra power, and the differential between our selling price and their selling price (set by the utility commission) even when we generate more than we use in a month. We see it as pretty optimized in that regard, but still want to improve the HVAC system situation, as well as dealing with the hot water supply and waste issue that is the main subject of this article.
Marty, I don’t know if I mentioned that we live in central Connecticut, with 6200 deg-days /year (and decreasing). We have a 4 BR colonial house with 2 older occupants (once we were 6). More house than we need now, but we are invested in it. We have put in double pane sash kits and retained the original storm windows, so kind-of triple glazing, plus 3-layer pleated shades, that add almost R-3. We have 15″ of fiberglass in the attic and had the walls foamed over the 1.5″ fiberglass that was in them (1968 construction). I have caulked around all the window trim and baseboard radiation. where the blower door showed leaks. I even foamed our electric outlet box holes and gasketed the covers. We have”last-forever” aluminum siding that we repainted about 25 years ago and it is still in great shape. I don’t want to remove that and cover the sheathing with 4″ of polyiso or Roxul with proper air sealing. If the siding was beat up I would, but there’s too much embodied carbon in that nice aluminum. We have tall trees on 3 sides that shade our roof, so no solar.
We have a condensing gas boiler that also makes domestic hot water, so we burn about 670 ccf of gas/ year (40 kBtu/ SF-yr). We do have a mini-split heat pump with one head on each floor, that we are running right now for heat in mild months. An article I read recently said that the HSPF rating for heat pumps is not a good predictor of energy use for variable speed compressors (it underestimates actual use). I have made an estimate based on the HSPF with a reduction for that fact (using HSPF 9.5 instead of 10.3 it is rated for) and I get a result that we would need 6600 kWh more each year (over the 3500 kWh now) to replace the 62.2 million Btu’s provided by burning 670 ccf of natural gas, and that would cost $465 a year more than the gas. I expect a big increase in gas cost this year so maybe that difference will drop a bit to $330 or so, but it will definitely be more expensive to run the heat pump all winter, and I am not so sure the heat distribution will be acceptable (oil and especially propane users would see savings, though not a great payback). Several single zone heat pumps might do better, because I have seen HSPFs as high as 13 kWh/kBtu, and that would save about $110/ yr. IF you don’t have access to solar and do have the option for a condensing boiler, I don’t think an air source heat pump can compete on operating cost or, if it’s very efficient will have a VERY long payback. I don’t know how we will achieve mass electrification of existing homes with the current air source heat pumps that have little or no operating cost savings and a rather high installation cost to provide good distribution in 3 and 4 BR homes. Only higher gas costs and lower electric costs or more efficient heat pumps can solve that puzzle.
IMHO, what we need are high temperature hydronic heat pumps that can use the existing baseboard heat terminals in older north east homes. They would have to make 170 degrees F. hot water and probably use CO2 as a refrigerant, but they would keep the conversion cost down and have a cheap resistance backup in the indoor buffer tank. Relying on leak prone heat pumps for winter heat in a cold climate with no backup seems like a bad idea. Imagine a 4-hour refrigerant-leak repair in 18″ of snow; not good! A hydronic model could be quickly removed and repaired in a shop. Also we have to stop using R-410A refrigerant that has 2,085 times the GWP of CO2. Two leaks in my 3 year old mini-split had the global warming impact of two years of burning natural gas. And R-32 with a GWP of “only” 700 isn’t much better. The one-piece construction of hydronic heat pumps make them less leak prone too; no field joints are needed. We have low-temp hydronic heat pumps available now, but I suspect the Dutch will beat us to the high temp model.
I seem to have gotten a bit off the track of home electricity monitoring, didn’t I ? But with my new Emporia Vue, I can track my heat pump power use and maybe I’ll do a little experiment in November and December to heat the house. I’ll still be getting gas bills for domestic hot water (and the $18 customer charge), so will be able to track gas prices too. Rising gas prices have driven electric prices up 40% here since January and for the first time in 20 years or so, no vendor is offering 100% renewable power in CT. My previous vendor pulled out of the state in August. So right now I can only buy 33% renewable power.
Gas would be nice to have, but when I checked on the cost to install a tap into the line at the street, feed to our house, and (being slab-on-grade) a distribution network in the attic to the WH, cooktop (as an alternative), and fireplace, it was going to be about $8000. So we have stayed all-electric, and worked on changing-in energy efficient replacements, like the efficient replacement for the failed heat pump HVAC system when we bought the house, heat pump water heater, induction cooktop, and Ninja Foodi mini-oven.
We’re at 4000 ft in northern AZ, so we can get hot (105-107F) in the summer and cold (some 2 ft snowfalls, lows around 20 F) in the winter. Our Carrier Infinity heat pump (2013 vintage) works well year-round, with only occasional use of the 10 kW electric add-on heater in the air handler during the colder weather and programmed-thermostat transitions, as well as the inevitable heat pump “thaw” cycles in winter (which are not too often, since we usually have dry air). We have not experienced any refrigerant leaks in the 9 years we’ve had it, although the previous owners went through 5 outdoor units in 25 years because they never changed out the leaking heat exchanger in the air handler. We did.
There is a claim that a modification to create a higher-efficiency heat pump has recently been invented, which could be incorporated into heat pump designs pretty easily if it is confirmed to be significant and cost-effective. It would be easy for manufacturers to use the same heat pump models as today, but offer this as an upgrade feature (read: higher cost and higher profit) by just adding it into their existing line(s) of products.
Like you, we’ve also “upgraded” our Andersen windows with tightly-friction-fit 1/4″ “optically clear” acrylic interior panels, which I custom ordered to fit where the casement screens used to go from an on-line supplier. I also ordered automotive trim with a hollow foam bubble that can be compressed, and a 1/4″ push-on fitting that goes on the acrylic, in black, so it largely disappears and provides the seals for the panels. These have improved the windows’ resistance to outside noise as well as our energy efficiency. So far, so good.