A Weekend Plumbing Adventure
Did you know that some plumbers stuff a wad of white bread (sans crust) into a pipe before they solder it? That’s one of the things I learned during my weekend plumbing adventure. More about that later, though. The purpose of of my weekend plumbing exploits was to cut the wait time and wasted water for three of my hot water fixtures. It takes 2.5 minutes for the hot water to reach my kitchen sink and a minute for it to arrive at my shower. So this weekend I tore into my plumbing with the aim of improving the hot water delivery to those two fixtures plus my bathroom sink.
The plan
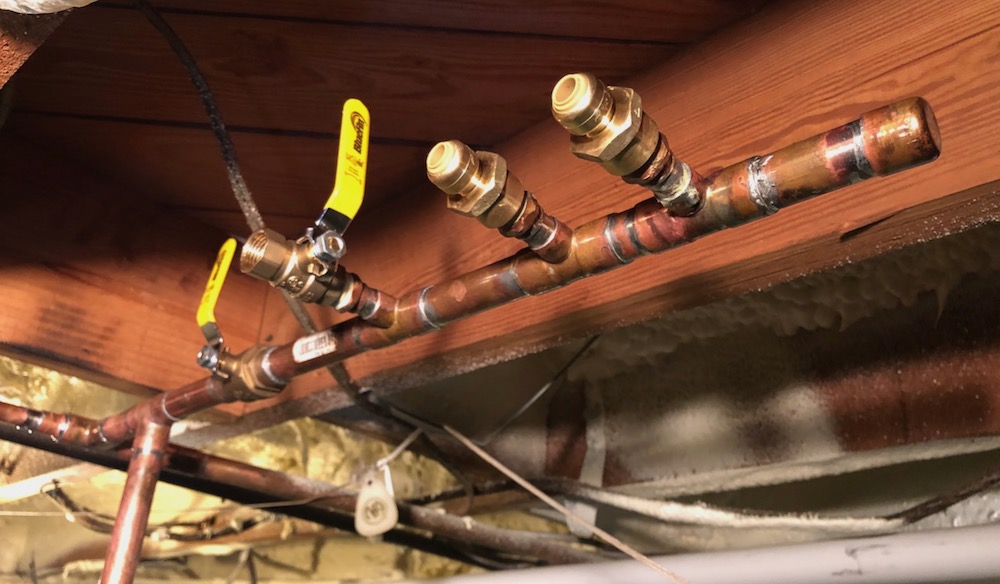
My plan for this hot water retrofit is based on the one I wrote about last year. My friend David Wasserman had long wait times for hot water, too, so he installed smaller pipes that bypassed the longer, larger pipes. Like he did, I built a manifold for the bypass runs. You can see it in the lead photo above. What I’m doing differently, though, is eliminating the original run to those fixtures.
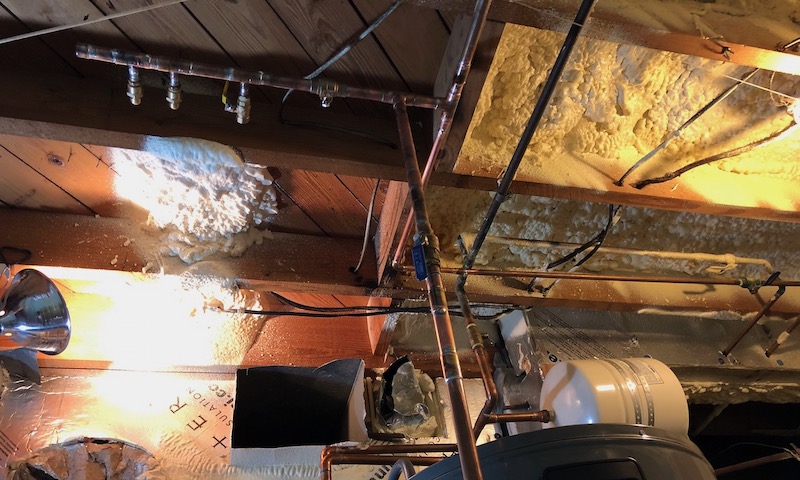
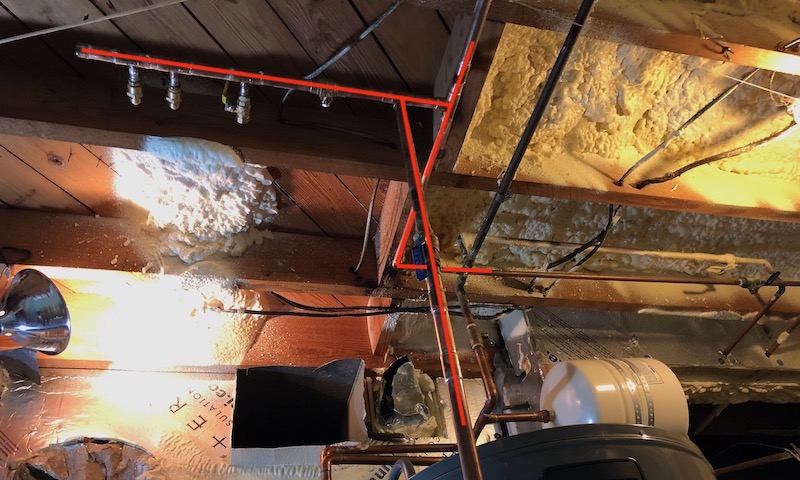
The photos above and below show the part of my hot water plumbing that I worked on. They’re the same photo, but I highlighted the sections I replaced and added. The manifold is the part on the left. To give you perspective, I was crouching near the water heater (bottom right) and looking up toward the mechanical room ceiling.
The manifold has three ports, one for each of the fixtures. It’s basically just 3/4″ copper pipe with tees for the three ports. The ports come off at 1/2″ size and then go to a threaded adapter that connects to a Sharkbite push fitting. Then, PEX tubing goes from those fittings to identical fittings near each fixture. I’m using 1/4″ PEX for the two bathroom fixtures, which are about 8 and 18 feet away. For the kitchen, I’m using 3/8″ PEX. (See my article about Wasserman’s retrofit for details about the parts I used.)
A complete failure
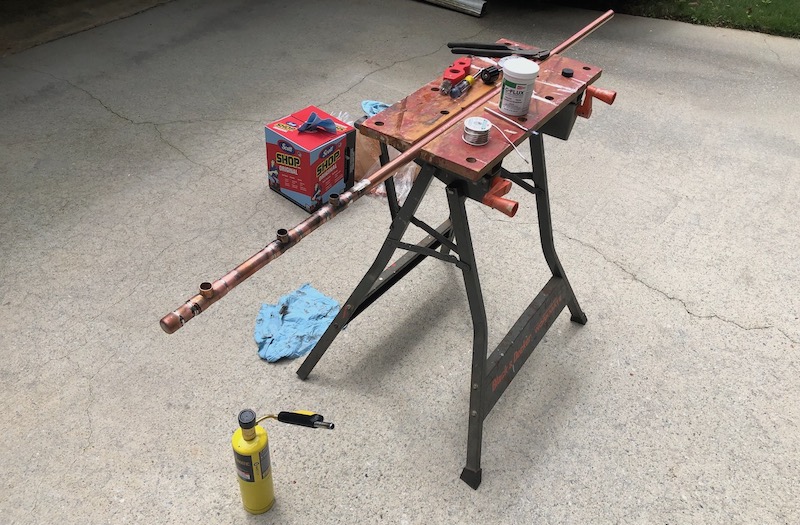
The good news here is that I was working only on the hot water lines, so I didn’t have to turn off all the water in the house. Because you know where this is going, right? I soldered the manifold together a couple of months ago. Since I did it on my portable workbench outdoors, it was pretty straightforward. It was also a good way to learn to solder copper, which I hadn’t done before. (Now you really know what’s coming!)
Installing everything in place, though, presented challenges I didn’t have on the workbench. Plus, I should have reviewed the soldering videos I learned from and studied up on installing whole assemblies. After working most of Saturday on this project, I finally had it all put together at about 7 pm. So I opened the valve and…
Water was spurting everywhere. It was a mess! One fitting was leaking quite a bit, but others were leaking, too. I don’t know how many of my 20 solder joints were leaking because I didn’t want my mechanical room to get any wetter than it already was.
After closing the valves, I tried to do some repairs. That didn’t work. I gave up at about 9:30 pm Saturday, frustrated and dispirited. I was afraid I’d never be able to get it to work and was feeling down about the whole project.
Assessing, regrouping, and…
The next morning, I went back to the YouTube videos on soldering copper pipe and did some reading, too. I studied what I had done and found several mistakes I had made (fittings too hot, fittings not hot enough, not dry-fitting everything before soldering…). Then I made a list of stuff to buy and headed off to Home Depot.
Upon returning, I disassembled a lot of what I had done the day before and started over. I also bought some tools that made the work go smoother (see below). It took me all of Sunday, but I finally had the system ready to test at 6 pm. I crossed my fingers and opened the first valve.
Success! The first four solder joints were dry.
Then I opened the second valve. There were 14 more solder joints to be tested here. And…
They also were leak-free. Whew! What a sense of relief I felt. I really did not want to have to call a plumber to come do cleanup on my DIY job.
Current status
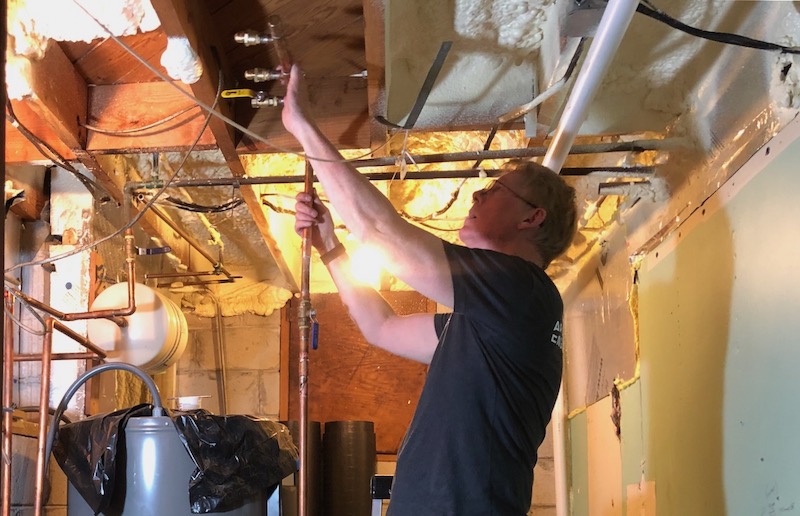
I don’t have the three new runs going yet because there wasn’t enough time. After that huge sense of relief, I celebrated with a couple of Moscow Mules in the backyard. You can see the current status of the manifold below. Starting from the left, there’s a shutoff valve for the manifold. The next port is the one going to the kitchen. I’ve got a valve on it temporarily because I’m going to do this run later. It requires going all the way to the back of my encapsulated crawl space, so I want to have plenty of time for that.
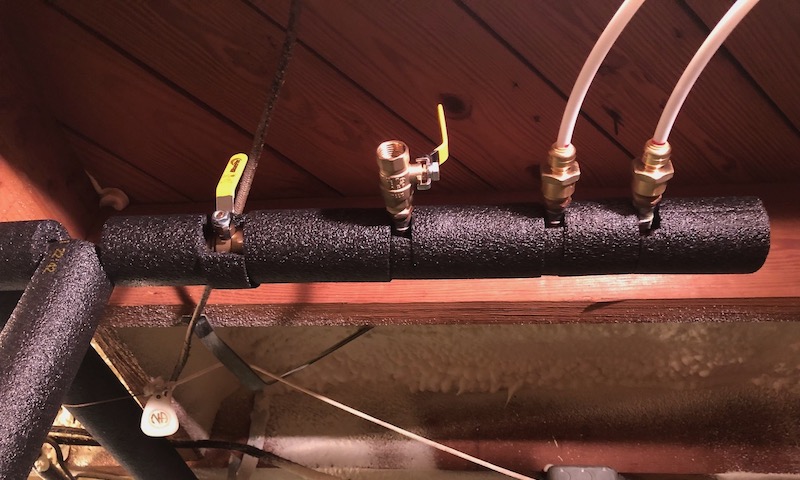
The two runs to the bathroom have the white PEX tubing inserted into the push fittings at the manifold. They’re not connected on the other end yet, though. I’ll need to turn off the hot water again to do that, and I’m waiting till Thursday to do that. My wife goes out of town then, so it’ll be better for my prospects of staying married if I do it while she’s away. (You know, like that time I gutted the bathroom in my condo while she was gone for a week.)
Lessons learned
Let’s start with the topic of putting white bread into a pipe. The reason some plumbers do that is that it’s difficult to solder a leak-free joint when there’s water in the pipe. Stuffing a wad of crust-free white bread into the pipe can absorb and block the water long enough to solder. But my wife raised the concern about bacteria in the line afterward, and so did one of my LinkedIn connections. So instead, I used my shop vac to suck as much water out as I could and then blow the rest as far back as possible. And now I have a loaf of Wonder bread that I’m wondering what to do with.
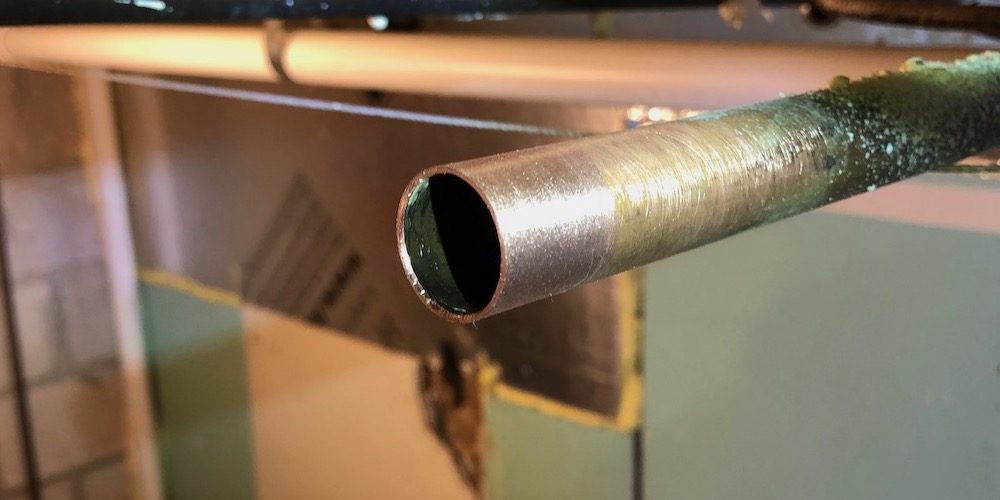
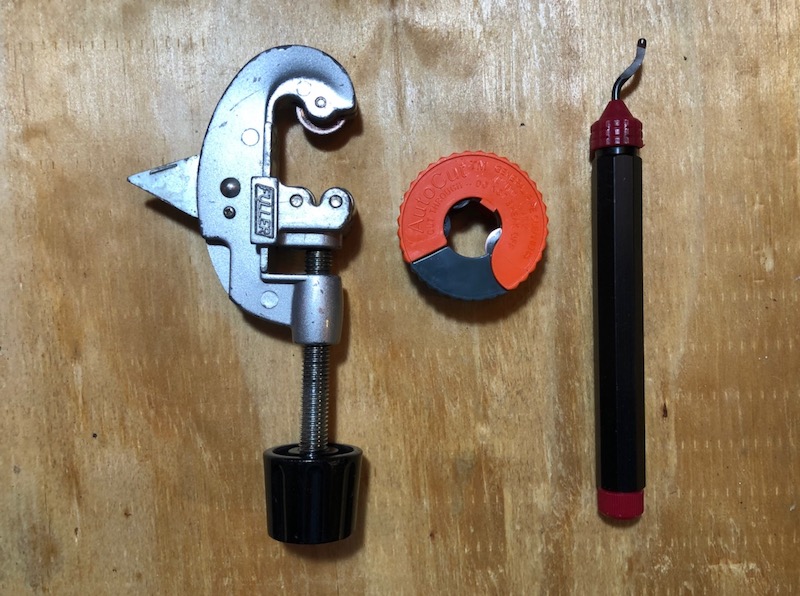
Another lesson I learned is that the right tools can make a big difference. My copper tubing cutter (below left) does a fine job of cutting pipe, but it requires a clearance of about 15 cm around the pipe to do so. Sometimes joists and other obstructions don’t give you that much space. The Autocut tubing cutter,* the orange and grey donut in the center of the photo, cuts well and requires little space.
The other tool I loved finding out about was the deburring tool* on the right. It’s a huge upgrade from the dull blade that comes on the backside of the standard tubing cutter (the triangular piece pointing to the left). It’s soooooo much better and faster than that other one.
Of course, I had to learn how to solder copper pipe (also known as sweating copper) and retrofit a plumbing system to make all this happen. Some of the best videos I found on learning to sweat copper are on the Got2Learn YouTube channel. I started with his How to Solder Copper Pipe the CORRECT Way and watched several of his other videos, too.
And then there are the personal lessons. I may be getting old, but I can still learn new tricks. But the other side of getting old is there, too. I was stiff and sore after a full day’s work on Saturday. I was even having back cramps, which I’ve never had before. But the biggest lesson—which isn’t new to me—is that you’re always going to hit some roadblocks. It’s how you respond when you hit them that determines your success or failure.
Allison A. Bailes III, PhD is a speaker, writer, building science consultant, and the founder of Energy Vanguard in Decatur, Georgia. He has a doctorate in physics and writes the Energy Vanguard Blog. He also has a book on building science coming out in the fall of 2022. You can follow him on Twitter at @EnergyVanguard.
Related Articles
A Hot Water System Retrofit for an Old House
Why Your Hot Water Takes So Long
Living With a Heat Pump Water Heater
* This is an Amazon Associate link. You pay the same price you would pay normally, but Energy Vanguard may make a small commission if you buy after using the link.
Comments are moderated. Your comment will not appear below until approved.
This Post Has 29 Comments
Comments are closed.
You did not fail, you found out how not to do it and what didn’t work.
True! I’m good at that when I take on new projects.
I’ve been an MD since 1978. The risk from bacteria in the line because of putting a piece of white bread in it to absorb the water is zero. Just flush the bread out when you’re done. I too have used the white bread trick, and it works great.
JDaveF: Thanks. The consensus here seems to be that it’s fine. My shop vac did the trick for me this time, but I’ll try the bread trick in the future if the need arises.
Excellent article Allison showcasing your dedication to improving all things energy-related. It’s rare that I feel I have anything to add to one of your articles, but this time may I suggest bread pudding with whiskey sauce to hide any ill effects of using Wonder bread versus French bread?
Debbie: Thanks! Bread pudding with whisky sauce sounds really good!
Did you consider going all Pex?
After only 3 years my copper pipe started springing pinhole leaks, poor manufacture I suppose. So I replaced with all Pex and no problems since. Do you have some data on pex vs copper?
John: If I were redoing the plumbing in the whole house, I might have done that. The new runs are PEX, but I’m tying them into the existing copper plumbing.
No, I don’t have data on copper vs. PEX.
My many years of building, including plumbing, taught me that having copper really clean is the most important thing. Also, you only apply heat enough to suck the solder in and form a small droplet on the underside that you wipe away with a damp cloth. My personal solution to your goal of faster hot water at the kitchen sink is a 1 gallon undersink point of use 110v water heater that cost under $200. I have my electrician provide a 110v circuit under all my kitchen sinks just so my customers can add this later on if they so choose. Hot water instantly for all of those short bursts you want at this sink. Kitchen is the main place this is important. Every time
I use hot water in the kitchen, I smile a little at how much I appreciate it.
Thomas: Yeah, the importance of clean surfaces is one of the things I learned from my online soldering education. Sunday morning I learned of something that I may have been doing wrong in that regard, too. After you clean the outside of a pipe or the inside of a fitting, you shouldn’t touch it. The oils from your skin don’t get removed by the flux. I can’t find it now, but one of the videos I watched showed how the solder didn’t stick to a place that had been cleaned and then touched before applying flux whereas the one that hadn’t been touched worked fine.
The point-of-use water heater is fine in some applications, and I’m glad it works for you. I’ve got too much invested in my heat pump water heater, however, to not use it in such an important place as the kitchen.
We tested https://www.sharkbite.com/us/en?gclid=Cj0KCQjwof6WBhD4ARIsAOi65ajoV_YsqsCsCbeO0D1e5T1LTK1WqGG0rMRhAuLrvelWL_HsXcs9uXYaAu6pEALw_wcB on https://ideapete.com/project-metahome/ and it beat the soldered joints every time
Pete: I’m using Sharkbite fittings for my PEX runs.
Generally the two things to an easy copper solder joint are shiny clean connections and adequate flux added before the heat. Most of the time a small amount of moisture will steam off when heated with mapp gas. If you are going to have steam on a final connection that will seal the pipe system, plumbers will add a coupler with a small screw on opened drain first.
Amazon example of coupling with drain cap to release steam:
Supply Giant EDXD0012 1/2″ Lead Free Cast Brass Straight Drain Coupling with Cap
rj: Thanks for the tips. Yes, clean surfaces are definitely critical.
The fail I felt the greatest sting from was not knowing to go open the faucets in the upstairs bathroom so the water could drain completely before trying to solder a copper joint going to a dishwasher in the kitchen on the first floor, of a neighbor. Since the water was always in that pipe, I literally could not get the joint to solder and hd to give up and call a real plumber. Life sometimes comes at you fast.
Or you could have used a Sharkbite fitting of the appropriate type. No problems with water at all. In fact, Allison’s project could have been done with Sharkbite fittings vs. soldered ones, including the tees, going from the copper line directly to PEX line with the same fitting. Yes, they are more expensive, but they are much faster and less problematic than soldered connections, and can even be undone and re-used if necessary. No, they don’t leak if properly installed. Been there, done that. Another advantage of the Sharkbite fittings vs. the typical inside fittings with clamps on PEX is that the Sharkbite barely reduces the inside diameter at the connection, while the metal or plastic inside fittings greatly reduce the diameter along the full length of the fitting; the flow (and pressure) reduction effect at elbow fittings is significant, and can be problematic in some installations. Compare the inside diameter of a metal or plastic inside fitting for 3/4″ PEX with a Sharkbite, and you’ll see a huge reduction in the open cross section area, whether compared to the 3/4″ PEX or to the Sharkbite, which goes OVER rather than INTO the PEX. And you don’t have to buy the special crimp rings and crimping tool ($60 for the tool) in order to install or remove the Sharkbite fittings.
Marty: Yeah, I could have done all Sharkbite fittings, but I wanted to learn how to sweat copper. I watched my grandfather and uncle doing it when I worked summers with them as a teenager, and it’s a skill I wanted.
Your point about inside fittings is an important one. It’s always best to use fittings that don’t reduce the diameter, especially elbows, which also introduce turbulence by turning the water.
Bill: Ouch! That sounds like one of those “No good deed goes unpunished” events.
Allison, congrats on your perseverance! My soldering lessons learned were to make sure the flux is good (who knew it can go bad over time and not work AT ALL!).
Also, be wary of borrowing a friend’s torch that then falls apart (when lit) and creates a fireball right under a gas line in your crawlspace! Wow, that sounds worse than it was – I calmly smothered the flame, turned off the valve (and then wet my pants).
Good torch and good flux with clean fittings makes all the difference. A cookie sheet or piece of sheet metal keeps the heat away from framing and a wet rag is good to keep nearby (and to cool and wipe down recently soldered fittings). I also like the convenience of having the sparker built into the torch – definitely recommend this feature. Also, I have also used the bread trick and it works! Good times! -mikeb
Mike: Thanks! Saturday ended badly, but Sunday was a different story. I was ecstatic when I opened the valve and everything stayed dry.
Yikes! A disintegrating, lit torch making a fireball under your house? Wow! I asked my experienced plumbing and hot water expert friend Larry Weingarten for his recommendation of a torch and have been very happy with it. It does have the built-in sparker. I also sprang for a flame resistant pad to help me not set the house on fire and had wet rags handy, too. The wet rags also helped (I believe) with keeping nearby joints from melting when I was soldering.
Fun read Allison – great adventure! BUT – “never had back cramps before” should have been your warning – unfortunately it is a warning that comes AFTER the misadventure – too many lessons learned in life are like that.
Good on you for sticking with it – – the best way to learn (as you clearly know).
Roy Collver
Roy: Thanks!
Don’t worry about germs in the pipes. If you only knew how much minor blood and skin gets in pipes you’d probably be aquaphobic.
Adam: I think I may have put some of my blood in the pipes here. I was feeling the burr on a freshly cut pipe and put a nice little slice on my finger that bled for a while.
Allision, did you consider a smart hot water recirculation solution. It saves water and will deliver desired outcomes with a little bit of pre-planning. You can voice-enable most solutions as well. “Alexa, turn on hot water”.
I did circulation in my 1903 Vic, fairly easy 1650 sqft with good crawlspace, and love it. Saw the Emporia smart sockets and put the pump on one, and now schedule regular start,stop and on demand with it plus see energy use.
AND kept more private than Siri. Next water heater will be heat pump.
James: Yes, I did. I had a couple of calls with Gary Klein about my hot water distribution, and that’s one of the things that we discussed. The demand-type recirculation systems work well and use far less energy than continuous recirc systems, even when they’re on a timer. I wanted to try David Wasserman’s method first, though. (See link to my hot water retrofit article above.)
I feel your pain… 25 years ago we owned a 1912 vintage house with a “octopus” gravity hot air system that I converted to baseboard radiation. The way the house was put on the foundation meant that each “end” of fin tube I installed required four to six 3/4 copper ells, most of which needed to be soldered in a very restricted place between wood joists and flooring. I did improve my technique quickly! Mostly I needed more heat, so a MAPP gas torch helped a lot along with flame shield material to allow me to get in-between the joist and wood construction without putting the structure on fire.