How to Kill the Performance of Your Insulation
If you want to kill the thermal performance of your insulation, you can take your pick of several excellent ways to do so. Of course, you could just not install insulation. (It happens, even in new construction.) You also could install the insulation unevenly. Or you could interrupt the insulation with more conductive materials, like wood. But if you want to take your insulation-killing skills to the next level, use steel.
The benefits of exterior continuous insulation
My article on series and parallel heat flow in walls shows that you don’t always get the R-value on the label of the insulation you install. For example, let’s say you build a 2×6 wood-framed wall with studs spaced 16 inches on center. Then you put R-19 fiberglass batt insulation in the cavities with no other insulation. Cover it with drywall on the inside and sheathing and cladding on the exterior.
Do you have an R-19 wall? No, when you average the effect of the wood studs and add in the other materials (e.g., drywall, sheathing…), you end up with R-15.8. That’s a 17% reduction from what it says on the label. When you add in the effects of the other framing (e.g., top and bottom plates, corners, rough openings…), the net thermal resistance drops even lower.
One way designers improve the thermal effectiveness of wall insulation is to add continuous insulation to the outside of the wall. If it’s truly continuous, that improves the thermal performance tremendously. Instead of putting R-19 in the stud cavities as above, let’s say you put R-19 continuous insulation on the outside of the wall. That results in an average R-value of 22.9, an improvement of 21% over the labeled insulation R-value and 45% over the R-15.8 we got above.
But how does the attachment system for exterior continuous insulation work? And does it degrade the thermal performance? Let’s look at the three most popular methods.
Vertical z-girts
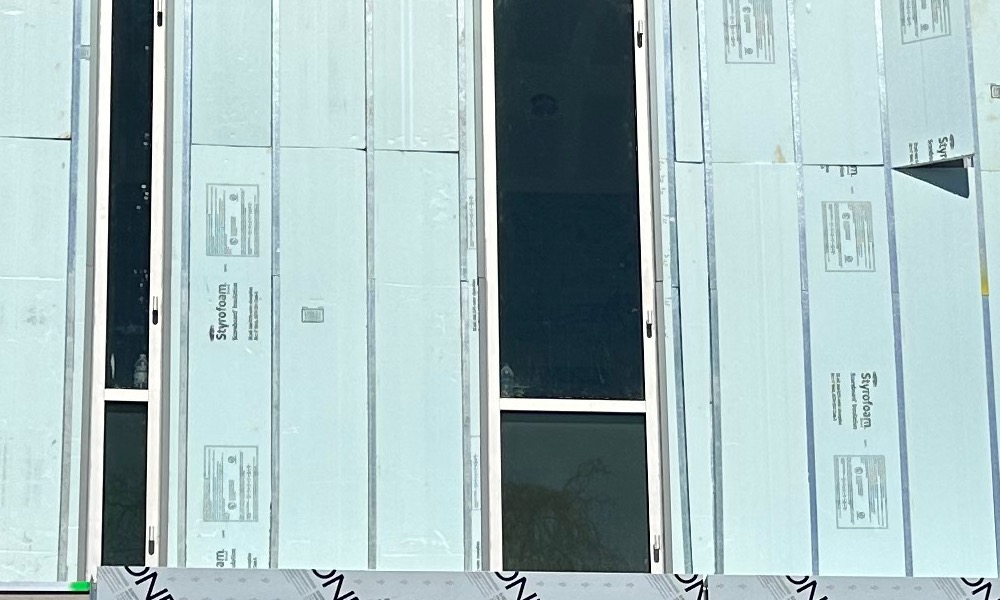
What got me thinking about this topic was a building under construction near the Energy Vanguard office. The lead photo above shows a closeup of part of the wall. You can see the blue extruded polystyrene (XPS) rigid foam insulation. You also can see the vertical metal strips every 16 inches apart. Those are called z-girts.
![Vertical z girt attachment system for exterior insulation before insulation is installed [Photo from RDH Building Science report]](https://www.energyvanguard.com/wp-content/uploads/2023/03/exterior-insulation-vertical-z-girt-attachment-rdh.jpg)
![Diagram of a verical z girt [Chart from RDH Building Science report; link below]](https://www.energyvanguard.com/wp-content/uploads/2023/03/vertical-z-girt-exterior-insulation-attachment-diagram-rdh.png)
Installing the z-girts horizontally gives you a bit of improvement, but it still has a thermal efficiency of only 30-50 percent. Using crossing z-girts, where you do one layer vertical and the other horizontal, is another step in the right direction, with an efficiency of 40-60 percent. Going with fiberglass or other nonmetallic materials for the girts gives you a bigger boost.
Clip-and-rail attachment
A second way to attach exterior insulation is with a clip-and-rail system. This reduces the contact at the wall because the clips don’t run the whole length of the rails. Also, the clips, rails, or both can be made of fiberglass or other nonconductive materials. Or they can be made of less conductive stainless steel.
![Clip-and-rail attachment system for exterior insulation before insulation is installed [Photo from RDH Building Science report; link below]](https://www.energyvanguard.com/wp-content/uploads/2023/03/exterior-insulation-clip-and-rail-attachment-rdh.jpg)
Long screws
Using long screws is probably the most common way exterior insulation is attached to walls in new home construction. The screws go into wood strapping, girts, or hat channels on the outside, then all the way through the insulation, and then into the structure. The photo below is from the RDH report and shows how that system works with wood strapping and three layers of mineral wool insulation on the exterior.
![Attaching exterior insulation with long screws [Photo from RDH Building Science report; link below]](https://www.energyvanguard.com/wp-content/uploads/2023/03/exterior-insulation-long-screws-attachment-rdh.jpg)
Building science labs are still testing various configurations and attachment systems. The photo below shows a test of long screws through two layers of 2 inch thick rigid foam 8 feet high. Hanging from the bottom of each is a bucket of rocks. A deflection gauge measures how much the weight pulls it down. The answer is that if you do it right, it works.
Now, the screws aren’t free of thermal penalties. They’re made of metal and thus conductive. But there’s a lot less area for heat to conduct through with screws. And then there are two kinds of screws: galvanized steel and stainless steel. It turns out that stainless steel is great for structural use, especially where corrosion can be a problem. And they’re also great at reducing the thermal penalty because they’re not nearly as conductive as galvanized steel. Of course, the penalty with stainless steel is that it’s more expensive.
The thermal performance of various attachment systems
The chart below is from the RDH paper. As you can see, galvanized steel vertical z-girts—like the ones I saw yesterday—are the worst. The two best, at greater than 90 percent thermal efficiency, are stainless steel screws and fiberglass clips with no screws. Everything else falls somewhere in between.
![Thermal effectiveness of different attachment systems for exterior insulation [Chart from RDH Building Science report; link below]](https://www.energyvanguard.com/wp-content/uploads/2023/03/exterior-insulation-attachment-systems-thermal-effectiveness-rdh.png)
Download the RDH paper: Cladding Attachment Solutions for Exterior-Insulated Commercial Walls
Also see papers on thermal bridging from Building Science Corporation, like A Bridge Too Far, by Joseph Lstiburek, PhD, PE.
Allison A. Bailes III, PhD is a speaker, writer, building science consultant, and the founder of Energy Vanguard in Decatur, Georgia. He has a doctorate in physics and is the author of a popular book on building science. He also writes the Energy Vanguard Blog. You can follow him on Twitter at @EnergyVanguard.
Related Articles
Does Poor Installation of Insulation Hurt R-Value?
Bats Can’t Live Under a Thermal Bridge
2 Ways to Get the Best Insulation in Your Home
Comments are moderated. Your comment will not appear below until approved.
This Post Has 8 Comments
Comments are closed.

“Will those long screws be able to hold up the insulation and whatever cladding you install over the insulation? ” Of course, in the world of mechanical engineering, the study of Joint design is one in which some people dedicate their entire careers. “Flexible fastener, stiff joint!” was something one of my professors used to say. In this application, the long screws through the wood and foam and into the hard material (wood or masonry) creates the stiff joint that does’t slip.
H.
In nearly every issue of SprayFoam magazine there is a highlighted project that uses steel studs and spray foam between them. After seeing many projects like this, I emailed Rick Duncan P.E., their technical director, and complained that the magazine should point out how inefficient that was. By then Rick had become the Executive Director of the Spray Polyurethane Association. His response was it provided a good air barrier. I could just imagine the outrage from chemical companies advising against using tens of thousand of pounds of chemicals.
It probably doesn’t even provide a good air barrier unless there is a conscientious effort to ensure it is continuous.
I renovated a duplex from the outside. The siding needed to be replaced and the interior plaster was in good shape. I ran 2 X 4s on edge 2′ on center. None of them were located at a rim joist. Other than where the 2 Xs crossed there was at least 3 1/2 ” of spray foam everywhere and mostly 7″. In the addition part, I sheathed the outside and insulated from the inside. I don’t think this was very much additional work. But no one has said they thought it was a great idea.
I participated in a Kwik Model Manual J through D webinar. They used a .15 framing factor. I protested. Oak Ridge had measured actual framing factors and found them to about .25 and frequently much worse. Considering the cost of framing material, this is an easy place to save significant labor and material. Insulation is usually estimated on total wall area, so it wouldn’t increase the insulation cost.
On occasion, pictures in our magazine do show SPF as a cavity insulation between framing as an alternative to air-permeable fibrous cavity insulation. SPF provides required R-value and air barrier in a single application step. If closed-cell SPF is used, it may also provide a vapor retarder for colder climates and a durable water-resistant cavity insulation in flood-prone areas that can also improve the structural performance of the assembly.
The photos in question show SPF installed between metal studs. I completely agree that insulation between any framing does not optimize the R-value of the assembly due to thermal bridging. The thermal bridging impact is magnified when metal framing is used because of high thermal conductivity of steel. Prior to air leakage limits introduced into energy codes, it was not uncommon to see metal framing with only continuous insulation and no cavity insulation.
To meet modern energy codes, the optimum assembly would consist of a layer of continuous insulation applied outboard of the framing, augmented by cavity insulation. The entire assembly also needs to be air sealed. One of the best designs that addresses maximizes thermal resistance and minimizes air leakage is continuous insulation (PIR, XPS, EPS) with an air-impermeable, self-sealing cavity insulation like SPF.
This is a perfect example of how fixed costs, in this case labor, are transferred onto the tenants in the form of variable cost of energy usage.
What a waste of $$.
My company works mostly in Northern Alabama and Southern Tennessee. When I started in this business years ago, I did numerous things to eliminate thermal bridging. It is my opinion, that in most of the homes we design the HVAC systems on and spray foam, thermal bridging is rarely an issue. Most of our homes are large custom homes with a lot of windows. We have found that in cooling climates, R-value overkill in the walls and overkill on thermal bridging does not help the home much. You printed a chart not long ago showing the differences in walls and exterior sheathing and my takeaway is that is really doesn’t matter when you have walls loaded with R3 to R5 windows. We are good with 2 x4 walls or 2 x6 walls. We highly recommend the Zip System exterior system and open cell foam with a great air sealing package. Size, design, install, and commission a multi-stage all-electric heat pump in the encapsulated attic or encapsulated crawlspace and much of your energy efficiency worries all over. In commercial construction, most of it is so poorly done that it does not matter what you do.
Your comments reflect why I believe an integrated design and construction team is important. Being able to identify early in the design the forever penalty of oversized windows might help folks make the decision to right size them to balance all the goals of why we build in the first place, ideally in a more sustainable fashion than our traditional solutions. Thank goodness for code changes requiring us to collectively conquer these challenges!
Thank you Allison, I learned something new from the RDH report: the chi-value.
Also referenced here: https://www.passivhaustrust.org.uk/UserFiles/File/Technical%20Papers/2022.02.21%20Steel%20frame%20briefing%20note%20v1.3%20Patrons.pdf
One point from the above I’ll have to remember: “the Chi-value for a bracket is specific to the insulation type and thickness it penetrates AND the substrate it is fixed to”.
The devil is in the details. It is crucial to have reliable thermal performance data for any clips, screws, brackets, etc. in order to be able to reliably compare assembly u-values for different options. Calculating u-values for these elements is no walk in the park.
I took my beach house with 2600 sq ft, added zip wall, 2 inches of 6lb mineral wool with a rain screen and cement siding.
I also replaced all and increased all the window sizes by 20 percent.
Made the attic a conditioned space and insulate the crawl space floor with 4 inches of foam.
Changed to geothermal.
The house is super quiet and the electric bill went from a maximum of 450 a month to a max 150 a month.
I can’t even hear the neighbors run their lawn mowers or the 70 mph wind gust.
The walls are now 11 inches thick.
I used Marvin windows with lamented glass to get mostly 40 STC rated windows.
Amazing home now.