Does Poor Installation of Insulation Hurt R-Value?

Poor installation of insulation matters. Even in cases where you might think the R-value won’t be affected, it is. Eleven years ago this month, I wrote an article about one of the most important and misunderstood principles in building science. The article is titled Flat or Lumpy – How Would You Like Your Insulation? In it, I showed what happens to the R-value when a poor installation of insulation is particularly bad. The attic in question was supposed to be a uniform R-30 but instead got only R-10 over 50% of the area and the other half was R-50. It does not average to R-30. In fact, it averages to a mere R-17. See that article for details.
Having that big a disparity in the insulation distribution, however, isn’t the most realistic situation. More likely is that you’ll get a couple of inches less in some areas and a couple of inches more in other areas with blown or sprayed insulation. Or maybe the installers shorted you on the insulation in one part of the attic but did not make it up elsewhere. Let’s look at those scenarios today.
Right amount, poorly distributed
The graphic below shows what happens to the R-value when the installers put in the right amount of insulation. The top line shows perfect installation. The other six show various degrees of poor installation of insulation where half of the attic gets less than it’s supposed to and the other half gets more. On the right in black is the average R-value for each installation. On the right in red is the percent decrease in R-value from the target of R-38.
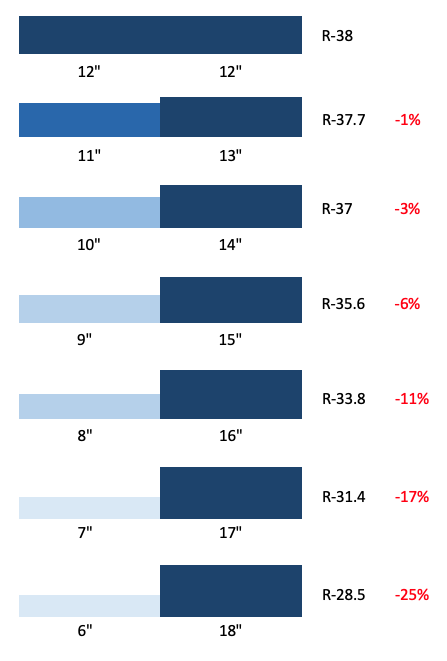
As you can see, when the insulation is shorted only an inch or two over half the attic and increased by that amount on the other side, the hit to R-value isn’t too bad (-1% and -3%). A 3 inch short on the left side knocks 6% off the R-value, and beyond that you’re in double digits, which I would find unacceptable.
I didn’t model all of the scenarios above when less than 50% of the attic has the poor distribution. But for 9″ and 15″ over half of the attic and 12″ over the other half, the reduction in R-value is 3%. Compare that to 6% (line 4 above). For 6″ and 18″ over half the attic and 12″ over the other half, the reduction is 14%. Compare that to 25% (line 7 above).
Wrong amount, poorly distributed
If the installers haven’t predetermined how much insulation material they’re going to install, another way poor installation of insulation can reduce R-value is by getting the correct amount over part of the attic and shorting the other part. The two graphics below show this scenario. In the first one, the shorted side gets 2″ less insulation than it was supposed to. The top line shows perfect installation of a uniform 12″ depth of insulation. The next five lines show the R-value and percent reduction in R-value when various portions of the attic are shorted those 2″.
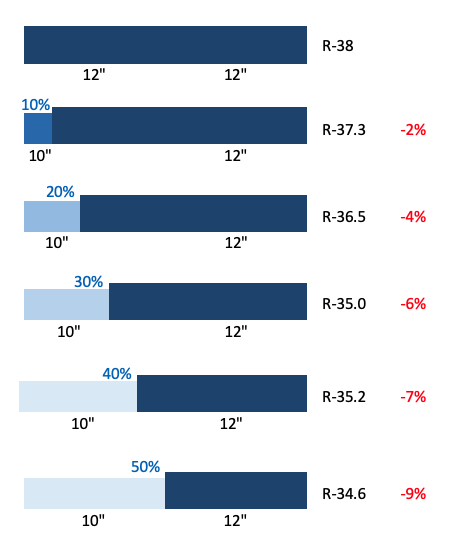
Getting 2″ less insulation than you pay for over part of the attic knocks the R-value down only 2% if only 10% of the attic is affected. If, however, they short you those 2″ over 50% of the attic, you’ve lost 9% of the R-value you paid for. That’s for a 2″ short.
If the installers short you 4″ over part of the attic, here are the resultant R-values and percent reductions in R-value.
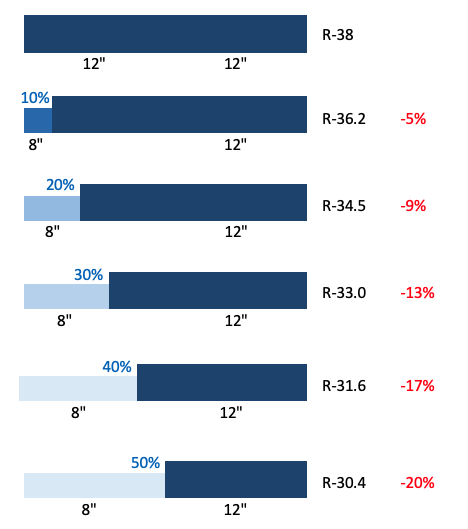
As you would suspect, the 4″ short becomes painful more quickly. Even 10% of the attic shorted 4″ knocks your R-value down by 5%. With 20% of the attic insulation reduced by 4″, the average R-value is down 9%.
Contracts and quality assurance
Understanding the tolerance of blown or sprayed insulation can help you get the insulation R-value you pay for. Insulation contractors usually specify the average thickness of insulation you’ll get. As you can see from the analysis here, average thickness isn’t good enough.
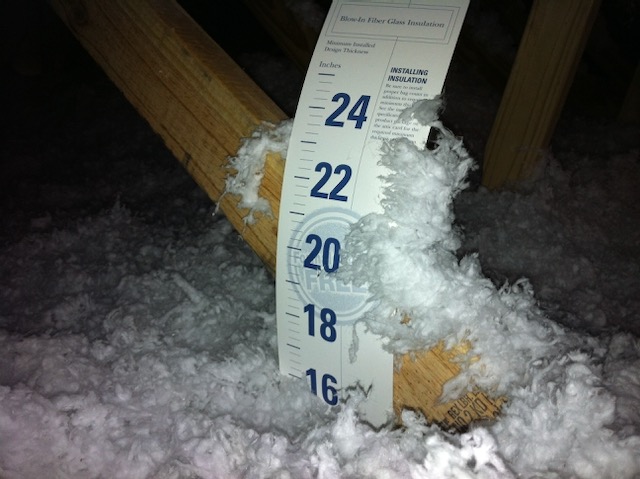
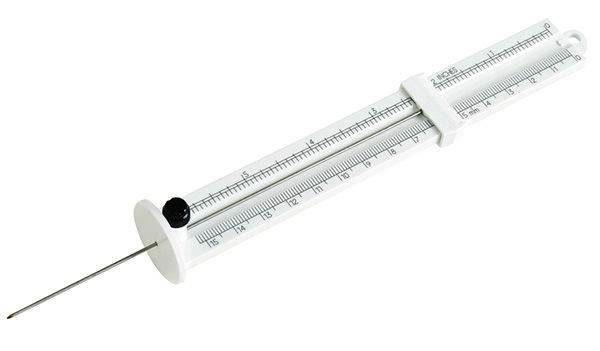
A better way to ensure you get what you’re paying for is to specify the average thickness of insulation as well as a minimum thickness. The tool that determines that for blown insulation is the depth marker, as shown above. Make sure your contractor puts in a lot of them. It’s easy for installers to pile it up to the required depth at the markers and install less between the markers. With more markers in the attic, it’s easier to see problems. With spray foam insulation, the tool is a depth gauge (shown below).
After the installers finish blowing or spraying the insulation, look at those markers or check the depth in enough places to know you’ve got enough insulation. Average depth alone is not a sufficient metric to determine the quality of installation of blown or sprayed insulation.
Allison Bailes of Atlanta, Georgia, is a speaker, writer, building science consultant, and founder of Energy Vanguard. He is also the author of the Energy Vanguard Blog and is writing a book. You can follow him on Twitter at @EnergyVanguard.
Related Articles
Flat or Lumpy – How Would You Like Your Insulation?
2 Ways to Get the Best Insulation in Your Home
Attic Stairs – A Mind-Blowing Hole in Your Building Envelope
NOTE: Comments are moderated. Your comment will not appear below until approved.
This Post Has 25 Comments
Comments are closed.

Where I see this effect playing out most commonly in new construction is the attic hatch. You might find an R-38 batt or less attached to the hatch on an R-49 loosefill install. Worse yet, the batt won’t be sized to fit the hatch exactly and might have a 1+” perimeter of no insulation at all. This latter scenario is the one where I imagine installers have no idea how much of an effect a small area of R-0 has on the average R value of the whole flat attic.
Ryan, yes indeed! An uninsulated attic scuttle hole or pull-down stairs is a huge liability. That was the first real world application of Flat or Lumpy that I wrote about:
Attic Stairs – A Mind-Blowing Hole in Your Building Envelope
Definitely. I just calculated that a 5 sq ft R-1 attic hatch would degrade a 1000 sq ft attic insulated to R49 down to R39.5!
What would an uninsulated attic hatch reduce the attic R-Value by?
Chris,
The article on the mind-blowing hole that I put in the Related Articles section has an example of that. In an attic with R-38 over 99% of the area and 1% of uninsulated attic hatch (R-1), the average R-value is less than R-28. (An uninsulated hatch is about R-1.)
Attic Stairs – A Mind-Blowing Hole in Your Building Envelope
It can be labor intensive but I build attic hatches with high levels of foam insulation that seal both at the top and at the bottom. Most houses I work on have no insulation or air sealing at the hatch which is usually just a painted piece of plywood sitting on the protruding edges of the trim around the opening. Most contractors have no idea that there is something called building science let alone how to apply it.
Bruce: Yep. It’s amazing how much low-hanging fruit is out there for companies that do this work.
Having resorted to currently air sealing my attic floor and installing new batts myself, I have a couple questions to practical issues that I haven’t seen addressed anywhere (yet)
With shallow slope (30 degrees and less) at the eaves, there’s a tradeoff between installing radiant barrier all the way to the end (touch the joist), leaving 3.5″ for R-15 insulation beyond it (out to cover the top plates etc), vs stopping the radiant barrier short 4 feet from the edge so as to allow 11″ thickness of R-45 insulation all the way. Does the proper installation of insulation have priority over the radiant barrier?
Because of the eaves, is there a minimum air gap required between insulation and the roof deck or baffle? Ignoring ventilation, this question is about the insulation touching the roof deck vs not, so now the insulation thickness and R value at the eaves can’t meet the desired minimum. If it’s blown in it may invariably touch. I assume batts conduct heat better than air does.
Stuff sitting on top of the drywall (canlight covers, fans, etc) can stick out 9″ or more. Automatic 9″ * 1 sqft minimum-R-value penalty? Or is the insulation supposed to be bumped up in little hills there? You can easily have 40-50 of these. Each duct boot penetrating the ceiling is also uninsulable on top.
Suppose my energystar recommended R-value is R-30 to R-60. Isn’t more insulation detrimental to home comfort at some point because of the higher mass absorbing heat during the day and radiating it down into conditioned space via contact with the ceiling underneath at night?
Hoping these are relevant to the discussion on insulation installation vs R-value. I read on another post that invoking David’s name makes him magically appear and comment 🙂
For reference, 3.5″ of rock wool batt = R15, plus another 7.25″ = another R30 on top.
Deniz,
1. I’d say the insulation at the eaves would be more important than the radiant barrier.
2. It’s fine to pile the insulation all the way up to the baffle. When you put insulation in enclosed cavities, it’s in contact with surfaces on every side.
3. Yes, you should try to cover the bumps with the full thickness of insulation, assuming they’re insulation-contact rated.
4. No, it’s not true that “more insulation [is] detrimental to home comfort.” Yes, some heat does go all the way through the insulation, but thermal mass isn’t a problem with insulation because it has so little.
Deniz wrote:
> Does the proper installation of insulation have priority over the radiant barrier?
Most definitely.
> is there a minimum air gap required between insulation and the roof deck or baffle?
I’m not sure what you mean by the “or baffle” part of your question. There are different types of baffles but the idea is that they enforce the necessary ventilation air gap between insulation and roof deck — typically 2 inches. If you have raised-heel trusses, you’ll also need some sort of dam to retain blown-in insulation. Simple cardboard baffles with fold-up tabs do both. In any case, insulation should never touch the roof deck in vented attics.
A 2-inch ventilation gap is plenty for a radiant barrier to work (assuming RB is attached to sheathing). In a retrofit situation, the foil is often attached to the bottom of the rafters. In that case, there’s no reason to run foil past where it would interfere with or contact the insulation.
BTW, I would argue that the cost of retrofit radiant barriers is never justified unless the duct system is in the attic and you do the install yourself (and don’t value your own time!) At one time, TechShield roof sheathing cost about 10 cents per ft2 more than non-RB sheathing (for new builds and roof tear-offs), and even then it was unlikely to be justified in except in the very hottest climates (based on large study of Energy Star homes in Houston).
> If it’s blown in it (the insulation) may invariably touch (the roof deck).
Not with insulation baffles as you already confirmed you will be using.
> I assume batts conduct heat better than air does.
Incorrect. Otherwise why bother putting insulation in a wall cavity?!
> Isn’t more insulation detrimental to home comfort at some point because of the higher mass absorbing heat during the day and radiating it down into conditioned space via contact with the ceiling underneath at night?
Absolutely not! There’s not nearly enough mass to matter.
Thanks very much David for insights, I already feel smarter. I feel I should clarify some of my reasoning.
This is a Southern California tract home with a (poorly) vented attic, no raised-heel trusses. There is no venting at the eaves/soffits (zero, none), and none at the ridge, none at gables. The only vents are the O’Hagin kind. The builder had also installed no baffles behind the blown-in fiberglass that I removed. My question about air gap between insulation and roof deck was for preventing conduction, not for leaving room for non-existing ventilation. I’m actually thinking baffles would be useless in this setup plus they leave less room for batts at the eaves – are they?
My radiant barrier is retrofit attached to rafters, and my overall goal is unrelated to saving electricity on running the AC. My goals are IAQ and occupant comfort-related. Stunningly, I am already running the AC less now with air sealing and radiant barrier but zero insulation, vs when I had uneven blown in insulation and no radiant barrier. Same amount of attic ventilation.
My ducts are in the attic, 6 to 7% leakage, covered in black R4.2. Both HVAC systems are also in the attic.
Regarding heat mass, I’m using rock wool batts which weigh 2.15 lbs/sqft for R-45, a total of 3000 lbs, which I think is much heavier than fiberglass.
I wonder if these circumstances change any of your answers?
@Deniz, there’s no harm in having insulation contact with the already-installed RB at the edges, but you should remove (or simply slice) the radiant barrier in those areas as you definitely don’t want to give up the additional insulation depth where the foil would prevent that. Again, there’s no reason not to allow insulation to contact roof deck over the plates. Of course, if you later decide to add soffit vents, you would need to insert baffles.
Regarding the additional mass of rock wool… I’ve seen no studies that demonstrate any additional thermal benefits due to the higher mass of rock wool. I would be skeptical of any claims to that affect, and in any case, I can’t see the rationale for the considerable cost of rock wool in this application.
Regarding light cans and other interference…. aside from displacing insulation, light cans are never air tight even if they’re “AT” rated, and getting a tight ceiling is probably more important than improving your insulation coverage. The best way to achieve that is to cover and seal the fixtures with air-tight caps (e.g., CanCap, Tenmat Recessed Light Cover, diy XPS box, etc.). Or you may want to consider replacing some of your light cans with surface-mount LED fixtures.
BTW, the reason I thought you might have raised heel trusses is that you indicated you could get 11″ depth over the wall plate. I don’t see how that’s possible if rafters bear on outer edge of top plate, which is how regular trusses are typically designed.
@David You are right, I misstated when I wrote ’11″ thickness of R-45 insulation all the way.’ instead of ‘as far as it will go before tapering’. With no foil at the end, I can get maybe 5″ thick insulation at the bitter end, which extends slightly past the wall plate, so by the time I’m over the wall plate I may be averaging 7″ of thickness already. I understand now that maxing out insulation here is much better than just having 3.5″ for the last few feet.
In fact this was one of the reasons for choosing rock wool: higher R value per inch of thickness helps at the edges of my low pitch roof (I need 10.75″ of rock wool vs 13″ fiberglass to achieve R-45). Plus I can taper the rock wool nicely to fully fill the shape of the eave vs fiberglass I’d have to stuff (I’m avoiding blown-in because of IAQ issues plus it wouldn’t stay put nice and flat). From my DIY experience, rock wool seems easy to work with, to cut to shape for even coverage, and the spongelike material makes it easy to layer in alternating directions to fully cover the joists. Probably more labor intensive than fiberglass batts but it feels like it would result in better distribution of insulation. I don’t remember the math for lost R-value due to the joists, but this way I’ve got guaranteed R-30 still above them to make me feel good. Except those darn eaves.
My question about higher rock wool mass was – can it actually be DETRIMENTAL, because the higher mass absorbs more heat (?) during the day and then gives it off at night. I certainly wish it weren’t as heavy as I’m hitting the limit of how much weight gypsum board can carry.
I had considered adding soffit vents but unsure about the cost, and their potential value in absence of a ridge vent. In another blog post, I read that a certain balance between high/low vents is desirable, maybe 50/50 or 40/60, so I’ve shied away from randomly opening up holes for gable vents as well.
The Tenmat covers are actually not as easy to really install airtight as I thought. I wonder if a ceiling-side LED retrofit kit with a foam gasket wouldn’t have done the same air sealing job much easier. I’m curious if there is a good way to test / measure the all-important ceiling airtightness, since blower doors don’t isolate ceiling leakage, and some things like fire sprinkler heads and bathroom fan dampers/flaps can’t be easily made airtight after the fact.
Thank you for this discussion.
> My question about higher rock wool mass was – can it actually be DETRIMENTAL, because the higher mass absorbs more heat (?) during the day and then gives it off at night.
In general, thermal mass in a building enclosure is beneficial, not detrimental. Not all the heat absorbed by the buidling’s mass ends up being released into conditioned space. A lot gets released back into the attic, more than half if the diurnal swing is favorable. Also, I think you’d be surprised at how little heat is actually absorbed. Also, even a higher density product like rock wool is still mostly air.
> The Tenmat covers are actually not as easy to really install airtight as I thought.
I assume you’re calking them to the ceiling? I find that DIY 1-inch XPS boxes are easy to make and install, and they work really well. You can size the box to each fixture so as to minimize the amount of displaced insulation, and the boxes themselves have an R-value of 5, which makes up a little for of what’s lost due to displacement.
> I wonder if a ceiling-side LED retrofit kit with a foam gasket wouldn’t have done the same air sealing job much easier.
I haven’t tested that but I’m not sure the clips would be strong enough to create a true seal. OTOH, with surface mount fixtures, wherever possible, you can easily seal off the original hole.
> I’m curious if there is a good way to test / measure the all-important ceiling airtightness…
This can be done with a blower door and duct tester. To get the attic to 50 pascals with the small fan, you’d probably need to seal the O’Hagin vents. Also, let the tech know the size of your attic access hatch so he can make a mounting surface for the fan (typically cardboard). If your attic access is a regular door, it would be easier to use 2 blower doors, but it could still be done with a duct tester fan.
> some things like fire sprinkler heads and bathroom fan dampers/flaps can’t be easily made airtight after the fact.
I recall reading an article about air sealing sprinkler heads maybe 10 years ago. You can probably find with with a Google search. Some bath fans are easier to air seal than others.
@David,
My installer sloppily set the Tenmats (not flush) on the plastic sheets that cover all the gypsum board attic floor, made big slits for wiring, and then sloppily sprayfoamed the circumference. Their sorry explanation was that it was for insulation purposes, not air sealing. Ha!
You mentioned caulking – do you mean caulk the circumference to the gypsum (I should have cut away the plastic sheeting)? Or do you mean using caulk underneath the flange as an adhesive sealant?
Energystar’s Rule Your Attic video show expanding spray foam being used on the perimeter. Tenmat’s own installation video and install instructions do not show or mention caulking or foam sealant, they seem to have more of an “It’s the thought that counts” attitude.
I can assume mine aren’t airtight because some of my cans (while off) are barely visible whereas some have obvious hot areas when viewed from the ceiling side via IR camera.
energystar video
https://www.youtube.com/watch?v=UTODEUGgKbs
tenmat video
https://youtu.be/yZXHw20q8bo
What was upsetting is that my installer asked for $250 per XPS box, times 34 cans. I assume each must be DaVinci-grade artwork for that price.
I still think the $7.50 LED retrofit kit with foam seal might be airtight “enough” and a viable DIY alternative. Or perhaps I’ll just caulk the trim to the ceiling – there you go, why not? – those things last 50,000 hours anyway and even if you replace them, the trim from the next one will hide the ugly.
Using blower door/duct tester to test ceiling airtightness is a great idea but impossible in an existing home like mine. You can’t possibly reach every O’Hagin vent to seal it because crawling around is near impossible with all the ductwork and low pitch. Would love new construction to require this though.
I found a reference to Jeff Hugo’s article from the 2012 Nov/Dec edition of the National Fire Sprinkler Magazine titled, “Caulking Fire Sprinklers for Energy Code Compliance,” but the article doesn’t seem to be available online.
@Deniz, regarding light can covers… The poly needs to be cut. Technically, it needs to be sealed back to cover but the integrity of a ceiling vapor barrier isn’t nearly as important as the air barrier. My recommendation was to caulk the cover TO the ceiling, as an air seal, and secondarily as an adhesive to prevent shifting (and thus air barrier failure). Foaming over the flange accomplishes the same thing.
My XPS box reference was intended as a DIY solution. In fact, many air sealing details ultimately become DIY projects, unless you’re fortunate enough to live in an area where multiple expert air sealing subs are competing for business.
Regarding LED refrofit fixtures… caulking them (instead of gasket) sounds like it would work.
Regarding roof vents… couldn’t they be sealed from the top? Keep in mind, you don’t have to “air seal” the attic to the outside, only reduce the leakage enough so that the fan can reach 50 pascals. And if the fan doesn’t hit 50, there’s a formula or table for extrapolating the results (the house blower door fan must be adjusted to match the max pressure achieved by the attic fan). You’re primarily interested in the ratio between ceiling leakage and total house leakage. BTW, be sure to unseal the roof vents before measuring the reference total house leakage.
Regarding sprinklers… Here’s something more recent: Air Sealing Fire Sprinkler Systems.
Tapering insulation off towards the eaves makes a significant difference as well. Sometimes the roof is only 5-6″ away from the ceiling drywall at the eave. 2ft from the eave it is 9″. And doesn’t get to 15″ for R-49 until it is 3 ft from the eave. That could be 24% of the area of a very simple Gable roof at 1000 sqft!
I have thought about modeling this effect in more detail than just my calculator, but I’m a little scared of the potential results.
Very good point Jeff. Raised heel trusses can alleviate this and so can using extended eaves, which I believe not only adds architectural value but also adds additional value through increased building durability and effective shading but new homes are often too large and too close to the set backs to pull this off. To account for this, our Portland, OR based green building certification (Earth Advantage) requires that homes have at least R-21 over the inside edge of exterior walls in the flat attics. I advise builders that have at 6.5″ of height there use 5.5″ R-21 HD batts for 1-2 feet in and then blow loosefill up to them. For homes with very low pitch roofs that don’t have enough space for the 5.5″ batt plus an 1″ for ventilation we require higher R value insulation in those areas to achieve R-21. The idea being that the worst point of the attic should be no less than the R value of the wall under it.
Jeff, yes, that’s one of the most common ways you get shorted on the insulation in an attic. As Ryan mentioned in his comment, raised-heel trusses are a good solution for this in new construction. Here’s an article I wrote about that topic:
The Low Spark of Raised-Heel Trusses
The penalty of shorting insulation at the eaves may be nonlinear on warm sunny days. I’ve had a completely uninsulated attic for a while and noticed with an IR cam that ceiling temperatures (other side of attic drywall floor) were several degrees higher underneath the eaves on sunny sides. Presumably because the effect of the radiant heat transferring from the roof deck to the drywall (or whatever amount of insulation is in between) is inversely proportional to the distance (squared). My guess.
If an attic is flat R-10, and then R-40 is added to 90% of the attic, will the heat flow thru the R-10 area increase?
If you put your thumb over the end of a garden hose, the flow rate thru the still-open part will increase, and the overall flow-rate will stay the same.
In the insulation context, I’m sure the overall flow-rate will be reduced, but is the analogy partially correct: would the heat flow thru the R-10 area increase to some extent?
If so, is there a way to calculate what the heat flow would be thru that area?
I know u-values are heat flow rates, and I know they are spoken of as if they don’t depend on factors like the surrounding insulation.
If a house is heated to 70 °F, and if there is no difference in wind or humidity or exterior temperature, then is this equivalent to a thumb-on-hose context where the water pressure is constant however much of the hose opening is covered?
My brain has two conflicting conclusions:
1. Insulation that has u=0.1 is u=0.1 insulation, whatever the insulation around that area.
2. the thumb-on-hose analogy is not perfect but contains a lot of truth, particularly that with the same [[pressure]] of heat wanting to expand/equilibriate/rise, if you add R-40 to part of the attic, then more heat will rise thru the R-10 area than when the whole attic was R-10.
Help?
@Jonathon, maybe this will help: your garden hose analogy doesn’t hold water 🙂
Restricting the hose with your thumb does in fact change the flow rate. That’s how the faucet valve works, and why low-flow shower heads work.
In the case of thermal equilibrium, surface temperatures largely determine the heat flow through an assembly of a given R-value (resistance), so as long as the rooms are maintained at the same temperature, the R-40 ceilings have no effect on the heat flowing through the R-10 ceilings (ignoring the effects of 3-D heat flux at the boundaries).
@Jonathon
I will speculate that although fluid dynamics apply to air just as much as water, the heat transfer in question here is not so much by convection, but by conduction (and radiation). Also, the air pressure is not building up in the attic. So the heat transfer through the R-10 area is likely related only to the air temperature above it and any radiant heat hitting it if you ignore air leaks for a moment. Is it possible that having R-40 elsewhere increases the temperature of the attic air and the roof deck because less of that heat is transferred to the conditioned area? Possibly although who knows if this effect is significant.
There are some other great blog posts explaining how the heat flows. The heat will flow through the R-40 section, and the heat will flow through the R-10 section (at a faster rate because by definition of R-10). But the heat will also continue to “flow” in all the other directions. Up back to the roof. Out the roof /gable vents. Onto the ducts. Onto the HVAC equipment and other stuff that’s in the attic. Etc.
PS I am no HVAC expert nor trained. Just participating in your thought experiment.
One small observation: When I had no insulation in my attic, the attic temperatures remained consistently close (within 20-25F) of the room temperatures underneath (separated by R-1 gypsum board). When I had R-38-ish insulation, that delta was 40+ F. So more insulation slowing/rejecting the heat transfer downwards could increase the average attic temperature (because it can’t escape in the other directions any faster) could maybe indirectly make your rooms underneath the R-10 warmer. Maybe. But R-10 is still R-10. My other observation was that attic air temperatures can be quite variable depending on where in the attic you measure, and the surface temperature of the insulation at any point may be more susceptible to radiant heat from stuff above and around it than said average air temperature. And then there’s attic ventilation, and HVAC duct leakage that is highly localized.
From a practical perspective, I have R-45 in some of my attic and R-1 in the rest. The HVAC mixes the air inside my house so having the partial R-45 is still a net benefit and doesn’t seem to make the uninsulated rooms “worse” if that’s the root of your question..
I’ve found after going into a crawl spaces that insulation companies sometimes gap up to 2 inches to the floor deck? (2×10 with only 8 inches of insulation) What’s that over an entire crawl?