Uncovering the Secrets of an Old House
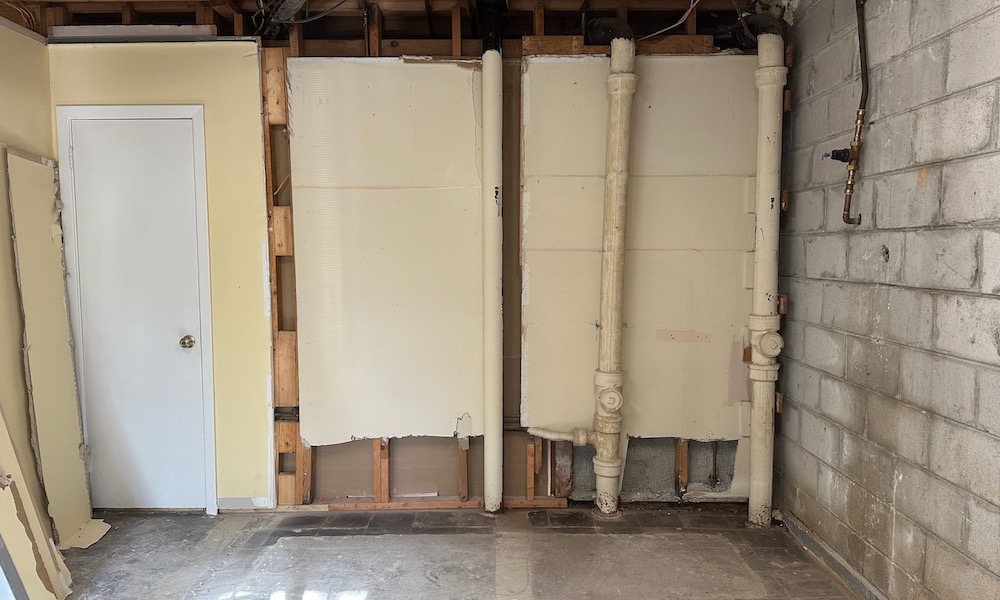
I’ve been in a lot of old houses and seen a lot of interesting things. One of the things I love about that is trying to figure out the mysteries I find. Lately, the mysteries I’ve been encountering are in my own house. I’m in the process of remodeling my basement, for example, and the photo above shows part of a bedroom that I’ve demolished. In that photo are two secrets that I’ve figured out.
Mystery drywall and water
The photo below shows another view of the lead photo, a bit earlier in the demolition. The four red arrows in the center are pointing at two horizontal lines. Why are they there? But wait! Why is that drywall there anyway? As you can see from the studs, that area was between two walls. Since this isn’t a multifamily building with a party wall, there doesn’t need to be drywall there.
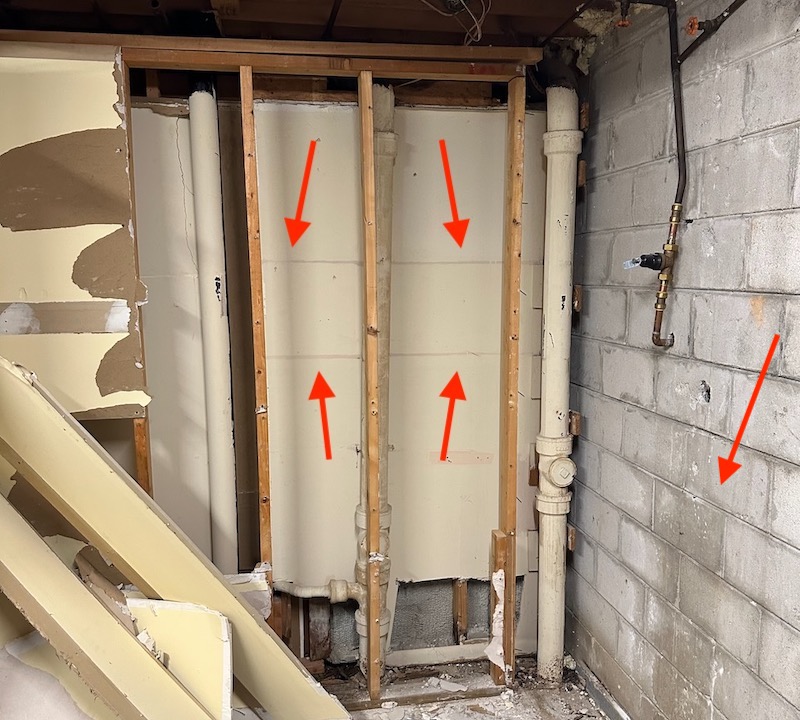
If you look closely, you’ll see other clues. The vertical sewer pipes, for example, are painted. Also, the cleanout in the pipe on the left is blocked by a stud. My guess is that that wall I tore out in front to the sewer pipes was built years after the house was built.
In the first part of the life of this house, those drain lines were exposed in the back of the closet for this bedroom. Then someone rebuilt it with the back wall of the closet in front of those pipes. The horizontal lines are there, I think, because the closet had shelves there.
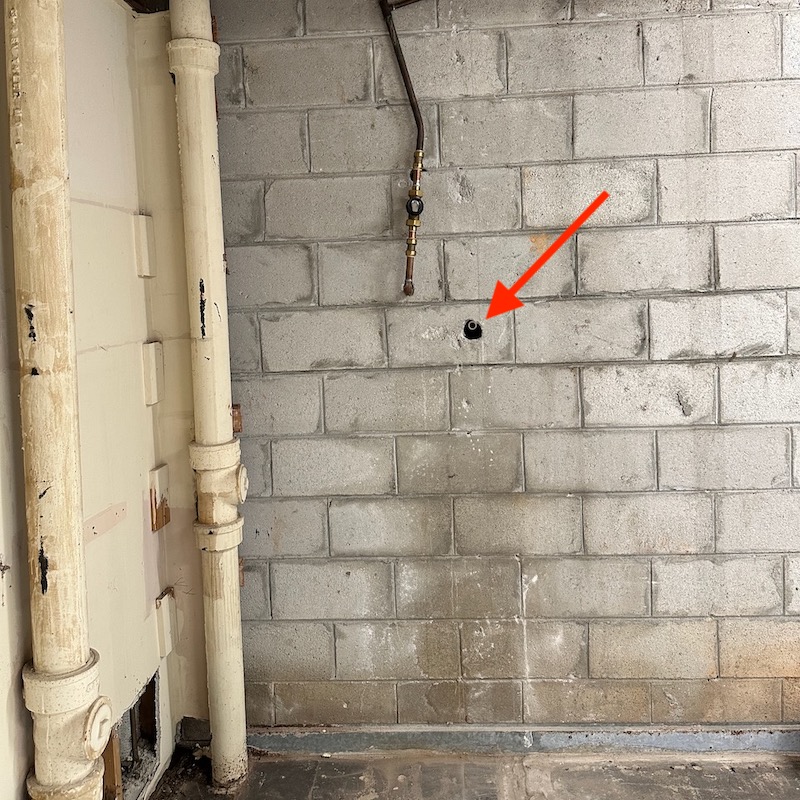
The other mystery in the lead photo is that dark area on the concrete block wall. In the photo above, the arrow points to a copper pipe that was cut off some time in the past. That pipe was where the water supply for the house came in originally.
I think there must be a difficult-to-access pipe joint in the block, and it sprang a leak. So instead of fixing it, they abandoned it and brought the water supply in another hole. The new pipe comes in above and to the left of the old one. You can see that the water line above it points directly at the old pipe entrance.
The dark area isn’t wet now but stained from the previous leakage. It must have leaked for a while, too, because the white staining below the old pipe is efflorescence.
Cracking up
One of the first things I noticed in the basement after my wife and I bought the house in 2019 was that the slab was cracking at the perimeter. You can see it in the photo below. I didn’t know why that was happening until I dug into it this year. I mentioned this in my article on radon testing and will write more about this later.
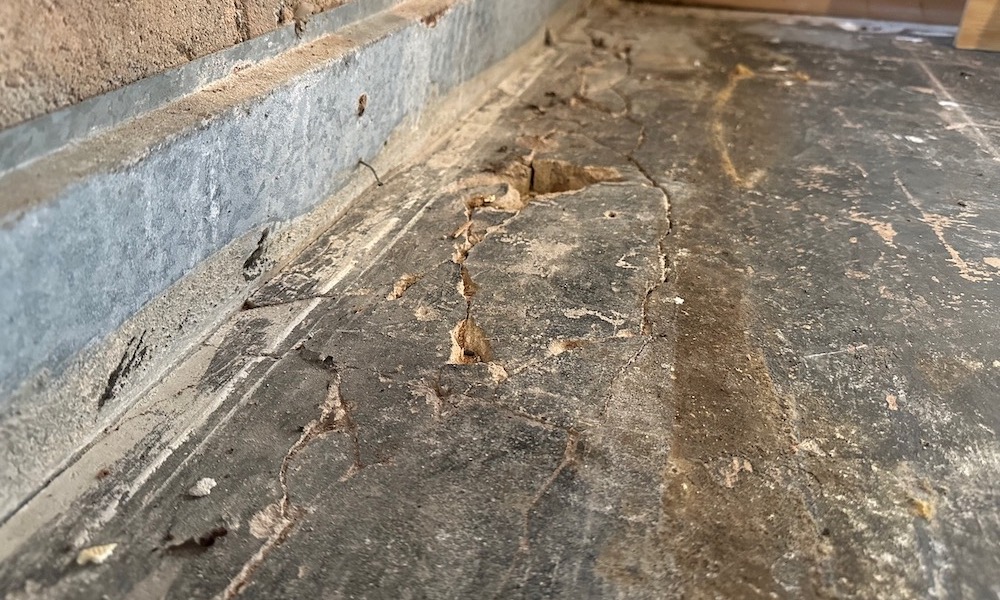
The reason it was cracking is that that part of the slab isn’t original to the house. The house was built in 1961. The owners, probably in the 1970s, had an interior perimeter drain installed. That’s what the galvanized metal is there, too. Unfortunately, the concrete they poured over the drain wasn’t thick enough. It was only half an inch in some places. I’m fixing that now.
Water stains on basement ceiling tiles
I took the photo below in a corner of my basement. When you see only that, it could be anything really. Plumbing leak. Condensation. The result of a dead animal decaying.
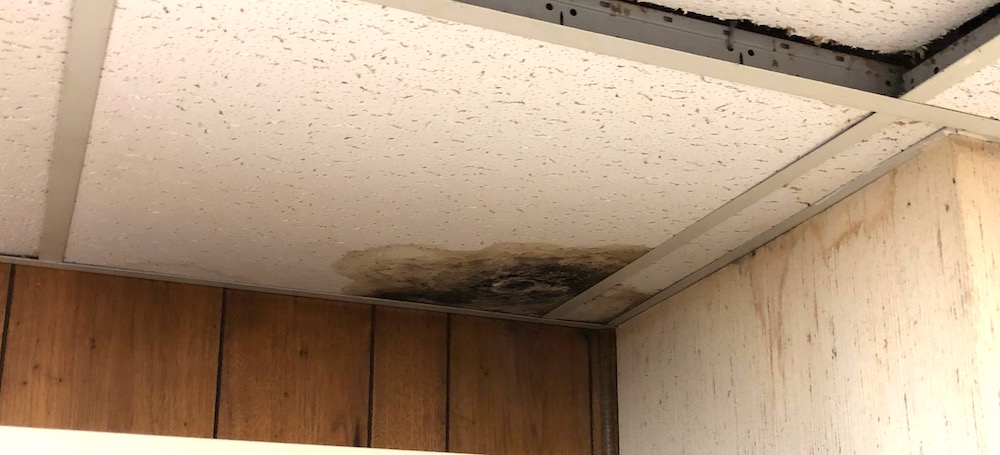
In fact, it was condensation. There was an uninsulated air conditioner duct and boot above. You can read all the gory details about this one—and see more photos of what I found above that stain—in the article I wrote about this.
Spray foam miss
I have spray foam insulation in my attic. The original installation occurred in 2012, before I lived here. After we bought the house, we had all the soffits, fascias, and gutters replaced. And that gave me an opportunity to see what happened when the spray foam shot from the gun in the attic out toward the eaves.
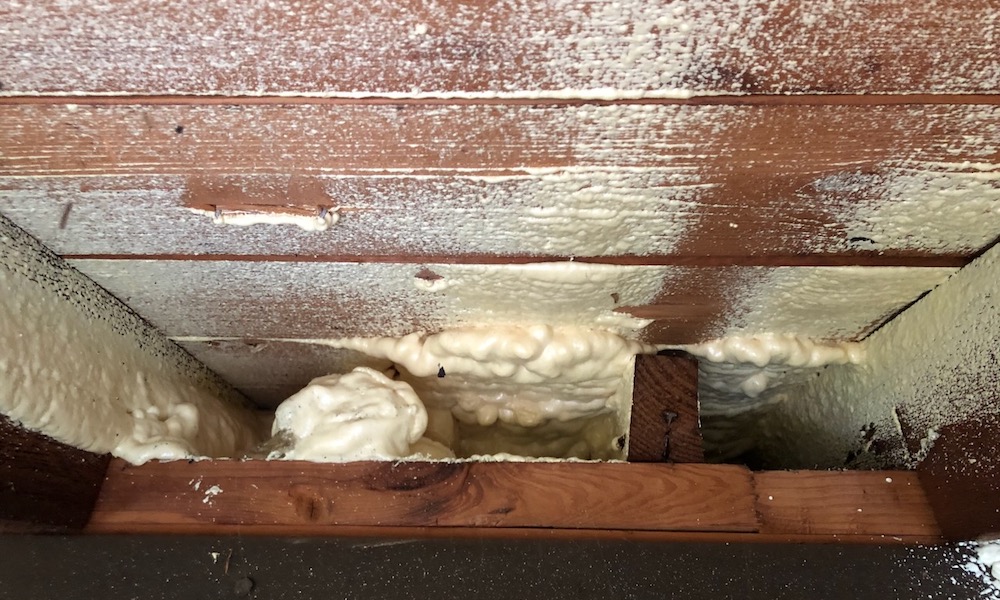
That photo above tells the story pretty well. That lump of foam on the left is about the only insulation over that section of the exterior wall. That also means it didn’t get a good air seal there. I wrote about this spray foam flaw and how to fix it back in 2019.
Crawl space vents
We know putting vents in crawl spaces doesn’t help with moisture in humid climates. Putting those vents in a finished basement is just insane. Why would anyone invite all that outdoor humidity to come into an air conditioned space?! Yet they did so in my house. And I’ve seen it in other houses, too.
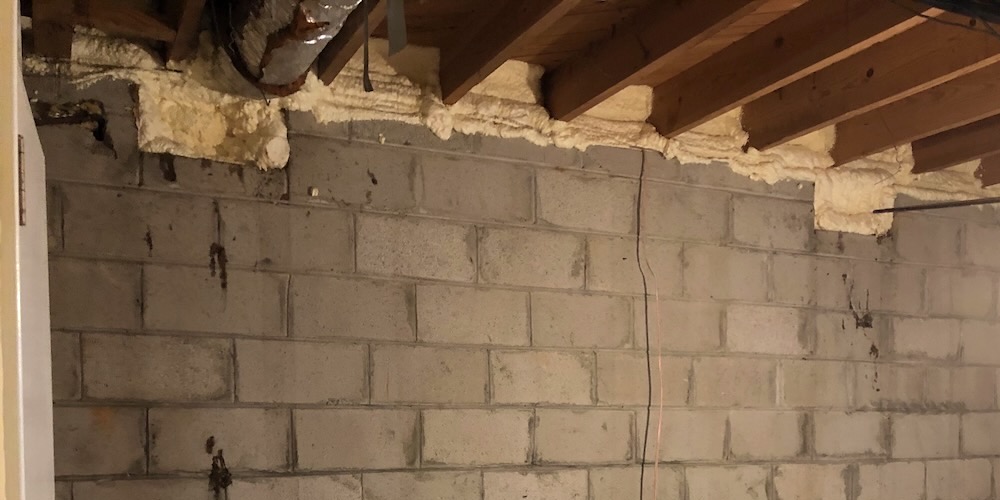
You can see that the ones here were sealed up. That’s the best thing to do with crawl space vents.
My favorite air leakage site
This last photo isn’t from my house, but it’s a great illustration of uncovering the secrets of an old house. I found this back in my contracting days. I was crawling through an attic and saw a very dark spot in the yellow fiberglass insulation. When I pulled the insulation back, I saw this hole. And what you see below is only half of it. There was another hole about the size on the other side of the joist.
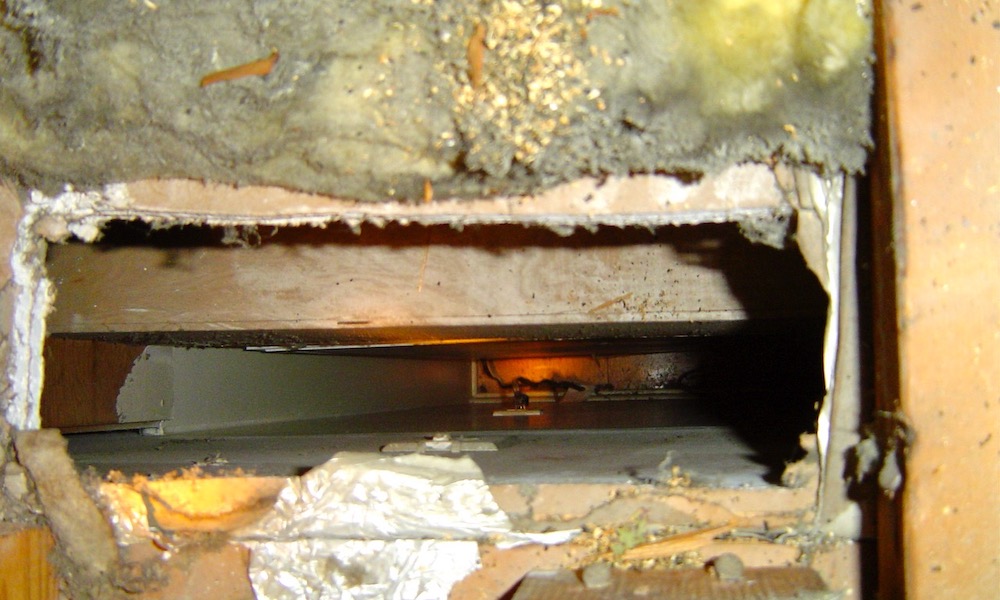
I puzzled over this for a bit before figuring it out. The hole looks down into a narrow space. It may be hard for you to tell from the photo, but the surface on the bottom side of the hole is a painted wall with an outlet. A cord is plugged into it, and there’s another white surface at the top side of the hole.
It’s a refrigerator! The owners of this house had their kitchen remodeled a decade or so earlier. Either the contractor or the cabinet installer must have figured that the fridge needed to be vented to the attic. Wow! That was a huge air leak. And the homeowners paid for it in comfort, indoor air quality, and energy costs for years.
When you get into old houses, especially during demolition, you can find some interesting mysteries. Some of them will remain mysteries, but with a little understanding of building science and how houses work, you can figure out quite a few.
What mysteries have you found and figured out?
Allison A. Bailes III, PhD is a speaker, writer, building science consultant, and the founder of Energy Vanguard in Decatur, Georgia. He has a doctorate in physics and is the author of a popular book on building science. He also writes the Energy Vanguard Blog. For more updates, you can subscribe to our newsletter and follow him on LinkedIn.
Related Articles
Spray Foam Insulation at the Edge – A Forensic Analysis
Finding the Source of a Basement Water Problem
Solving a Crawl Space Water Mystery
Comments are welcome and moderated. Your comment will not appear below until approved.
This Post Has 6 Comments
Comments are closed.

Great article. I am in the process of renovating a 1950s midcentury modern gem in New Hampshire. This house was built in 1953 a few years after Levittown and their mass-produced radiant slab houses. Our house has miles of 1/2 inch copper piping in the slabs (and under the slabs) which was still operational as recently as last year.
One surprising thing we’ve found was a vast network of copper pipe embedded in 1+ inches of plaster in the ceilings. This occured over the parts of the house which have a wood-framed floor. This was apparently a more elegant solution than a couple of cast iron radiators. Above the radiant ceiling was 7 inches of rockwool and a foil barrier. The plaster was reinforced with metal lathe, rebar and of course the copper piping. They doubled up the flat roof 2×8 joists to 9 inches on center to support this ceiling. Removing that ceiling was not fun.
The amount of oil that must have been burned over the past 70 years to keep this nearly glass house warm with a radiant ceiling is staggering. We are in the process of bringing this MCM into the 21st century.
Steven: Wow! Yeah, I’m sure removing that ceiling was quite a job. Removing any plaster is difficult, but making it thicker and putting copper tubing in it would definitely up the difficulty level.
You’d expect with a 127 year old house we lifted then set back down on a new basement we would find mysteries. So far nothing especially mysterious, just a bunch of variable quality modifications over the decades. Well, there are a few mysteries. Why did someone 70 or 80 years ago take off all the ginger bread and cover the house with stucco?? There are a very few other homes in town that are stucco though those are newer making ours historically unique. Another, at some point someone replaced a 4′ x 10′ section of subfloor and last 4′ of floor joists in the SE corner of the building. When I opened the wall in that corner to pass an HRV duct up, I noticed that there is sheathing on the exterior side, not the back of the old siding that I find when I open other walls, so apparently the rot found its way up into the wall or started there below a window in that corner. They supported the break in the floor joists with a beam on piers and for good measure set it a 1/2″ high causing a ridge in the floor. I properly fixed the floor joists before lifting the house thus getting rid of the ridge. Mystery…what caused the rot? Interestingly, that corner of the house refused to set down on the new foundation, stubbornly hovering 1/2″ above it so when stucco cracks began to appear I just shimmed it where it was.
We have a 1954 ranch about a mile away from you. Having the sewer line replaced finally, we discovered that not only did it take a right hand jog towards the downhill neighbors before turning back left and uphill and then going out to the street, BUT, there was a galvanized water line laid on top of it the whole way except that it went further uphill to the meter where the sewer line went to the street AND there was a braised joint copper water line on top of the galvanized, inch for inch ! We bought from the original owners and have lived here for 33 years with the copper line as the service line into the house (there was galvanized throughout inside though !).
My best guess, is that the owner, who was a Civil Engineer from GaTech and who designed his own piping system to handle rainwater from downspouts etc., found out that the builder had put in galvanized and told him to swap it to copper. We won’t talk about the 2×4 rafters 24″o.c., nor the partial french drain in the basement…
I have been involved in the building restoration industry for quite sometime. I even got to teach energy efficient construction at the University of Kentucky.
I love doing restoration work on old buildings and houses. It is fun to reverse engineer construction methodologies from 150 years to date. This is fun !! Enjoy the challenge and reminisce on construction methods from years ago.
Dr. G
We live in the East Bay of the San Francisco area. Local winds are predominantly from the coast, but northern and northeastern winds can be hot ones. Our house is a 1956 construction California Ranch of 2000 sf livable space, plus garage and sunroom.
When we first moved in, we discovered that:
– Our electrical wiring was a mixture of copper and aluminum. We replaced the aluminum and upgraded the amperage for the house.
– Water delivery was all iron pipes. Code still requires iron for sewage. We have replaced the delivery pipes with copper using, using various remodels, and a water main leak in the front yard, to complete that replacement.
– The sewage line in the main bathroom has very little angle to it.
– The single-pane glass windows are mostly set in off-site (prefab) milled aluminum frames. We have 4 windows (all on the north side of the house) within the sunroom whose frames were built on-site as part of an early, remodel. They all bleed in the winter.
We had an “energy audit” about 8 years ago in order to qualify for available energy, efficiency of upgrades. Results included:
– Zero insulation in any of the exterior walls 2×4 framing (16” centers)
– 1956 1-3” blown-in rockwool in the attic with lots of penetrations in the ceiling from past remodels and installations (e.g., cable TV, etc.)
– Soffit vents (along the entire exterior rim of the house) without chutes that ensure air flow up to the ridgeline vent (original roof was wood shake and replaced due to fire hazard/insurance coverage)
– Then existing gas heater and water heater were so old they weren’t even “energy star.”
– Ducts were so leaky they didn’t even register as providing minimal air flow
– Then existing gas heater was heating the sunroom via floor vents fed by under the floor ducting.
The order of recommended for remediation:
– 1st: Replace heater, air ducts, & water heater
– 2nd: Attic air sealing & insulation
– 3rd: When opened (as in during remodels), insulate walls. And, using spray foam (2-holes, 1 at top, 1 at bottom) along exterior of exterior walls between each 2×4 was also suggested.
We did #1. We also added solar panels while the NEMS were more favorable to home owners.
We are now looking into the attic air sealing and insulation before we retire. And, I also wonder if spray foam along our western facing exterior wall may help keep that side of the house from overheating (as it often does by the end of a 80-100° day).
We are confused at this point about the right amount and kind(s) of attic work.
– Sealing the ceiling seems to be a given, so we are ready to do that.
– We’ve had rodents up in the attic with some minor damage to the ductwork so we also need to remove the existing rockwool and sanitize that space. One vendor wants to replace one duct. The others don’t think that’s needed.
– So far, every insulation contractor that we have talked to is recommending fiberglass batting in order not to block the airflow from the soffit vents to the ridgeline vents. And, in order to not have the insulation blown by the airflows (such as by strong winds).
– Code requires R-38 as minimum but insulation rebate requires at least R-44. I’m not sure which is going to be better for the future, given climate change and the summer’s temperatures
– According to one contractor, they would lay one row of R-30 batts between ceiling joists and another (R-19) row of batting perpendicular across the ceiling joists.
– And, a few contractors have recommended adding radiant barrier sheeting attached to the roof joists.
– No one so far recommends insulation of the attic over the garage, or they only adding enough to come up to the top of the joists. That design seems to me to suffer from the “fluffy” issue that you describe in one of your articles, defeating the R-value applied over the living area. Really not sure what to do.
– Finally, there are two entrances to the attic: one in the garage, and one in the closet of a back room . One contractor, an attic bag above each. Others have recommended sealing off the 2nd entrance. How can we identify how the bag would impact the overall performance of the insulation of the attic?