7 Reasons to Gut Your Bathroom When You Remodel
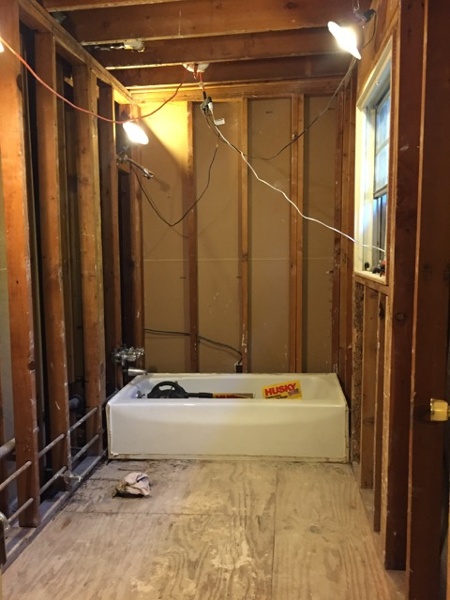
If your home is old enough for a bathroom renovation, you may want to go ahead and completely gut it. I started my bathroom remodel last month with a complete demolition. If I hadn’t, a number of problems would have been unavailable for repair…or even undiscovered. Here’s what I found when I opened up the walls and ceiling of my 1970 condo in the Atlanta, Georgia area.
1. Repair termite damage
When I opened up the exterior wall, I found termite damage in two places: the king stud, jack stud, and cripple on the bathtub side of the window (shown below) and the jack stud on the other side of the window. The good news is that the damage was done long ago. As long as I’ve lived here, the owners’ association has kept up with termite treatment and monitoring, but I understand there was a period when they didn’t. Hence the damage I found.
2. Replace rotten subflooring
In addition to the termite-damaged wall, I also found rotten subflooring near the bathtub. This was mostly from getting too wet, and I suspected it because tiles had started popping up in that area.
3. Make up for no or little insulation
I knew we had insulation in our walls. I thought it was R-11 fiberglass batts because our upstairs neighbor’s icemaker had a bad leak a few years ago, taking out half of our laundry room ceiling and part of the wall. The common wall had R-11 batts. I figured the rest of the walls did, too. I knew they had insulation because I’ve checked behind switch and receptacle plates.
I got a little surprise when I took the drywall off of that exterior bathroom wall and saw this:
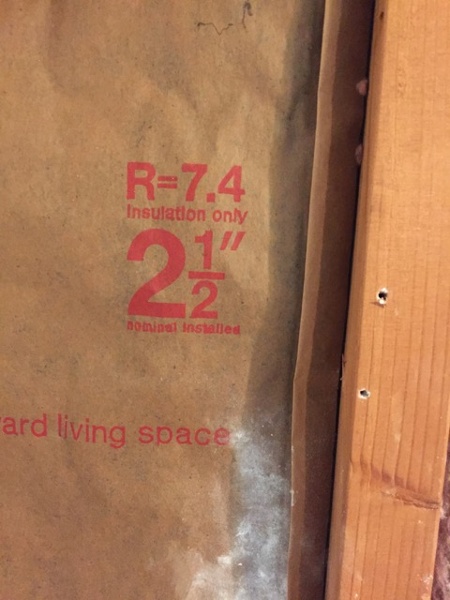
This is actually a good thing, in a way, because it means I’ll get more improvement than I thought I was going to get.
4. Seal the air leaks
Yes, our 1970 condo is leaky. I knew about the big bathtub holes and other plumbing penetrations because I’ve seen them from the basement. I didn’t know that the walls were sheathed with asphalt-impregnated fiberboard (Celotex) that provided lots of air leakage pathways. Again, looking on the bright side, that means I’ll be able to make more improvement than I’d thought.
I can’t wait to do a blower door test when it’s all done. Unfortunately, I won’t be able to separate out the improvement due only to my bathroom work. The owners’ association just had the whole floor sealed with spray foam insulation. I’m guessing our total air leakage will be around half of what it was.
5. Install an exhaust fan (or fix the duct)
Did I mention our condo was built in 1970? The master bath has a window, so naturally, it didn’t need an exhaust fan, right? Wrong. I’ve got over a year of data on temperature and relative humidity in that bathroom without an exhaust fan. Now I’m putting one in and will collect more data. Stay tuned for the results.
But even if your bathroom already has a fan, I’d wager it doesn’t move enough air. The typical bath fan moves about half its rated air flow. If your bath fan isn’t accessible from the attic, opening up the ceiling is the only way to get at the duct and fix it. What you see in that photo below is common for bath fan ducts: sagging flex duct that makes too many turns. (That’s not my new fan, by the way.)
6. Fix plumbing surprises
Here’s another thing I found. I’m not a plumbing expert, but I see a problem here. Imagine if that section of common drain line for our back-to-back sinks got clogged. Now imagine running a snake in there from one sink. Do you think it would make the turn? Probably not. We changed it out and offset the two.
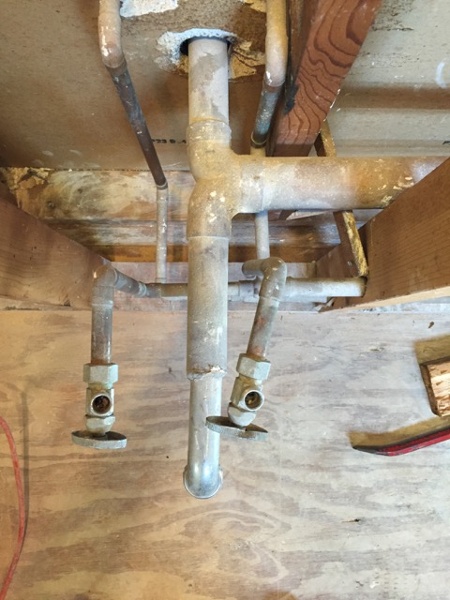
7. Solve unknown mysteries
Several years ago we had to do some plumbing work for the tub in the hall bathroom. When the plumbers had the wall opened up, I asked them to put valves in on the hot and cold water lines so that if anyone had to work on that plumbing in the future, they wouldn’t have to turn off the water to the whole building.
So they put in the valves. When I opened up the wall, I saw them and took this photo:

I’d used that shower a few times over the years and always wondered why the pressure was so low. Now I understand. The plumbers installed the valves but then didn’t open them fully. Those red handles should be straight in line with the pipes. Nice!
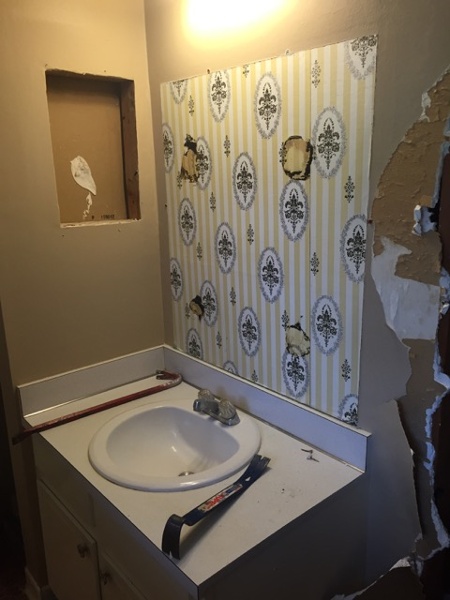
I also found that our ceiling had two layers of drywall. We have a smooth ceiling throughout our condo, but the original ceiling was stippled. Fortunately, it wasn’t a popcorn ceiling, which could contain asbestos.
And I discovered the original, hideous wallpaper.
If you’re remodeling a bathroom, there a lot of good reasons to go all the way and gut it completely. That’s what I’m doing. We’re almost ready to start closing it back in, so stay tuned for more stories from the bathroom.
And let me end with a caveat. If your home was built before 1978, it probably has lead paint in it. If you’re doing the work as a homeowner, you’re not subject to the rules of the Renovation, Repair, and Painting (RRP) Program, which applies to contractors, but you you should still work safely. Here are their lead guidelines for do-it-yourselfers.
Articles in this series
Air Flow Pathways in a Leaky Bathroom Wall
How to Fix a Leaky, Underinsulated Exterior Wall
Installing an Exhaust Fan During a Bathroom Remodel
Other Related Articles
5 Reasons Bath Fans Have Such Poor Air Flow
This Hole May Be the Biggest Air Leakage Site in Your Home
NOTE: Comments are moderated. Your comment will not appear below until approved.
This Post Has 22 Comments
Comments are closed.

Unfortunately, most ALL rooms
Unfortunately, most ALL rooms originally constructed prior to the 1990’s need to be deconstructed back to the studs to repair/improve wiring, insulation, air sealing, window/door flashing that was marginal to begin with (and would not pass code today). I’ve even had to re-do bone-head things I’d done in past remodels. In your photo of the bath tub – do you have a gap to allow waterproof drywall to slip behind the tub to better seal the wall (but how to attach it to the wall below the tub line)?
Very true, David, but I think
Very true, David, but I think a lot of bathroom remodelers don’t understand that the way we do. No, I didn’t need a gap because we removed the bathtub and are replacing it with a walk-in shower. There will be backerboard on the whole wall.
David, I completely agree on
David, I completely agree on the topic of gutting rooms to fix the sins. On the shower issue, I believe it’s commonly recommended for FIRE code to install blocking in the joist bays roughly at the top of the tub’s sill. You can also put other materials under the concealed space to airseal and/or insulate, but the blocking provides both a fire break for the wall and also additional structural rigidity for fastening the tub/wallboard/backer board.
WHAT??? Is the white fuzzy
WHAT??? Is the white fuzzy stuff in #3 picture bottom, the 2 1/2″ insulation? Mold? Second, waiting to hear what you are going to insulate the walls with, foam or what?
No, not mold. It’s just some
No, not mold. It’s just some white gypsum powder from the drywall. The walls are now insulated with a combination of foam and fiberglass. Stay tuned.
Wait a minute! My wife
Wait a minute! My wife enforces a 14 day limit on all home projects I start. I have to do whatever it takes to demo, redo, and finish it all within 2 weeks. (She may have learned I tend to drag these things out). How did your wife sign on to a master bath redo that exceeds these limits? Can she call my wife?
Well, Dave, first of all, I
Well, Dave, first of all, I did all the demolition while she was away for a week driving to California. Once she came back and saw that the bathroom was no longer there, she didn’t have much choice, right? (Of course, she did have a choice about whether or not to talk to me ever again or kick me out. But I’m happy to report that all is well here.)
We’ve been talking about this bathroom remodel for a long time and she’s said she didn’t want me to do it all myself. That may have something to do with the time I decided to repaint the kitchen cabinets. It took about two years. In my defense, though, it wasn’t just repainting. I also added some trim to convert the dark, 1970s plywood doors to a Shaker style.
Anyway, my plan is to have this wrapped up in less than two months and to have such an amazing new bathroom that she’ll forget all about how long it took to do the kitchen cabinets.
I’m really interested in the
I’m really interested in the energy losses associated with use of an exhaust fan. My wife is sensitive to mold, so in our household, we will eat the energy losses in favor of mold reduction. I installed an exhaust fan for large bathrooms into our tiny bathroom ceiling. It does help reduce moisture. But at what cost? We are in Hawaii, on the leeward side of Maui, and use A/C about 340 days a year.
John, I don’t worry about the
John, I don’t worry about the energy usage of bath fans for moisture control. I live in a humid climate, and it sounds like you do, too. Reducing moisture levels in the bathroom trumps energy use of the fan.
Allison, you forgot some
Allison, you forgot some really good reason to open up the subfloor: fixing all the “sins of the subs” that happened in construction.
– Incorrect notching of joists.
– incorrectly framed structural members.
– Lack of insulation in the rim joist of the floor
– insulating hot and cold supplies that are hidden in the floor.
My favorite reason is replacing aging waste-pipe with PVC/ABS before it corrodes through and leaks, ruining the room below.
Good point, Dan. Yes, there’s
Good point, Dan. Yes, there’s a lot of floor stuff you can do, too. In our case, the floor is accessible from the basement, which our owners’ association just had insulated with spray foam.
Nothing is ever simple…
Nothing is ever simple…
A suggestion; unless you are the kind of guy who never drops a tool, may I suggest a cut-to-fit cover for the tub?
Thanks for you detailed descriptions of the project. I shudder to think of the horrors lurking behind walls in so many vintage dwellings.
Great idea to cover the tub,
Great idea to cover the tub, Steve. If I had planned on keeping it, I would have been more careful with it. Instead, we’re replacing it with a walk-in shower.
At least you didn’t find any
At least you didn’t find any spent razor blades behind the wall of the medicine cabinet. IIRC back in the day it wasn’t uncommon to just cut a slit in the cabinet and drop back behind the wall.
Well, now that you mention it
Well, now that you mention it, Kris, I did find two razor blades in there. A contractor who’s done a lot of work in this community said he’s seen some units with a big pile of them. And I’ve seen some of those medicine cabinets with the razor blade slit in other homes.
Every bathroom I ever looked
Every bathroom I ever looked at has had the tub up against an uninsulated wall cavity. Keeping the tub water warm was impossible. Sealing off the wall, insulating then installing tub always got rave reviews.
Next, install the bathroom fan remote from the bathroom ceiling using insulated duct. Put a light on the switch because it will be so quiet you won’t hear it. Duct leaks will no longer allow moisture to enter your attic. Buy a backward curved impeller – one of the German ones that will last for 25 years.
I fully expected my bathtub
I fully expected my bathtub to have no insulation behind the short side that was against the exterior wall. I was wrong. The insulation in that wall did go all the way down. Well, I was sort of wrong. The grade 3 R-7 batts that were in there probably didn’t help a whole lot.
> spent razor blades behind
> spent razor blades behind the wall…
I recall the medicine cabinet in the house I grew up in had one of those slots… those blades can be murder for the mice 🙂
Dan Geist nailed it, when we
Dan Geist nailed it, when we renovated our bathroom in a house built in 1913 the various changes and renovations over the century meant that there was almost nothing left of the framing underneath, had to completely rebuild and resupport the floor. I was amazed that I had not fallen through into the kitchen below.
Do you have any tips on
Do you have any tips on insulating ductwork after installing closed cell foam installation in crawlspace. Insulated ducts keep dripping condensation when air conditioning is turned on.
Thanks,
Kevin Muldowney
Great article Allison. One
Great article Allison. One caution – drywall tape and filler from that vintage may also (often) contain asbestos, not just the popcorn ceilings.
@Kevin, presumably you have
@Kevin, presumably you have uninsulated metal ducts?
Metal ducts will condense in most climates unless they’re fully contained within conditioned space. Even then, metal ducts can sweat if airflow is low or restricted (causing supply air to be colder) or if indoor humidity is too high (often due to excess infiltration, inadequate spot ventilation, and/or oversized A/C).
Ducts located in semi-conditioned crawls or attics should always be insulated, since humidity can be higher there than in living space.
You only need a minimal layer of foil-face duct insulation (e.g., R-4) on supply ducts to stop the sweating. However, all metal components — including supply boots, fittings and plenum — must be insulated. And most importantly, the outer jacket, which acts as a vapor barrier, must be carefully sealed at all seams and ends, typically with foil tape.