The Problem With Too Many Basement Walls
Ever been in a basement that smelled musty? Maybe the better question to ask would be if you’ve ever been in a basement that didn’t have that smell. Far too many basements do. There could be any number of reasons for it, but let’s focus on the basement walls here. As I’m in the middle of remodeling my basement, this is a topic that’s been on my mind.
The status quo
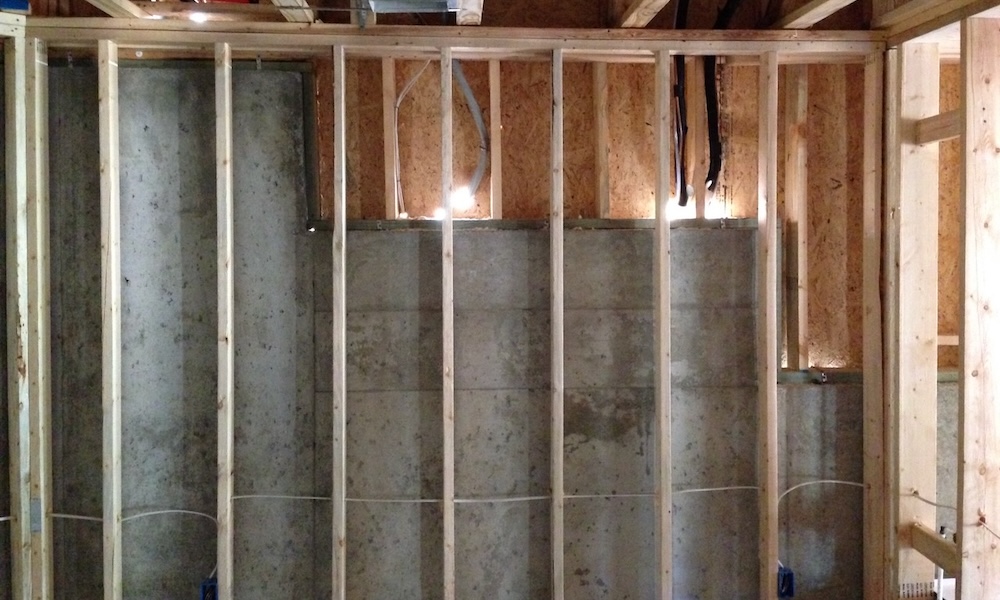
The lead photo above shows how many basements get finished. The exterior concrete (poured or block) foundation wall gets an interior framed wall with some insulation and drywall. In that photo, the basement wall is partly above grade, which is why you see the stepped foundation wall with an exterior framed wall above it.
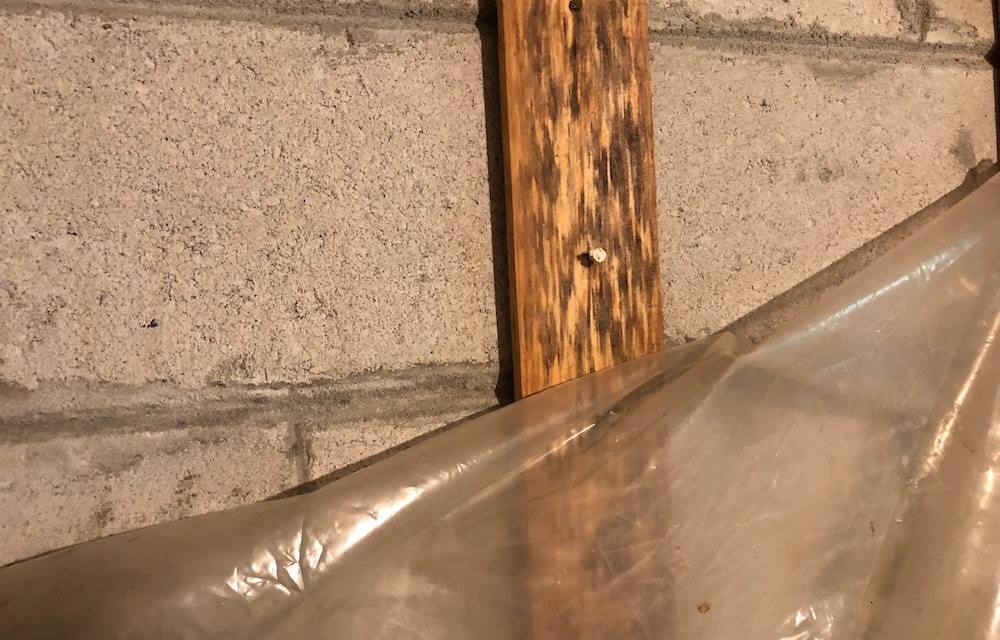
If they don’t care about insulation, the person finishing the basement sometimes will attach wood furring strips to the foundation wall, staple some plastic to the wood, and then install the drywall. That’s how the basement in my house was finished when I bought it in 2019. As you can see in the photo below, the wood wasn’t happy in that environment.
The problem here is that most foundation walls get wet. They’re in contact with wet soil. Sometimes rain hits them directly or drains down on them. Occasionally people irrigate them along with the landscape.
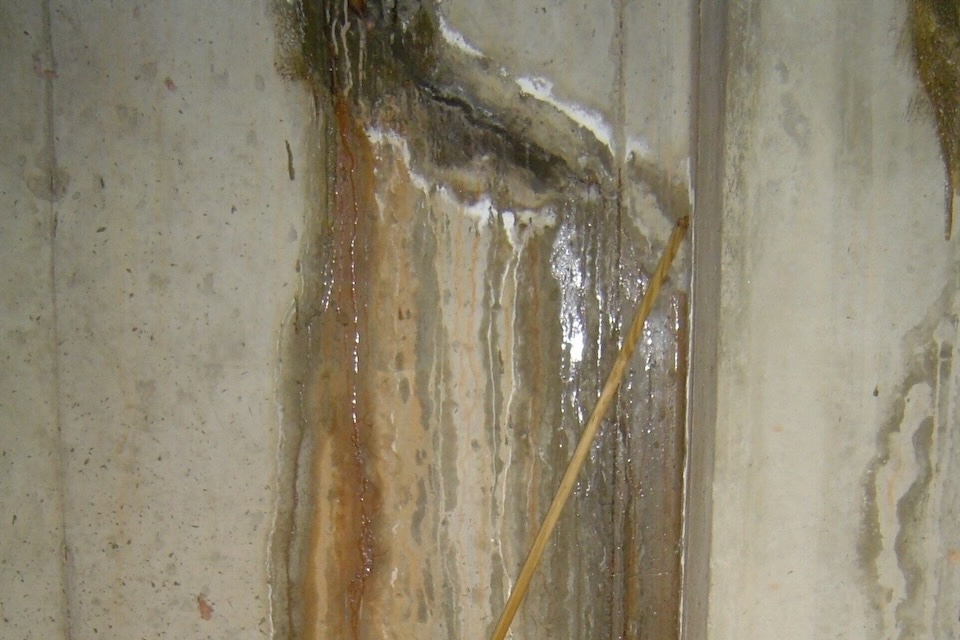
If most basement walls had a good water control layer on the outside, that problem wouldn’t exist. Neither would the plethora of basement waterproofing companies. Sometimes you have liquid water making its way to the interior, as you see in the photo above. Other times, the wall doesn’t get wet enough to drip but still evaporates plenty of moisture to the interior.
A moisture trap
The problem with the standard way of doing basement walls is that water, either liquid or vapor, comes through the foundation wall and gets trapped. And in that space between the concrete and drywall, it finds stuff it likes: wood and the paper facing on drywall especially.
If there’s plastic in the walls, it can stop the moisture from reaching the drywall. But it also can become a condensing surface. Basements are cooler that above-grade living space. When the humidity increases between the wall and the plastic vapor barrier, its dew point temperature might rise above the temperature of the plastic.
That results in water condensing and dripping down to the floor. Then it wets the wood bottom plate in the wall, creating good conditions for mold growth and rot.
Better ways to protect basement walls
Of course, the best way would be to have bulletproof water control measures on the exterior. That means not just the walls, but also the footings, which can get wet and wick that moisture up into the walls. It means putting a good, robust vapor barrier beneath the slab. And it means grading the yard to slope away from the foundation and keeping rain from the roof away as well.
But before you do anything with finishing out the walls, you need to make sure you don’t have liquid water coming through the walls or floor. You may need to do more work on the exterior or, if that fails, install an interior perimeter drain system. Only then can you start installing the insulation, framing, and finishes.
![InSoFast insulation panels make finishing a basement easy [Photo courtesy of InSoFast]](https://www.energyvanguard.com/wp-content/uploads/2024/03/Attach-Panel-2-Screws-Per-Stud.jpg)
It’s called InSoFast and is made with expanded polystyrene (EPS) foam and polypropylene studs. You can see the wall panels going up in the photo above. The black strips are the polypropylene studs. I hope I’m only a couple of weeks away from starting to install mine. I’ll keep you updated here about how it goes.
Allison A. Bailes III, PhD is a speaker, writer, building science consultant, and the founder of Energy Vanguard in Decatur, Georgia. He has a doctorate in physics and is the author of a bestselling book on building science. He also writes the Energy Vanguard Blog. For more updates, you can subscribe to Energy Vanguard’s weekly newsletter and follow him on LinkedIn.
Related Articles
Two Rules for Preventing Humidity Damage
What Happens When You Put a Plastic Vapor Barrier in Your Wall?
Basement Renovation in a 1961 Home
Comments are welcome and moderated. Your comment will appear below after approval.
That was helpful. Thanks,
I see that the new online spelling is “to many walls.” Shall we get on board with that?
Ken, you made me read the entire article again to find “to many walls”.
The title includes “too many walls” and I could not find “to many walls” anywhere in the article.
So, what were you commenting on?
Allison doesn’t usually make very many spelling or grammatical errors in his articles.
There were no errors in the blog. I was just poking fun at what is becoming common online. I should have added an emoji. ;^p
Thanks for the article Allison! I’m still finishing up my new build but the musty smell is obvious, esp on rainy days like today. It really began when the drywall was painted last August. We have radiant slab which hasn’t solved it. The poured concrete walls were treated with black tar stuff.
Andrew: The “black tar stuff” on your walls was probably just damp-proofing. A true waterproofing system would include an elastomeric coating on the concrete, some type of drainage plane, and a foundation drain that takes the water to daylight ideally.
If you improve the grading on all sides, to slope the ground away from the house, this is often the best solution.
Mold and mildew grow on the sheet rock paper. So use the sheet rock that has a fiberglass face instead for wet areas. It is installed and cut the same way as regular sheet rock. A little more expensive, but worth it. I used it in the bathroom of my new house. No mold or mildew to date.
Xypex all exposed bare concrete before doing anything else.
This really works!!
If you find a better product let me know.
As a licensed home inspector, we were taught to NEVER apply moisture proofing to the inside of the wall. This can trap water inside the concrete wall, leading to the concrete deteriorating. If the house is finished, make sure the grading is sloped down away from all sides of the house and the gutters are kept clean and the downspouts drain far away from the house. If that doesn’t fix it, you might need to excavate the basement and improve the moisture barrier outside. But usually, the first two steps fix the problem. In my area about 90% of the homes I inspect have the same problem, and in almost every case its from bad grading and gutter issues.
Allison, what measure(s) did you undertake to reduce the moisture in your basement?
Steven: The below-grade sides of the basement don’t have any bulk water problems, and the soil beneath the parts of the slab that we opened up has been dry. But the above-grade walkout side of the basement does get some water.
Someone a long time ago had an interior perimeter drain installed, which caused more problems than it solved. (See my radon article: https://www.energyvanguard.com/blog/radon-reduction-from-basement-sealing-preliminary/.) I didn’t feel comfortable abandoning it completely so I had a new one installed. And when we work on the outdoors, we’ll regrade the walkout side and make sure water moves away from the house.
And then there’s the water vapor side of your question. Once we’re done with the basement renovation, it’ll be a lot more airtight.
Not to mention the beauty of daylight pockets and holes in the step-down of the foundation wall in the first photo. Free mother nature test (just pray for a sunny day) to help you fix all your water entry and air leakage issues on the outside before you cover it up on the inside with framing, insulation, and wall finish.
Danko: I hoped someone would point that out. Thanks. And yeah, it’s always best to do a daylight test before you ever get to the point of blower door testing. This one was particularly leaky.
It would be helpful for us DIY home designers to have a follow-up article on Green Building Advisors (GBA) on how to design the lower level to manage humidity. Key question is do you place a return in the lower level, or do you run RAP so any humidity can migrate to the upper levels – to a whole house return. Based on my own observations, I have ceiling fans in each room of the lower level to keep the air circulating. That and running a dehumidifier keeps the lower level at 40%. Unfortunately, no one makes an ISO-Thermal dehumidifier – so the lower-level gets quite warm during the humid months.
I have designed about 15 houses with the moisture proofing system I described in another comment below. I live in the area with the greatest rainfall east of the Mississippi. But no humidity problems in the basements. We insulate the frame walls with open cell spray foam because it allows water vapor to escape the house. A dual zone heat pump, one zone for each level, mixes the air sufficiently and my clients love their warm, dry, clean smelling basements.
William: See this article by Joe Lstiburek from nearly 20 years ago:
https://buildingscience.com/documents/guides-and-manuals/gm-read-this-before-you-design-build-renovate/view
The best solution (and a lower cost method) is to follow two critical steps:
1. Use exterior foundation insulation on the exterior of the masonry walls and under the concrete slab. This should be combined with a moisture barrier with a drainage channel at the footer. This keeps the concrete warm in the winter, eliminating one source of basement moisture: Condensation on cold surfaces. (If your home is passive solar, this makes your concrete serve as thermal mass, making the passive solar function much better).
2. Grade the earth to slope downhill away from the house on all sides towards drainage channels that carry the water away. This makes such a huge difference in keeping the basement walls dry! If the ground stays dry, it won’t leak into the basement.
Advantages of these two methods:
1. Lower cost finishing because there is no need to install studs and drywall. If you want to finish the concrete walls, a thin coat of plaster would be a nice improvement.
2. Higher energy efficiency, especially if the house is passive solar.
3. A warm, dry basement which can be more easily finished.
Lots of great comments here, in addition to Allison’s always good articles, directly related to moisture and humidity in basements and the proper way to insulate, with some mentioning the difference in temperature between the basement and the upper floors.
We live in a 10-year-old ranch in SE Michigan with a finished 10′ high lower level with a kitchenette, a family room for the grandchildren to play, my office and workout room, and my wife’s art studio. As an HVAC person, here are 2 things we did to eliminate some of the temperature and musty smell issues as well as save a chunk of money on utility bills.
1. I designed the HVAC system to be a 2-zone system, one for the lower level and one for the 1st level with a 96% efficient natural gas furnace. As has been mentioned, and as you all know, the lower level is considerably cooler in the summer than the upper level but is still minimally cooled (as required) but continually ventilated and dehumidified with air from the furnace that runs continually on low speed except when there is a call for cooling or heating.
2. In addition, I put in a highly efficient ERV (how about 90%? That is not a mistake) with 2 separate variable speed fans, one for exhaust and one for outside air for combustion and ventilation.
So we have a well-insulated tight home with a lower level that definitely is not musty and an HVAC system that is smaller than all our neighbors that costs us less in both gas and electric utility bills.
Also, so when my wife is painting with oils, we put the exhaust for the home directly above where she paints, and change the speeds on both the exhaust fan and the supply fan to minimize the smell of the oil paint in the entire home.
Just a few perhaps new ideas to keep in mind.
Jim: As you know, basements should never be in the same zone with the floors above. The heating and cooling loads are too different for that to work. Zoning can be tricky sometimes, but that’s an easy one.
Timely article. We get questions all the time from homeowners about the best way to insulate a basement wall (at least 50% below grade) specifically in regards to water vapor. If there is not an issue with water (liquid or vapor) coming through the walls the GA field codes shows that you can insulate with unfaced BATTS and drywall. No mention of any vapor retarder on the inside. It also states that you need a 3” inspection / view strip immediately below the floor joists for termite inspection. If basement is finished with drywall I guess the inspection gap is not relevant? Curious to hear your thoughts for CZ 3?????
Ryan: I’m not a fan of wood and fiberglass next to concrete, even if it seems dry. A poured concrete or concrete block wall can look dry yet be wet enough to add a lot of water vapor through evaporation from the wall. It’s best to put foam board or closed-cell spray on the wall first.
Here are a couple of good resources on how to insulate basements. The first is an article I discovered nearly 20 years when I was new in this field:
https://buildingscience.com/documents/guides-and-manuals/gm-read-this-before-you-design-build-renovate/view
The second is an article by Martin Holladay with an update on the issue of whether basement walls need to dry to the interior. It’s behind a paywall, so if you’re not a GBA Prime member, you won’t be able to read it, but here’s the tl;dr (too long; didn’t read): No, they don’t need to dry inwards.
https://www.greenbuildingadvisor.com/article/joe-lstiburek-discusses-basement-insulation-and-vapor-retarders
Could not tell you how many times we have used the InSoFast panels, great product. Get yourself a good hot knife. It makes quick work of cutting the InSoFast panels. you can make relief/plow cuts for pipes on the wall also with the hot knife also.
Ron: I first learned about the hot knife method of cutting when I built a SIP house 23 years ago but didn’t get on then. I’ve checked them out again and may do it this time. Can you tell me how bad the fumes are?
The InSoFast insulation panels do not appear to have any space to run a wall-loop of receptacles. How is this done with this product?
Barry: The InSoFast panels have vertical and horizontal electrical chases built into them. It looks like they’re pretty easy to use. Here are some of their videos on that:
https://www.insofast.com/explore/playlist-electrical.html
Unfortunately, my 1938 home has 22″ thick stone foundation walls. The original “finished” half of the basement was simply plaster spread directly over the stone with minimal electrical receptacles located in the basebaord trim. The unfinished half of the basement, the foundation walls are far to rough for your system.
While the basement does smell a little musty sometimes, there have been no visible water intrusions since we bought it 2 years ago. I will mostly likely end up spray foaming the walls and the foundation sill with closed cell foam, then using batts in the framing.
By demoing the old gas-fired boiler and radiators and gas fired water heater and installing a three-zone heatpump and installing a heat pump water heater in the attached garage, I have picked up an entire 12 x 12 room in the basement, for my bike shop.
Galen: Closed-cell foam is your best option for stone walls like you have.
Great comment thread going here! So I have the black tar on the outside and closed cell spray foam on the inside which should prevent too much water vapor from coming in to my basement. They did a water diversion drainage and there shouldn’t be too much water trapped next to the concrete. And I have zone conditioning. And it’s brand new. I don’t have internet yet and don’t have the relative humidity in the basement. Musty smell is notable especially on rainy days. I assume a dehumidifier will be my next step if humidity measures high. Does that sound right? Thanks!
We lifted our house and had a big hole dug out under it. Fortunately there were no springs, just lots of hardpan. When we did the finish grade, I had some of the clay soil sloped up to the house before covering that with topsoil forming an uphill dam against surface water. We put four coats of the black, gets-all-over-your-clothes tar on the foundation, and then drainage mat leading down to the footing against which we had a perimeter drain covered in rock, then filter fabric, then sand, and pit run backfill. The drains lead to a 12″ diameter standpipe that we could put a pump in if needed, then a pipe from it leads to a downhill sump. After two winters, no water appeared in the standpipe so the dam worked. Inside we glued 1″ of XPS and foam sealed the seams, then built a studwall on top of the concrete radiant floor which sits on a 10 mil vapor barrier. There is a capillary break between footing and foundation walls. It is very dry in the basement…..belt, suspenders, garters, and gaiters….and an HRV. The stud wall sits a nominal 1/3″ away from the foam and is filled with rock wool. There’s R-20 foam under the floor. We got it at it’s very lowest cost in a decade, $30 a sheet. Now it is $55/sheet, and there were 75 sheets. I figured this would be considered new construction so no tax credit.
I did a few things during construction to help with moisture.
1) Prior to pouring the walls, I coated all the footings with Henry’s sealant to minimize wicking into the associated walls and piers.
2) I applied Ghostshield 9500 densifier/sealant to the slab and the poured walls before applying the dimple mat system.
3) Installed dimple mat to move moisture to the drain system.
4) I also sprayed all wood in the basement with a mold inhibitor and applied boric acid to the bottom plates to handle insects. This coupled with the boric acid infused cellulose insulation should keep the wood trouble-free going forward.
Five years later, no leak and humidity is easily managed. No pests of any meaningful quantity.