
Making Room for an Electricity Monitor
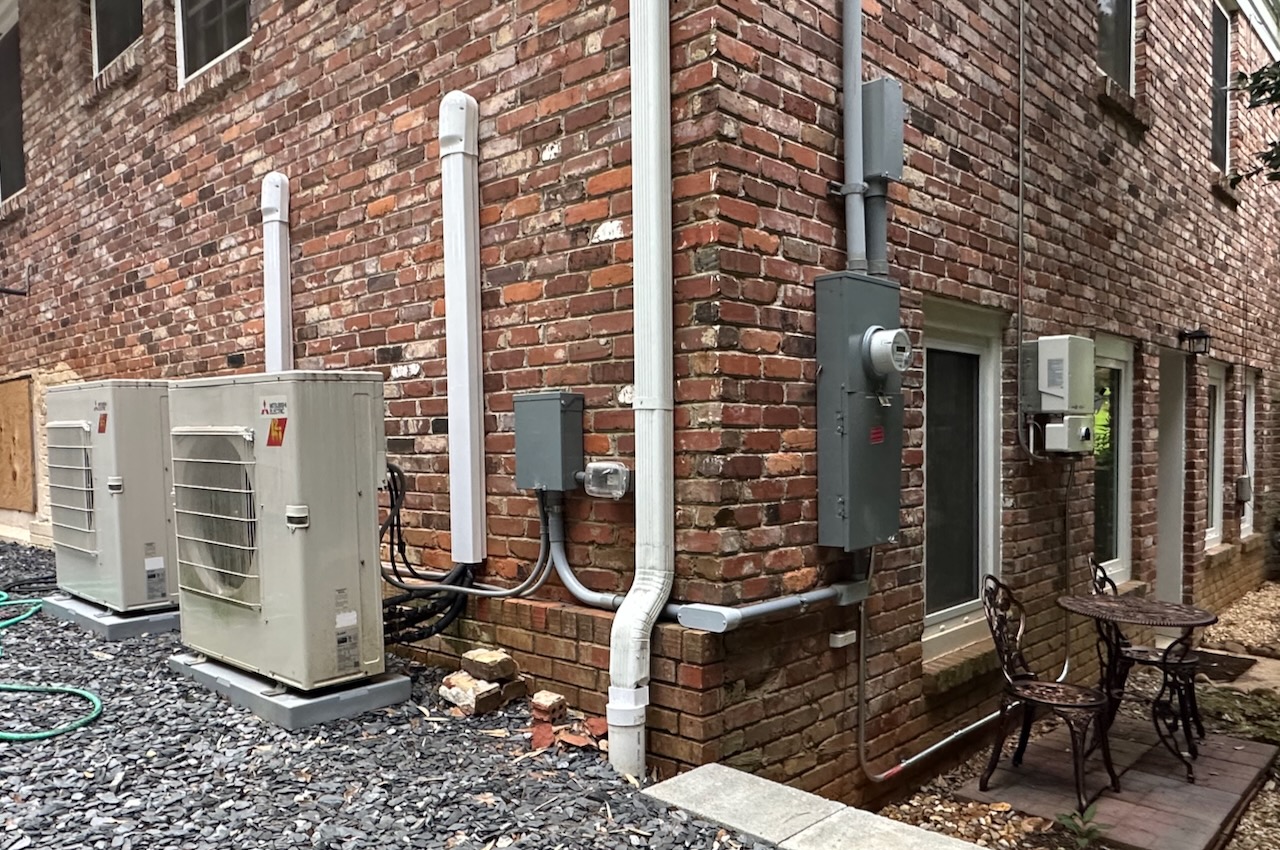
I’ve been using an electricity monitor in my all-electric home since 2022. When I began, it was simple. I had only a single electrical panel to monitor. Then I remodeled my basement, and things became more complex. I still have a 200 amp main panel. I also now have a basement sub-panel, an HVAC sub-panel, a panel right beneath the meter, and a photovoltaic system. Now I have three electricity monitors installed…and still need one more. Today, though, I’m going to tell you about the difficulty of getting a monitor on my HVAC sub-panel.
The photo above shows the parts of my electrical system that are outdoors. Starting on the right side, the white box above the bistro table is the inverter for my PV system. To the left of that is the meter with its panel. Around the corner is my HVAC sub-panel that powers my two main heat pumps sitting next to it. And that panel was the troublemaker.
The problem
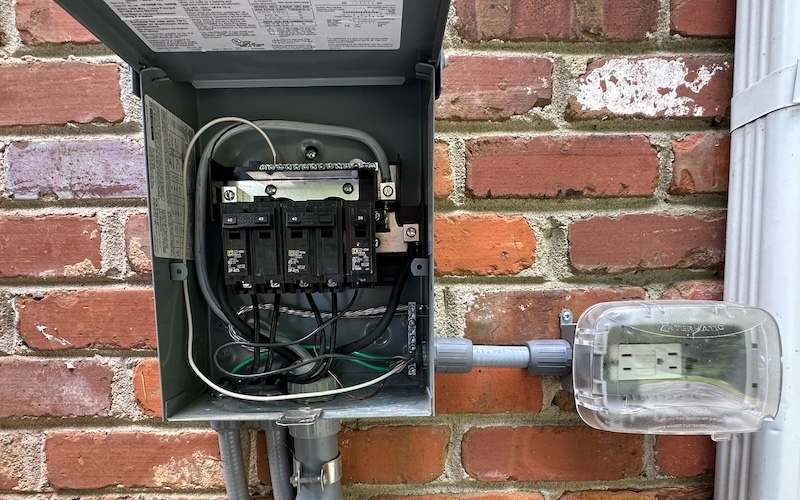
The photo below shows the inside of the sub-panel. It looks nice and spacious, but looks can be deceiving.
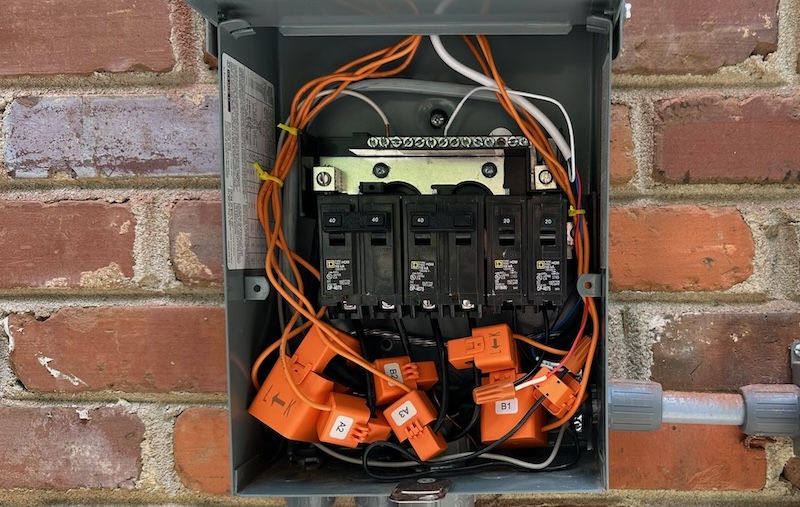
Below you see the panel with the current transformers (CTs) installed. But the main component is the monitor itself, which all those CTs have to connect to. This time I went with a Refoss electricity monitor, the EM16P. As you’ll see in the next section, the monitor is clearly too large to fit into my sub-panel.
When I first opened up the sub-panel and checked out where I might be able to put the monitor, I thought I might have to give up on monitoring the heat pumps. Then I had an idea.
The solution
Before I get into the details, here’s an important caution and disclaimer.
Caution: This project involved working inside an electrical sub-panel. Mine was fully de-energized—I shut off the upstream breaker feeding it and verified it was dead before touching anything. Don’t skip that verification step, and don’t assume a breaker being “off” means a panel is safe until you’ve confirmed it. Also, you can’t always just follow the directions for installing an electricity monitor, as I discuss in the section on the extra breaker. If you don’t know what you’re doing, call a licensed electrician.
This article is for informational purposes only and describes my own experience. It’s not professional advice, and Energy Vanguard isn’t responsible for any injury, property damage, or other consequences resulting from anyone attempting similar work. Electrical codes vary by jurisdiction, so check your local requirements and consult a licensed professional before doing your own panel work.
The idea was to install a separate electrical enclosure for the monitor.
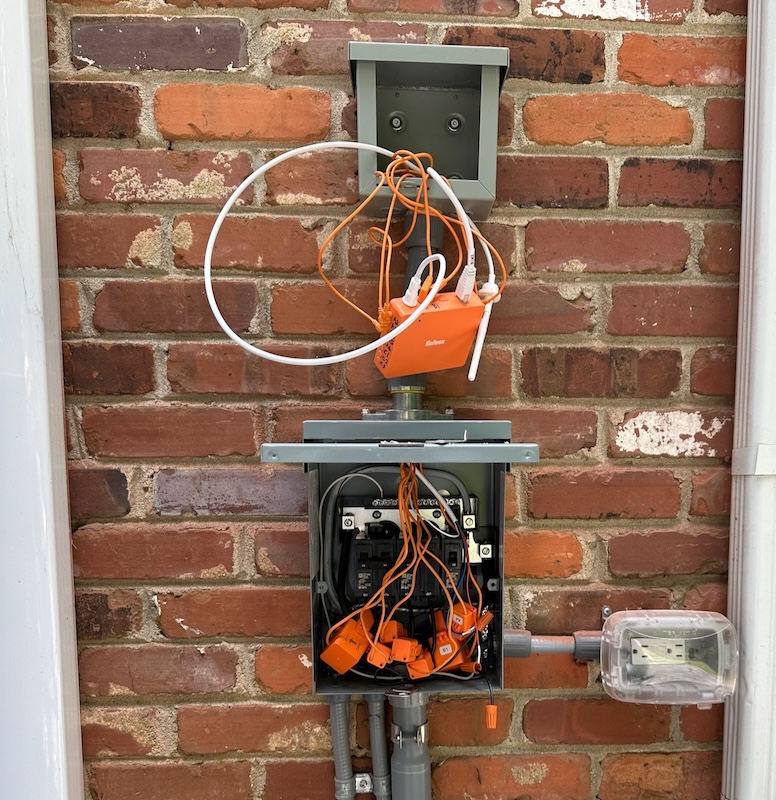
Two trips to Home Depot, three trips to two different Ace Hardwares, and 30 hours later, I had it all put together. The photo above shows what it looked like once I had everything installed and was setting it up. Below you can see what it looks like now.
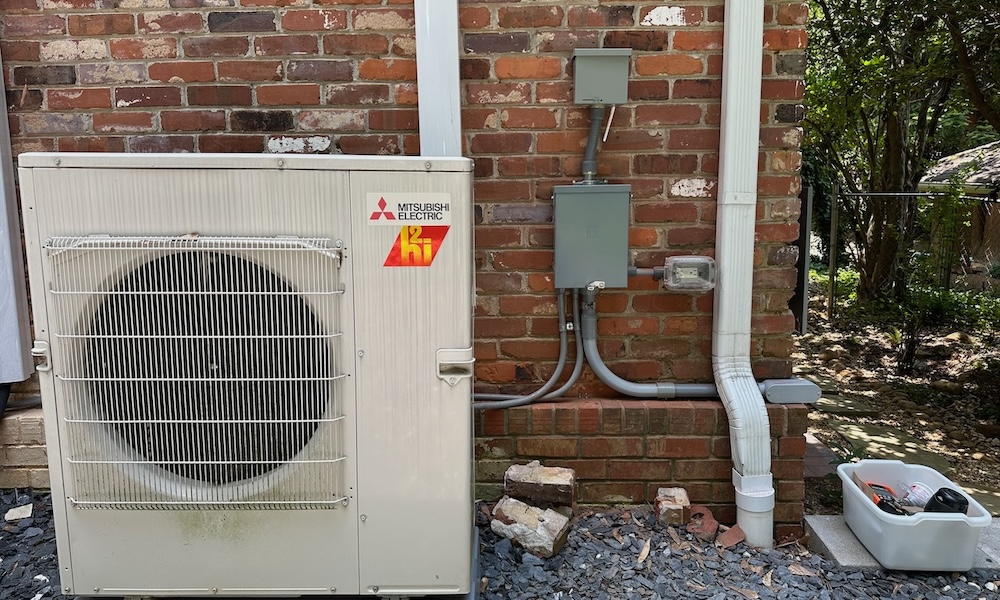
It’s been working ever since.
The difficult in-between
The section above makes it sound easier than it was to make this happen. But there was one thing that did make it easier than it could have been. The Square D panel the electricians installed for me two years ago has an opening at the top, as you can see below. So, I just needed to find a weatherproof electrical enclosure and the fittings and conduit to connect the two. Hence all the trips to stores.
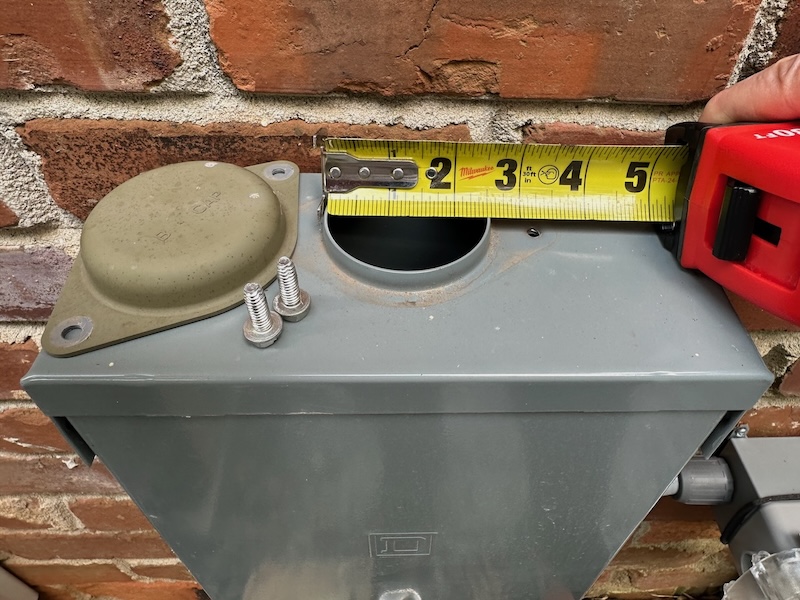
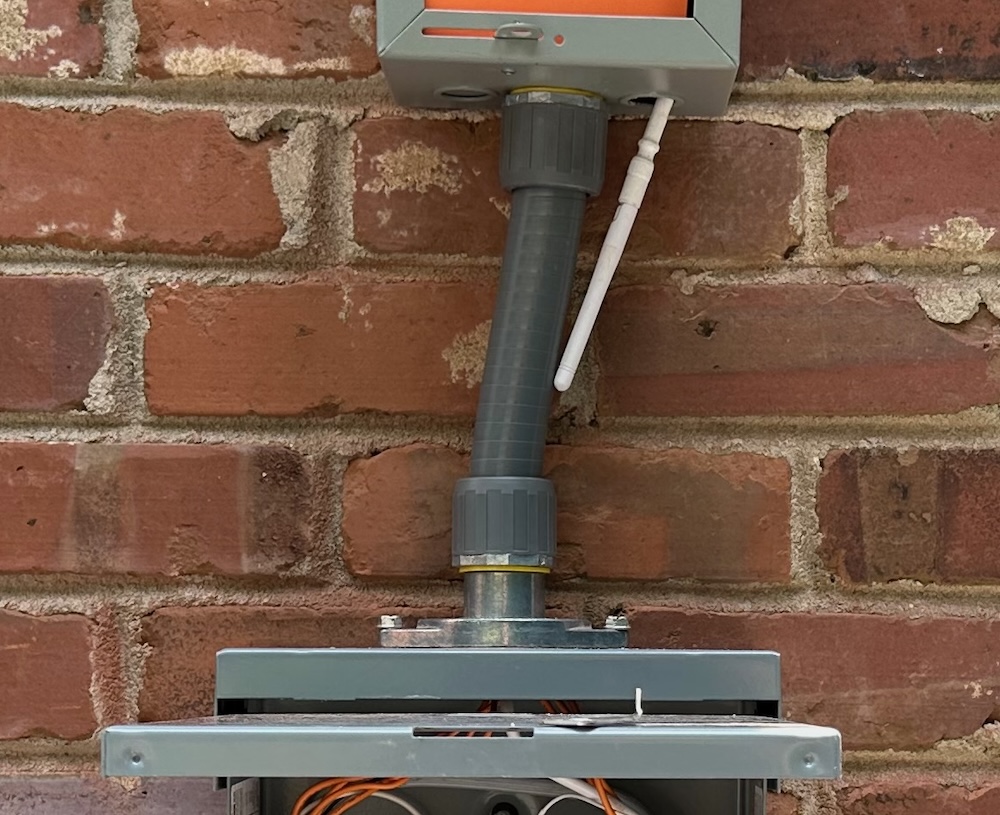
Once I got everything I needed, I managed to connect them (photo below). There are special fittings made for the Square D B cap opening. Then I just needed the conduit and connectors to make it all work. If you find yourself having to go this route, don’t go smaller than 1 inch with the conduit. That’s what I used, and it was just big enough.
In case you’re wondering, the white piece below my monitor enclosure is the antenna so it can connect to my wifi.
Home Depot had only one type of enclosure that would work for my project. It’s made by Southwire (based in my old hometown of Carrollton, GA), and it had the most difficult knockout I’ve ever had to knock out of a panel or junction box. In fact, I had to get out my drill to break it loose. The arrow below points to the three spots where I drilled.
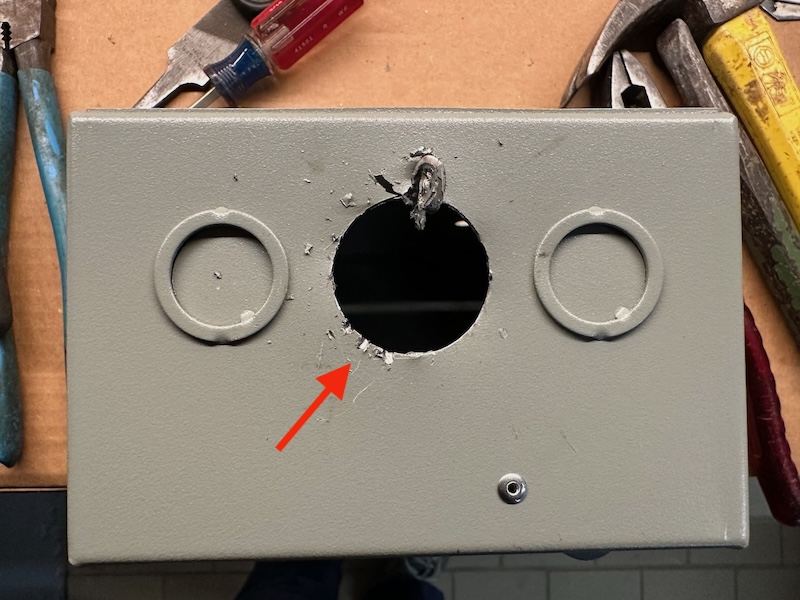
Installing the enclosure box took the majority of my time.
The extra breaker
You may not have noticed, but if you look carefully at the second two photos in this article, you’ll see there’s another difference besides the presence of all the orange wires and CTs. I had to install another breaker, and it’s on the far right in the photo on the right.
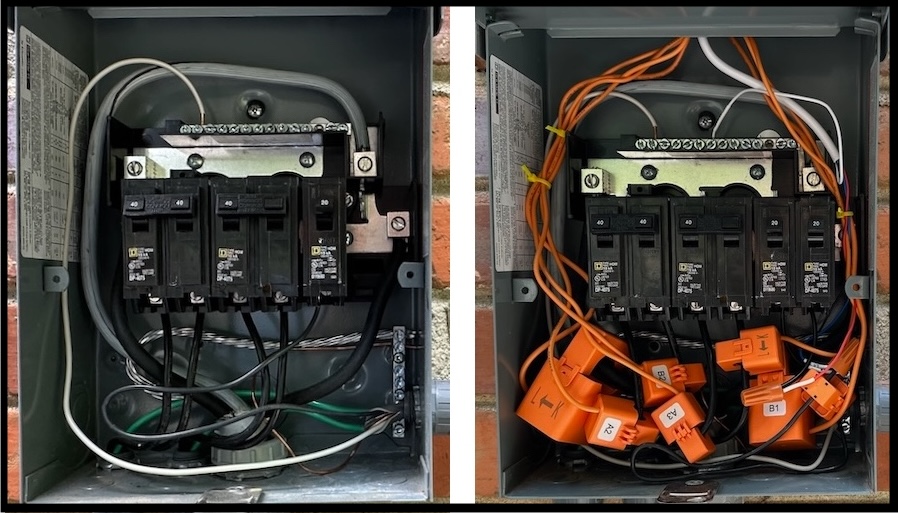
This is the part I mentioned up top about how you can’t always just follow directions. My sub-panel had two double-pole 40 amp breakers for the heat pumps and one 20 amp breaker for the outdoor receptacle to the right of the sub-panel. The heat pump wires are heavy gauge because they need to be able to carry more current. And that created the problem.
The electricity monitor needs power, and it needs to monitor the voltage and phase of the electricity. Also, an electrical panel has two sides, the A side and the B side, and you need to monitor both. The receptacle breaker gave me a good place to monitor the A side. But I couldn’t tap into either heat pump breaker to get the B-side reference. Because of the wire size difference, I couldn’t do the standard pigtail. And it’s a code and safety issue to connect the monitor wire directly in the breaker with the heat pump wire.
So, I installed a fourth breaker, identical to the one for the outlet. Now I had a way to monitor the B side. That breaker isn’t connected to any other load besides the monitor, but it’s available if I want to install another outdoor receptacle.
The electricity monitor
When I got started with electricity monitoring in 2022, I installed an Emporia Vue. This time I went with the Refoss EM16P because it’s what my friend Ben Knopp recommends now. He knows more about this area than I do, so I bought one and installed it in my main panel (photo below) in mid-June.

Then I bought two more, one for the HVAC sub-panel and another for the panel beneath the meter. The meter panel may require another external enclosure for the monitor, too, but I’m not ready to take that one on just yet.
The data collection
I got all this done by mid-day on 2 July and have been watching my heat pump electricity use ever since. The screenshot below shows what the app tells me. At the time, my main floor heat pump was cooling, the basement heat pump was not, and nothing was happening with the outlet.
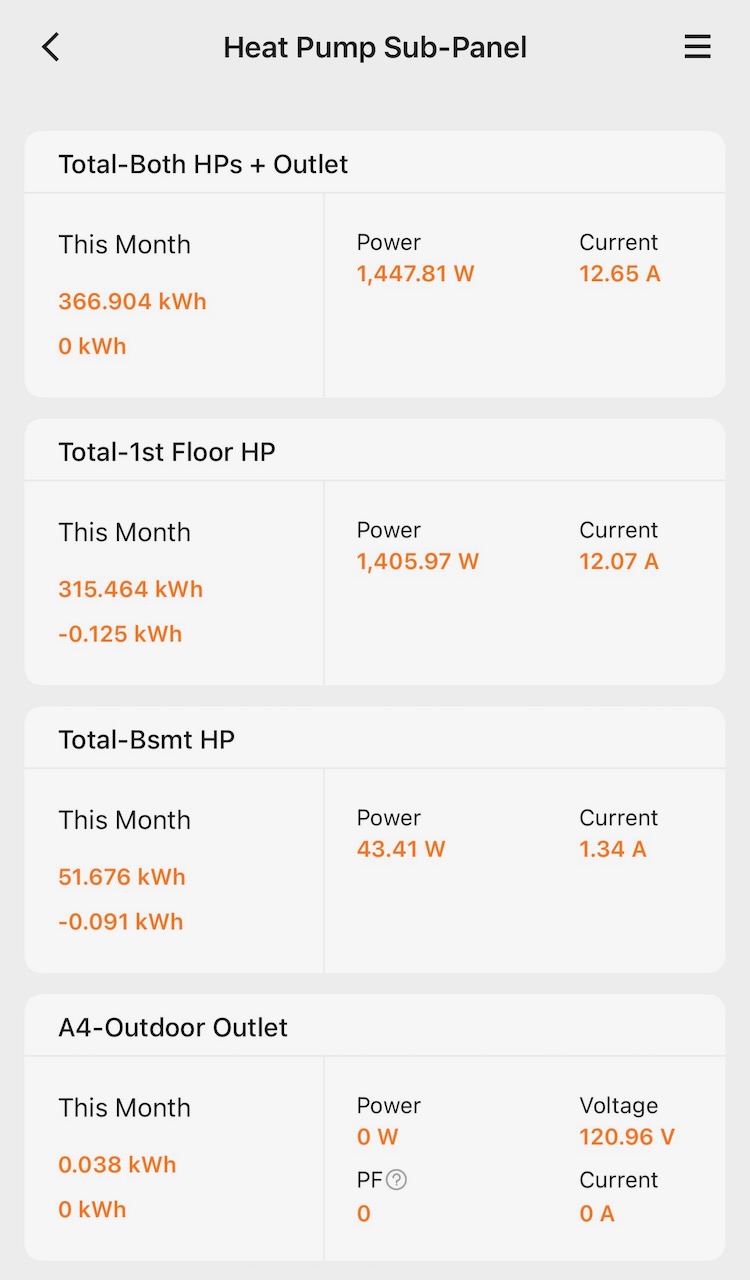
And because I have two Refoss monitors, I can look at the data from each one (screenshot below).

Now I’ve got a Refoss electricity monitor on my main panel and on my HVAC sub-panel. I didn’t just get rid of my Emporia Vue, though. It’s now installed on my basement sub-panel to give some detail about what’s going on there. That covers all my electricity usage.
My SolarEdge app shows me how much solar electricity I’m producing, but I’m not happy with that app (or the company). Once I get the fourth monitor (another Refoss EM16P) on the panel beneath my meter, I’ll be able to see my solar production in the Refoss app as well.
But there’s still another step beyond that. To be able to see all my data in one place—electricity and IAQ—I’m going to install Home Assistant. That’s when the fun really begins!
Allison A. Bailes III, PhD is a speaker, writer, building science consultant, and the founder of Energy Vanguard in Decatur, Georgia. He has a doctorate in physics and is the author of a bestselling book on building science. He also writes the Energy Vanguard Blog. For more updates, you can follow Allison on LinkedIn and subscribe to Energy Vanguard’s weekly newsletter and YouTube channel.
Related Articles
Introduction to Whole-House Electricity Monitoring
A Year of Home Electricity Monitoring Data
My First Week of Making Solar Electricity
Comments are welcome and moderated. Your comment will appear below after approval. To control spam, we close comments after one year.
Shelly make circuit breakers that have integrated power monitoring and wifi/bluetooth/ethernet
https://www.shelly.com/products/shelly-pro-em-50 which I think would simplify your system greatly.
Dale: That looks interesting. Some US manufacturers also have smart panels and breakers, but I decided not to go down that path when I had my electrical system upgraded in 2024.
Thanks for the Shelly mention, though. They have a lot of cool stuff.
The main panel is a horror show. What does that granularity of monitoring actually accomplish? Utility grid, solar inverters, HVAC equipment, hot water heating, range, and EV charger would cover the significant power sources and loads. For the other devices a plug-in monitor could be used as needed which is seldom. My condolences on your choice of inverters.
John: Yeah, I didn’t know SolarEdge was so bad in the customer service department. The inverter seems to be working fine, though.
Panoramic Power Wireless monitoring – https://www.youtube.com/watch?v=O5VG5b7y800 and https://www.youtube.com/watch?v=BtPu-PJXcyA
Garry: I hadn’t heard of that one. The wireless CTs are a nice touch to keep the panel less cluttered. Do you use this one?
Yes, I have used Panoramic Power at home, and my utility company uses it for high bill complaints and commercial energy audits.
Home and Utility Use
At home: Tested my system for personal energy tracking.
At work: High bills: Used to find the root cause of customer complaints.
Commercial and Industrial Use Beyond the meter: Tracked energy use down to specific electrical devices.
Peak demand: Identified which machines drove up peak load costs.
@garry & @johnh – the challenge with systems like the Panoramic Power, or the Span (as well as Solar Edge) is that they rely on the servers of the company that makes the equipment. They are closed systems and the owner of the hardware becomes hostage to the mfg of the equipment to get the functionality for which they paid. Not to mention that when either party has an internet outage your equipment does not report, and sometimes does not even collect data.
– Some of these companies provide online access as part of the equipment purchase cost, in exchange for use of (and often sales of) your data.
– Some initially provide access, then change to a subscription model, so if you want to access the data that you bought the equipment to have, you have to pay to access your own data. Even if you are paying a monthly or annual subscription to access your data, their terms often give them rights to sell your data, so they are making money twice and you are locked into a long term subscription. Samsung SmartThings is one of these companies – they just announced that access to your own data through their API will be $4.99/month starting in October.
– The worst outcome is when you buy equipment that relies on a central server as the ONLY way to access your data, and the company decides to stop supporting it. Examples of this are Wink, Harmony Hub, etc. The hardware becomes useless. Those are consumer electronics that presumably if the consumer set up they have the skills to replace the equipment. If this happens with your electrical panel, presumably the panel may keep working but you get no data unless you pay an electrician to replace the entire panel.
Dr. Bailes system of decoupling the electrical panel equipment from the data collection equipment, and going for open source data collection equipment that collects and processes the data locally by any number of systems seems like the proper decision for the 2026 landscape, both in terms of longevity of access to data (if it is all local and working it does not matter if whatever software is no longer supported – you can still get your data locally) and in terms of privacy.
Why not use a Span Panel?
John: Two reasons: (1) Replacing a new panel with a more expensive new panel wasn’t in my budget. (2) I briefly looked into going with a smart panel when we got the new panel but decided to stick with the tried-and-true standard panel. It seemed like new technology that’s probably going to cost more in maintenance, too.
Allison – Welcome to the wonderful world of home automation (when you install HA – Home Assistant)!
Just in case you don’t want the steep curve of acquiring an HA always on box, the HA zigbee and zwave radios for all the other devices you are sure to want to connect in the future, etc. etc. I recommend you also consider Hubitat. Great device, great support and a support community forum that is far friendlier to newbies than any of the HA support I could find online. But either way, you will love home automation….
cal: Thanks for letting me know about Hubitat. As I’m finding out, there are a gazillion options for products and platforms in this space. I’m not deadset on Home Assistant, but it seems to have a bigger user base and presence in the field. But I’ll check out the options before making a move.
Based on what I have read, HA has come a long way in the last 5 years in terms of user friendliness. You can also now purchase an HA “box” – HA Green, for about $200. It’s hardware that comes with the HA software preloaded. If you buy from some of the smaller sellers, you can also buy the add on zigbee and z-wave radios, which I understand are plug & play, for another $120.
At the time I bought my Hubitat box, none of the above was available. Hubitat still has a lower cost to entry – the box with built in zigbee and z-wave radios, as well as wifi and ethernet, is under $180.
Whatever you select, make sure it an run entirely local, and is not dependent upon anyone’s cloud and uses standard, non proprietary devices (z-wave, zigbee, matter, etc.) Otherwise your system won’t work when the internet goes down, and your hardware and hub can become e-waste if the mfg decides to stop supporting it. HA and Hubitat (HE) are the only two systems of which I’m aware that meet these criteria.
HA is a bit more open source, but with that comes more required tinkering by the user. Either HA or HE is a solid choice, and should be able to integrate with your Refoss, your Mitsubishi controls (although you may need to buy either a RedLink gateway or other device, and Mitsu might need to communicate via cloud on both HA and HE), your Awair and other systems. HE can also communicate with your Emporia and your Solar Edge system, but those integrations are with via the respective Emporia & Solar Edge cloud data (rather than local).
Welcome to the wonderful world of home automation!! Looking forward to future EV blog entries on how you use home automation to improve your air quality and efficiency!
As a note on the HA install – I originally attempted to use HA on a raspberry pi with SD card. I burned through 2 SD cards before I called it quits and purchased the HA green (you’ll see raspberry pi issues all over the user forums as well). I would definitely recommend just purchasing the HA green – there was no finagling required – just plug in and it booted up as expected, then just had to actually do the HA configuration, but that all worked as expected.
I purchased my HA green in October 2024 for ~$115 from ameridroid.
Cory: Thank you for those recommendations! I hadn’t seen anything about the Raspberry Pi issues yet, although I’m still early in the research process. Sounds like the HA Green is the way to start.
Home Assistant (HA) is now much easier to use than it was a few years ago. The Home Assistant Green (~$200) comes pre-installed, while Hubitat offers a more affordable option (under $180) with built-in Zigbee, Z-Wave, Wi-Fi, and Ethernet.
Whichever platform you choose, prioritize local control and support for open standards like Zigbee, Z-Wave, and Matter. This ensures your smart home continues working without internet access and avoids dependence on proprietary cloud services.
Both Home Assistant and Hubitat are reliable, future-proof choices. HA offers greater flexibility, while Hubitat provides a simpler setup.
Excellent article, Allison!
A couple of things I have noticed with my foray into home energy monitoring:
• The physical size of the current transformers (CTs) plays a big role in the space congestion issue. The larger a CT’s amperage reading capacity, the larger the CT usually is. Circuits in homes are usually 40a or less with most of the circuits being either 15a or 20a. The minimum size of CT offered by manufacturers is often in the 50a to 60a range, and it looks like Refoss supplies 60a CTs for individual legs. I don’t know why more manufacturers don’t offer smaller CT sizes down into the 20a range for individual legs, I would think that could help the congestion issue quite a bit.
• Some people promote using two CTs on 240v double throw circuits (one for each leg), and others promote using one CT and multiplying that value by 2. I know that using two will give exact results, but I have often wondered just how large the error range is when one CT is used and then multiplied by 2. I would love to find some data on one leg x(2) versus two legs for both AC driven and DC driven equipment, as this also is a factor in determining how congested the box will be.
Test it out to see if you can use one CT clamp and multiply or not. I would think it partially depends on the device.
My experience:
– 240/120v dryer and range legs were ~20% off of each other in usage. They got 2 clamps each. I guess you could multiply here but not by 2.
– 240v water heater, car charger, minisplit and forced air heat pump legs (no backup heat) were ~1% in leg usage difference. I chose to multiple the water heater and car charger by 2 but keep 2 CT clamps each on the HVAC heat pumps to get the most accurate reading.
Excuse my question if the answer is obvious. Do solar systems generally have their own breaker panel?
My electrician just installed an Emporia Vue monitoring system on my panel. And like you, I also have a Solar Edge inverter, and my solar generation isn’t currently monitored (except by the SolarEdge app. You seem to be suggesting that an additional monitoring system can be used on a solar system. Does that mean my solar system has its own breaker panel box?
Joseph: I’m not an expert in solar installations, but I’m pretty sure they don’t need their own panel. My meter has a small panel beneath it, and that’s where my solar generation goes into a breaker and from there to my house and the grid.
And yes, you can monitor the solar generation separately from the SolarEdge app. You can have your electrician put CTs on the wires from the inverter to the breaker, in whatever panel it inhabits.
Thanks, Allison, that’s helpful!
The DC components, solar panels and batteries, require DC specific circuit protection. Class T fuses should be used between the batteries and inverter. DC specific circuit breakers between the panels and inverter, enclosed separately from the AC panel. Surge protection is advised.
Whether you monitor with a third party product depends on the complexity of your system and whether it is single or multiple manufacturer.