
3 Conditioned Crawl Space Upgrades You’ll Wish You’d Done Sooner
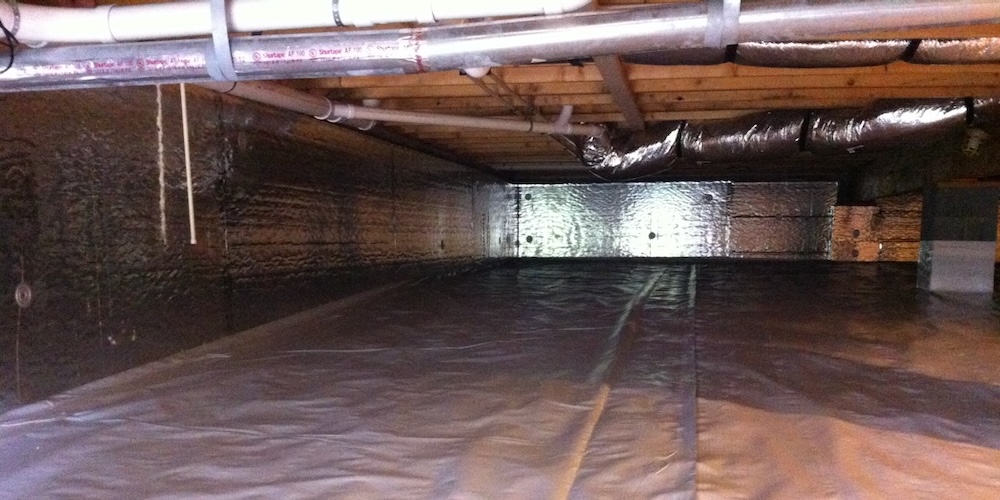
Imagine that you’ve got a problem with your air conditioner that requires you to call your local HVAC company. The technician comes over right away. You take them outdoors to the crawl space access so they can go in and get your house cooling off again. If they look in and see something like the photo above, they’re going to be happy to go in. If what they see instead looks like the photo below, not so much. That’s a no-brainer. But the three conditioned crawl space upgrades below can help even more, and they shouldn’t cost much extra.

1. Lights
HVAC techs, plumbers, and electricians have to work in crawl spaces a lot. Sometimes they have to crawl quite a ways to get to the place that needs attention. They also need to take tools, parts, and perhaps lights. The more they have to haul, the more trips they might have to make. And if their lights run on batteries, they could get stranded in a dark place. That’s when the spiders, snakes, and rabid raccoons attack.
OK, that probably won’t happen. Also, workers who’ve been doing this for a while will check the battery status before going in and bring more than one light. But with the simple and relatively inexpensive addition of some lights, they might avoid extra trips.

The reason I’m thinking about these conditioned crawl space upgrades is that I just put lights and outlets in my L-shaped crawl space. The photo above shows the first two lights. There’s another light all the way down and to the left, and you’ll see it in the next section.
2. Electrical outlets
Do you know what workers do when they’re first getting set up at a job these days? They find a place to plug in their battery chargers. It’s convenient to have a lot of battery-powered tools, but you still have to have charged batteries ready to go at all times. And the closer the chargers are to where you’re working, the better. So, put one or two GFCI-protected outlets in the crawl space.

The photo above is the other part of my crawl space. It also happens to be where the kitchen plumbing is, and you can see one of the two new outlets in my crawl space.

When I did my hot water retrofit in 2022, I spent a few hours belly crawling from the entrance at one end to the kitchen plumbing at the far end of the other leg. And then I had to work on the pipes while lying on my back to run my new smaller and shorter hot water line to the kitchen. Having permanent lights and a nearby outlet would have helped a lot.
3. Soil gas vent pipe
The last conditioned crawl space upgrade isn’t for the convenience of workers. It’s for you. When you have your crawl space encapsulated, get the workers to run a perforated pipe under the plastic liner to vent soil gases to the outdoors. Even if you don’t have them vent it during the installation, it’s there if you need it later.
Why would you need to vent soil gases to the outdoors? The main reason is to lower your indoor radon levels. Radon comes up from the ground. In a vented crawl space, air movement keeps most of it out of your indoor air. Encapsulation, though, changes the soil gas and air flow dynamics. Radon can still make its way into the crawl space air, which is now connected to your indoor air. So your radon levels could be fine before encapsulation but elevated afterwards.
Why should you put the pipe in during the encapsulation? Because if you add it later—as was the case in my house—they’ll have to cut the liner and then try to reseal it afterward. The fewer seams and cuts in the plastic liner, the better. If your radon levels are high after encapsulation, then you can have the rest of the radon vent installed. (It’s easy to test for radon.) That would connect the pipe under the liner to a pipe that goes out and up. If passive venting doesn’t do the whole job, you can add a fan. (More details here.)
I speak from experience here. The previous owner had the crawl space encapsulated in 2015. The soil gas vent went in this year. The lump in the plastic you see in the lights photo above is the radon vent pipe. And yes, we’ve had some trouble getting it sealed up. So, if you’re going to get the crawl space encapsulated, do it all at once.
Should you get these conditioned crawl space upgrades?
I’ve mentioned a lot of the benefits above. If you do these upgrades upfront, you may get a better encapsulation, too. And having outlets available helps if you need to put a dehumidifier in there later.
Will it cost a lot? Compared to the cost of bringing the crawl space inside the building enclosure, no. The encapsulation will cost thousands of dollars. Adding a soil gas vent pipe shouldn’t cost more than a few hundred dollars if included with the encapsulation. Having an electrician run wires for a few lights and outlets could cost a few hundred to perhaps a thousand dollars, depending on costs where you live.
Does every conditioned crawl space need these upgrades? No, at least not the lights and outlets. Some small crawl spaces don’t have any ducts or HVAC systems and little or no plumbing. Such a crawl space might go a decade or more before someone needs to go in there.
Having a switched light and an electrical outlet near the equipment is required by the National Electrical Code in new homes and some renovations, so in those they aren’t upgrades. For many existing homes, however, they definitely would be upgrades.
But as one of those people who has spent a lot of time in crawl spaces, I can tell you that good lighting especially makes a huge difference. (This applies to attics, too.)
Afterword
You may recall that I planned my basement renovation to occur in two phases. The first part was the walk-out side where we turned two bedrooms into a guest suite. The other part of the basement, which I’ve been calling “the big room,” is connected to the crawl space. Since my demolition rampage last December, things are wide open in that part. The photo below shows the big room and the two sides of the L-shaped crawl space.
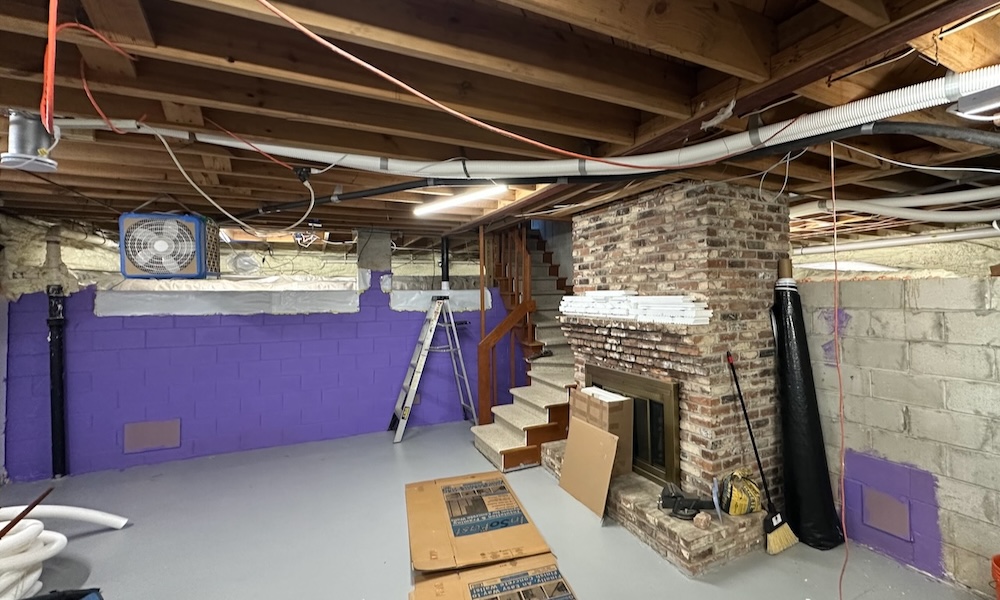
This part of the renovation is a lot less intensive than the guest suite. The HVAC and plumbing are all in place. It’s mostly some framing, a little electrical work, and then the finishes. I’ve been going slower on this part to let my motivation and finances recover. But I’m ramping it up now.
Allison A. Bailes III, PhD is a speaker, writer, building science consultant, and the founder of Energy Vanguard in Decatur, Georgia. He has a doctorate in physics and is the author of a bestselling book on building science. He also writes the Energy Vanguard Blog. For more updates, you can follow Allison on LinkedIn and subscribe to Energy Vanguard’s weekly newsletter and YouTube channel.
Related Articles
Should You Encapsulate Your Crawl Space?
Faster Hot Water Can Change Your Life
Radon Mitigation Basics for an Older Home
Comments are welcome and moderated. Your comment will appear below after approval. To control spam, we close comments after one year.
I agree with everything I read in this blog post. However, the photos caused some concerns.
The dangling wires and wires run across the void between joists are clear violations of the National Electrical Code. This applies to both the basement and the crawl space. The wires are supposed to be run on the side (not bottom) of the joists sufficiently far from the edge to be safe from nails, or else follow a added runner board.
Each county has a building department with inspectors and rules which require that work on almost anything is supposed to require a permit, and be inspected. Certainly, this makes it much more challenging to make their home better, if they decide to follow the law.
Bob: Good catches and feedback. The two large cables in the lights photo were installed by the licensed electricians who did the wiring for my basement renovation, which included getting a new service. The larger one carries the power from the meter to the 200 A main panel. The smaller one carries the power from the main panel to the basement sub-panel. It was done under permit and “inspected.” I put that in quotes because inspectors almost never look at or catch everything.
One of the nearby cables running beneath the joists was also installed by a licensed electrician when we got the heat pump water heater installed in the basement. I followed their lead when I ran the wire for my new lights.
What looks like dangling wires in the background are duct straps that weren’t removed when the asbestos abatement workers removed the ductwork from the crawl space, old landline phone wires, and decommissioned circuit cables. The piece of Romex in the bottom left of the lights photo is a scrap that’s not connected to anything. By the time I finish with the basement and crawl space, most of that will be cleaned up. Would you suggest I add runner boards next to the big cables?
But there’s a lot more serious electrical issues that I inherited when we bought the house than the ones you see here. I’m getting things improved little by little as I can.
I failed to mention that the strict requirements apply to the smaller gauge cables (e.g. 14 & 12), and some larger cables are excluded from the requirements. They are excluded because they are assumed to be physically strong enough that a human visitor will not harm them.
The rules regarding crawl spaces are a matter of some debate (e.g. not being relaxed for tall crawl spaces beyond the normal reach of a human), but the NEC still specifies strict rules.
I am not an electrician, but I researched this topic after an electrician friend saw the wiring in my crawl space.
Bob: You should have seen my 65 year old house when we bought it in 2019. The spray foam installer who encapsulated the attic in 2012 disconnected the powered attic ventilator and left the live wire dangling with just a bit of electrical tape on the ends. Also, it’s been modified so many times that the wiring and circuits were a mess. And the main reason we got a new service is that the service entrance was on one corner of the house with the meter on the opposite corner. That meant unmetered electricity was running through my attic.
Allison, your valuable insights into all things crawlspace, are much appreciated.
I never thought I’d be indebted to ants, but a recent crawlspace foray to set off an ant spray, revealed a growing puddle near the entry point of my water line. Subsequent details are too traumatic to share…
And last year, a visit to the nether regions for another attack on those pesky, tiny ants in the kitchen, led me to discover a leaking copper elbow in my 25 year old plumbing.
I share these experiences to emphasize the importance of periodic crawlspace inspections, often available at no cost from relevant businesses .
“Out of sight, out of mind” is an attitude that can obviously lead to unpleasant outcomes…
Steve: That’s excellent advice. In 2005 I discovered a leak in someone’s drainline after we encapsulated their crawl space. Who knows how long it had been leaking into that crawl space, creating a fertile environment for all kinds of life forms.
In addition to getting a set of string lights on my crawlspace (replacing or supplementing four flood lights within 5 feet of east other in a 28×68 rectangle), I’ve been gradually replacing the original vents with tiny glass block awning windows. This allows crude daylighting. This also allows me to air it out during good weather or as part of a cleanup. Once I add Allergy guard screens to replace the standard insect screening, I shouldn’t even be sneezing as a result. The extra cost of those windows is about $50 each.
Stacy: I thought about string lights, but Home Depot had some nice 3,600 lumen LED fixtures on clearance for $10. Why haven’t you sealed up the crawl space?
I have had too many intermittent water leaks (and polybutylene pipes). I also have a prefab wood fireplace with an outdoor air kit that ends in the crawlspace. I don’t use it enough to justify the expense of converting it to a wood stove yet, but have to have at least one of the vents slightly open to avoid smoke in the house when I do use it. It’s still closed 90% of the year. The rest of the vents are plugged with foam, but foam is not very stable against solar UV. The contractor whom I hired to install a sump pump wanted to replace the vents with automatic ones, but I refused because they will open precisely when humidity issues are most out of control.
The contractor stated his reason for refusal as that you can’t encapsulate a mobile home crawlspace. It’s a 1992 double wide with a concrete block foundation wall. Every other contractor I talked to refused to do anything except offer items from a DIY store.
Nice article Alison! Always a pleasure reading your insights. As a 27-year home inspector (not to mention, a building science nerd) I’ve spend a fair amount of time within these usually nasty spaces. I’ve always recommended edge-sealed 20 mil reinforced poly, and switched led lights in crawl space upgrades to my clients and it’s always a pleasure to open one of these spaces to find operation room-like conditions already in place Cheers!
Tom: At the beginning of my crawl space encapsulation work, I was using 20 mil plastic. That stuff is a bear to wrestle into place in a tight crawl space. Later I switched to 10 or 12 mil and found that it does a good job.
Interesting! My pleasure has always been crawling around on it and I never had to wrestle with it, which I imagine is quite fun with 20” headspace. I do know that 6-mil, which is the go-to I’m my area never seems to hold up well and is forever torn and most of the time laid out haphazardly, almost never edge-sealed. 10-12 mil seems like a smart move.
Do not use the phrase “conditioned” re crawlspaces, they are NOT conditioned. You need to do much more collateral work like “bring mechanicals up” (cast iron/conduit/coatings/foot-candles/egress) to cope with “conditioned space” exposure. Some counties tax it more. YOU ARE *DRYING* THE SPACE. Code says “Supply Air Drying Mechanism” for a reason. We champion the “Adjustable” Supply-Air-Drying-Mechanism, because nothing on the market is low enough, and we adjust it based on the “MOLD CHART” (google it)
One no-no based on these pics is the vapor barrier being un-tape-able due to poor ground prep and failure to remove dirt from collateral surfaces prior to laying the plastic, the tape wouldn’t stick, almost 0% of the tape would be considered “FLAT”.
You must do a fantastic flattening, cleaning, and finally *taping job*, before you order the spray-foam because the haze-particles ruin future tape-ability. Alison appears to have used “floor-liner” as a ground liner, and that product is really annoying to tape because its 6 mil and super flexible. Using a different material on the wall and floor is absurd if you are trying to keep things tight. Here you are surely negatively pressurizing the crawlspace as much as the soil with that soil-gas-system.
The soil gas vent pipe is the upgrade that stood out most to me.
It’s exactly the kind of thing that seems minor during encapsulation but can become much more difficult once the liner is already installed.
Adding permanent lighting and GFCI outlets also makes a lot of sense, especially when you consider future HVAC, plumbing, or dehumidifier work.
Planning for maintenance while the crawl space is being upgraded seems well worth the relatively small extra cost.
Running the soil gas vent pipe during encapsulation seems like especially good advice. Even if radon isn’t a problem initially, adding the pipe upfront sounds far easier than cutting into and resealing the liner later.